In this post, groups are created within Active Directory (AD). Then users are granted access to resources in another domain through group membership.
This post is part eight of a home lab that explains how to use Windows Server and AD.
Posts in Active Directory Home Lab
- Home Lab Introduction: Windows Server and Active Directory
- Install Windows Server 2022 using VMware Workstation
- Configure Windows Server 2022
- DHCP Server Installation and Configuration
- Create Organizational Units in Active Directory
- Create Users in Active Directory using PowerShell
- Join a Windows 11 Computer to a Domain
- Create Groups in Active Directory
- Create Group Policy Objects in Active Directory
Table of Contents This Post
- What are Groups?
- Lab Exercise: Accessing Resources Using Domain Local and Global Groups
- Create Two New Branch OUs
- Add Sales Users to New Branch OUs in PowerShell
- Create Central OU to Contain Groups
- Create Domain Local and Global Groups in PowerShell
- Add Sales Users to Global Groups in PowerShell
- Make Global Groups Members of Domain Local Groups
- Give Domain Local Groups Access to Sales Training Folder
- Verify Sales Users Can Access Sales Training Folder
- Conclusion
What are Groups?
Groups are collections of user accounts, computer accounts, and other groups in Active Directory. They provide a simplified way of managing permissions and providing access to resources.
Group Types
There are two types of groups: Security and Distribution.
A Security group is used to control access to resources (e.g., users, computers, services) and it can also be used for email distribution. A Security group is given a security identifier (SID)–a unique, immutable value that allows the group to gain, or be denied, access to resources such as a file server. This post focuses on security groups.
A Distribution group is only used for email distribution. It is not provided a SID and so cannot access resources.
Security Group Scopes
A scope defines the resources a security group can access and the members that are part of the group. There are three group scopes: Global, Domain Local, and Universal.
Global Groups
A Global group can access resources found within the entire forest. And it can contain members from the same domain in which the group is created.
In most situations, Global groups do not have permission to directly access resources, and they have individual users as members. It is common for Global groups to match the departments in the organization.
Domain Local Groups
A Domain Local group can access resources within the same domain in which the group is created. And it can contain any members within the forest.
In most situations, Domain Local groups have permission to directly access resources, and they do not have individual users as members.
Universal Groups
A Universal group can access all resources within the forest. And it can contain any members within the forest.
Membership in a Universal group is stored in a global catalog (GC). A GC contains users, computers, universal groups, and universal group members. Every time a user authenticates his membership in a Universal group, a GC is queried.
The first domain controller (DC) in a forest has to be a GC. Domains added later to the forest may be GCs depending upon the domain and site configuration of the business.
If there is only one GC in a forest, then users in other domains can authenticate to a Universal group by querying the GC over a WAN connection. Or the other domains can periodically cache the Universal group membership from the GC. Then when users in the other domains authenticate to the Universal group the cached membership information on their domains can be used, and the GC does not need to be queried.
Summary
- Global group
- Forest resources
- Domain members
- Domain Local group
- Domain resources
- Forest members
- Universal group
- Forest resources
- Forest members
Lab Exercise: Accessing Resources Using Domain Local and Global Groups
In this section we will go over a common scenario in which a resource (e.g., file server) is located in one domain within the forest. And users in another domain in the forest are trying to access the resource.
For our lab we will create access to a training folder for Sales users. The folder is located in the parent domain in a tree. And the Sales users are located in child domains within the same tree. Below is a visual representation of how Sales users will access the folder.
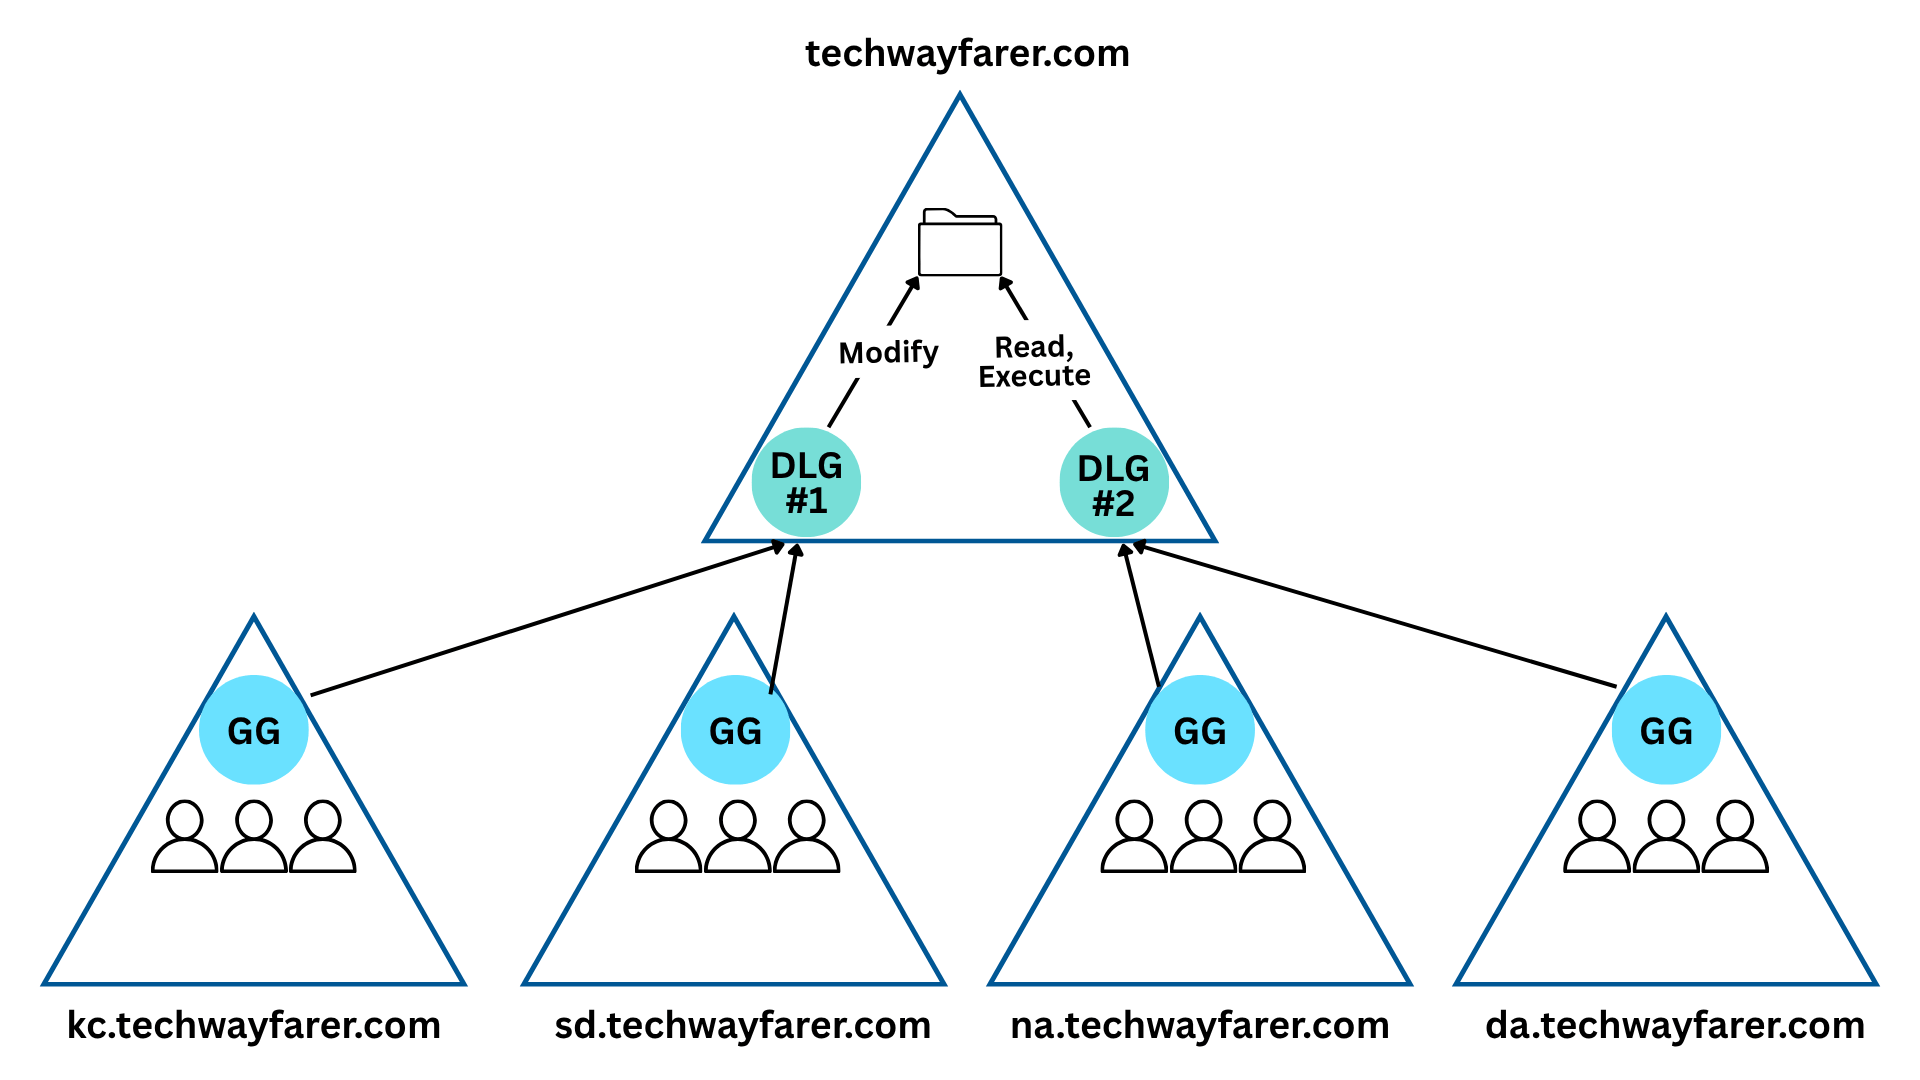
The four subdomains/child domains in this lab represent the cities of Kansas City, San Diego, Nashville, and Dallas.
When providing access to resources located in a different domain the common approach is the following:
- Make user and computer accounts members of Global groups.
- Make Global groups members of Domain Local groups.
- Give Domain Local groups permission to access resources.
Accounts –> Global Groups –> Domain Local Groups –> Permissions to Resources
In our lab, the method of providing access to resources can be more accurately described as follows:
Sales Users in each subdomain (Accounts) –> Sales group in each subdomain (GG) –> Domain Local groups in parent domain (DLG) –> Sales Training folder (Resource)
In earlier portions of the lab, we accomplished the following:
- installed Active Directory (AD) on a Windows Server virtual machine (VM)
- promoted the server to a Domain Controller (DC)
- installed a Global Catalog (GC) on the domain (techwayfarer.com)
- created the organizational structure for an example business
In this portion of the lab the following additions will be made to the example business:
- Two new branch OUs are created in Active Directory for Dallas and Nashville. The branch OUs for Kansas City and San Diego were created in an earlier post.
- Sales users are added to the new branch OUs (Dallas and Nashville) using PowerShell ISE.
- A central Groups OU is created that will contain the Domain Local and Global groups.
- Two Domain Local groups are created in the parent domain, and a Global group is created in each of the four subdomains.
- Sales users are added to the Global group in each subdomain using PowerShell ISE.
- The Global groups become members of the Domain Local groups. Two Global groups (Kansas City and San Diego) become members of Domain Local group #1. And two Global groups (Nashville and Dallas) become members of Domain Local group #2.
- The Sales Training folder is created in the parent domain. Then the Domain Local groups are given access to the Sales Training folder. Domain Local Group #1 is given modify permissions, and Domain Local Group #2 is given read and execute permissions.
- Verify users can access the Sales Training folder.
1. Create Two New Branch OUs
In an earlier post the organizational structure for our example business was created in Active Directory Users and Computers (ADUC). An Organizational Unit (OU) called _Branches was created to hold all branch office locations for the organization.
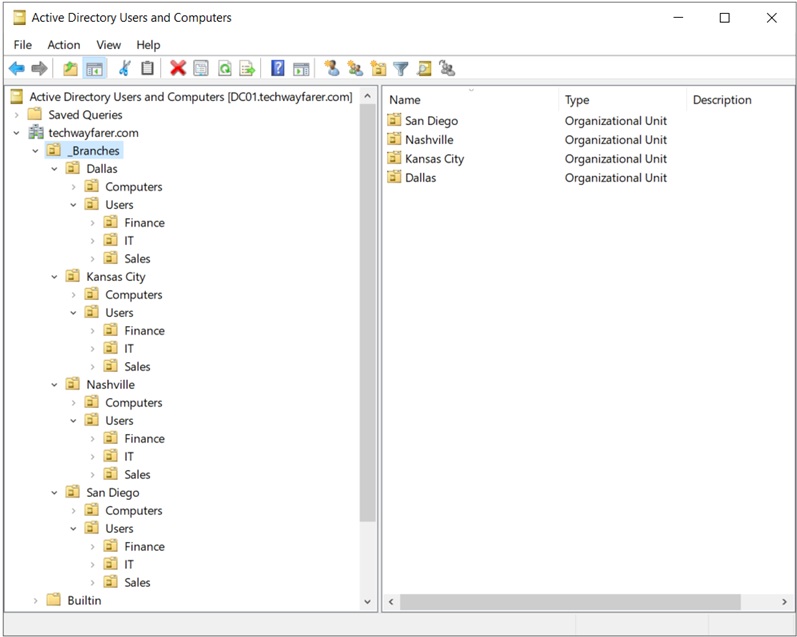
Each branch location uses the following OU structure:
- Branch Location Name
- Computers
- Users
- Finance
- IT
- Sales
In the earlier post two branch OUs were created for Kansas City and San Diego. We will expand upon the structure by adding two more branch OUs for Nashville and Dallas using the following steps:
- Open ADUC.
- Right-click on the _Branches OU and choose New > Organizational Unit.
- In the New Object window name the OU (e.g., Nashville) and choose OK.
- Right click on the new Branch OU (e.g., Nashville) and add the Computers OU and Users OU.
- Right click on the Users OU and add OUs for the departments (e.g., Finance, IT, Sales).
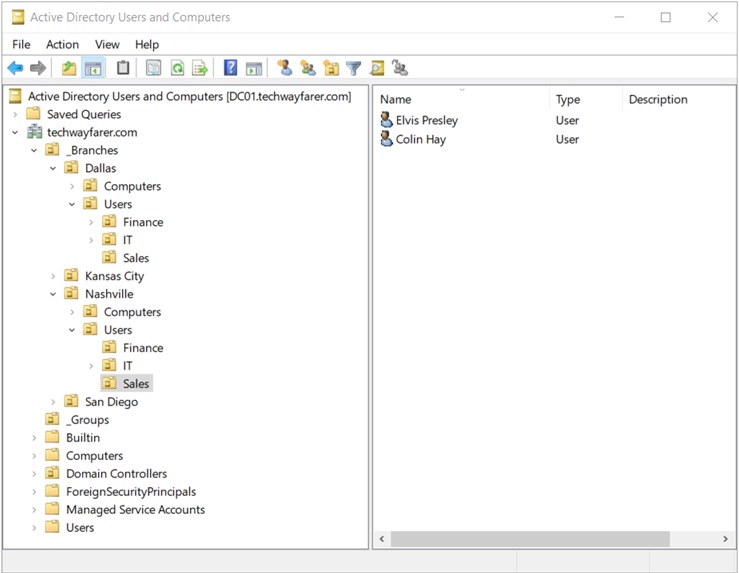
Below are the four branch locations and their OU structures you should now have in ADUC.
2. Add Sales Users to New Branch OUs in PowerShell
In an earlier post, we added users to two OUs (Kansas City and San Diego) using PowerShell ISE. Review the post for a detailed description of the steps.
In this section, Sales users will be added to the two new OUs (Dallas and Nashville) created in the previous step.
We can use Excel to create the new Sales users in Dallas and Nashville and save the file in CSV format.

The field names in the Excel file match the parameter names used earlier and found in the Microsoft documentation.
We then create and run a PowerShell script to add the sales users to Dallas and Nashville as follows:
Open PowerShell ISE on the Windows Server.
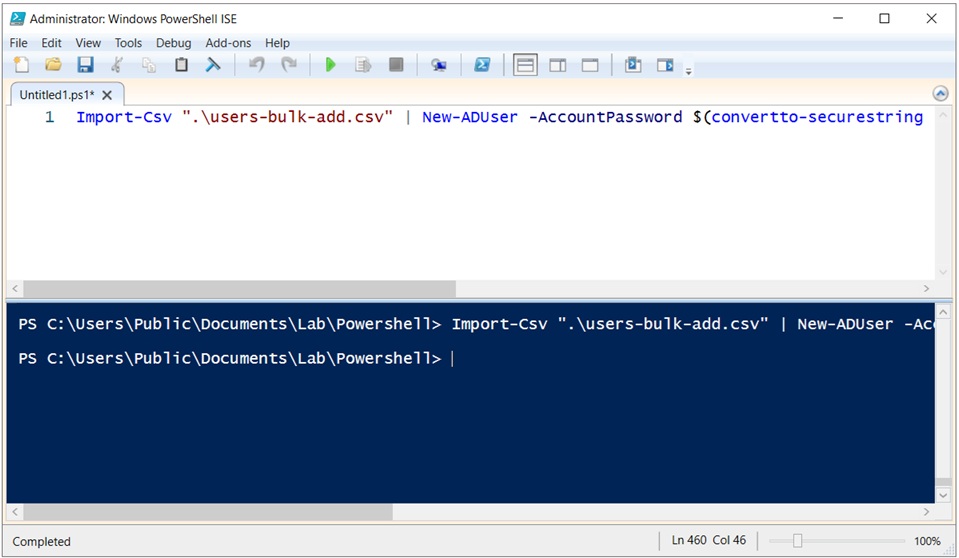
Copy and paste the following command into the top half of the PowerShell ISE window.
Import-Csv ".\users-bulk-add.csv" | New-ADUser -AccountPassword $(convertto-securestring "P@55w0rd" -AsPlainText -Force) -ChangePasswordAtLogon $true -Enabled $trueIn the bottom half of the ISE window, use the cd command to open the folder where the CSV file is stored. The CSV file for this lab has been saved in the following directory.
PS C:\Users\Public\Documents\Lab\PowerShellRun the script by pressing F5 or the Run Script button (green arrow) in the top menu.
Open ADUC and verify the Sales users were added to AD.
3. Create Central OU to Contain Groups
In an actual business, OUs for users and computers are normally stored under their respective branch OUs, as we did in the previous step. Groups, on the other hand, are normally stored in one central location such as a Groups OU.
Create a central OU to store the groups using the following steps:
- Open ADUC.
- Right click on the root domain name (e.g., techwayfarer.com) and choose New > Organization Unit.
- In the New Object window, name the OU (e.g., _Groups).
- Click OK.
4. Create Domain Local and Global Groups in PowerShell
In the step, PowerShell ISE is used to create two Domain Local groups in the parent domain and a Global group in each of the four child domains. Then in a later step Sales users will be added to the Sales group in each child domain.
In a real environment the Sales group for each branch location will usually be created by the domain administrator for the child domain. In our lab only one DC was created for the parent domain (e.g., techwayfarer.com). So the one domain administrator will create the Sales group for each child domain.
The following code can be used to create the groups in PowerShell ISE. See the Microsoft documentation for details about the parameters used.
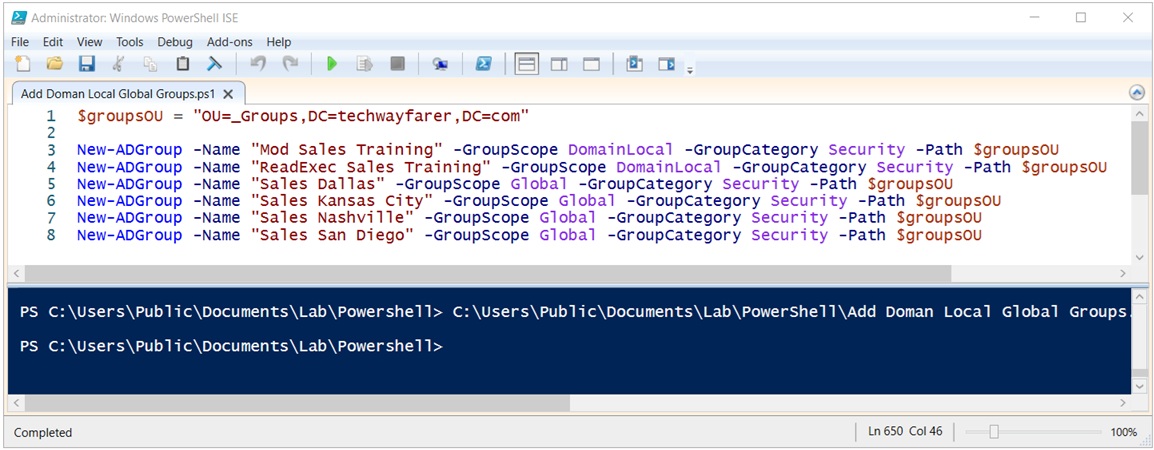
$groupsOU = "OU=_Groups,DC=techwayfarer,DC=com"

New-ADGroup -Name "Mod Sales Training" -GroupScope DomainLocal -GroupCategory Security -Path $groupsOU
New-ADGroup -Name "ReadExec Sales Training" -GroupScope DomainLocal -GroupCategory Security -Path $groupsOU
New-ADGroup -Name "Sales Dallas" -GroupScope Global -GroupCategory Security -Path $groupsOU
New-ADGroup -Name "Sales Kansas City" -GroupScope Global -GroupCategory Security -Path $groupsOU
New-ADGroup -Name "Sales Nashville" -GroupScope Global -GroupCategory Security -Path $groupsOU
New-ADGroup -Name "Sales San Diego" -GroupScope Global -GroupCategory Security -Path $groupsOU
Open PowerShell ISE and copy the commands into the top half of the PowerShell ISE. Change the names of the parent domain and the groups to match the configuration of your lab. Save the commands in a PowerShell file for later reference.
Click on the green arrow to run the commands. If there are no errors in your code, you should see a similar result in the bottom half of the PowerShell ISE window.
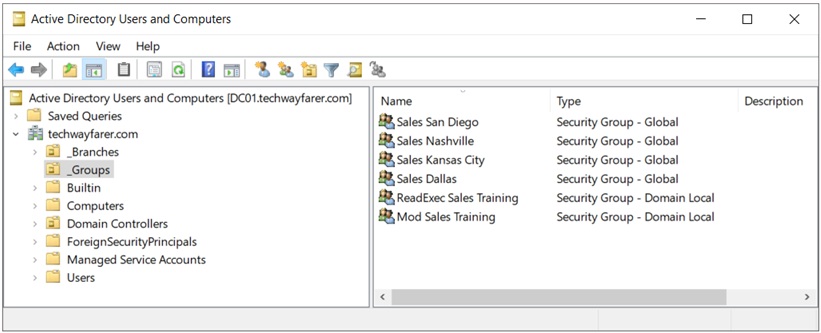
Open ADUC and verify the groups have been added to Active Directory.
5. Add Sales Users to Global Groups in PowerShell
There are currently Sales users in each of the four branch location OUs (Dallas, Kansas City, Nashville, and San Diego). In this portion of the lab the Sales users are added to the Global group for each branch location/child domain.
Two commands (or cmdlets) will be used in PowerShell to add the Sales users to the Global groups in bulk.
- Import-Csv
- Add-ADGroupMember
See the Microsoft documentation for the Import-Csv cmdlet and the Add-ADGroupMember cmdlet.
Open PowerShell ISE and copy the following command into the top half of the PowerShell ISE window:
Import-Csv ".\add-users-groups.csv" | ForEach-Object {
Add-ADGroupMember -Members $_.UserSam -Identity $_.GroupSam
}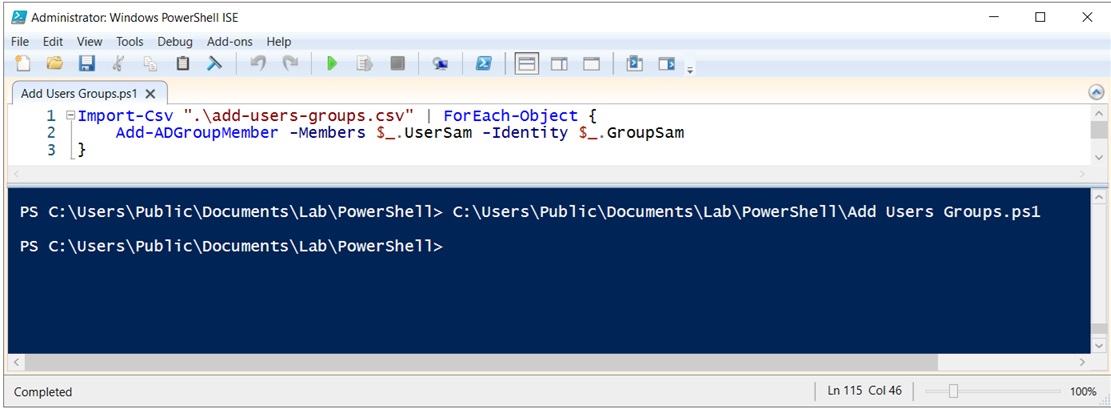
The PowerShell script will access each Sales user record in the add-users-groups.csv file and send it (using a pipe I) to the Add-ADGroupMember command.
In the Add-ADGroupMember command:
- The Members parameter specifies the user to add to a group using the UserSam field in the CSV file.
- The Identity parameter specifies the group that receives the new member using the GroupSam field in the CSV file.
The add-users-groups.csv file contains only two fields for each Sales user record. You can choose any name for the fields (e.g., UserSam and GroupSam). The CSV file can be created in Excel or in a simple text program like Notepad.
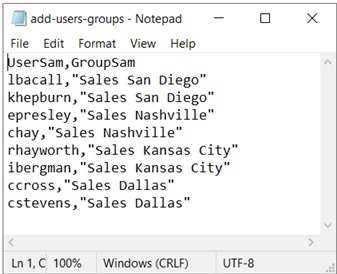
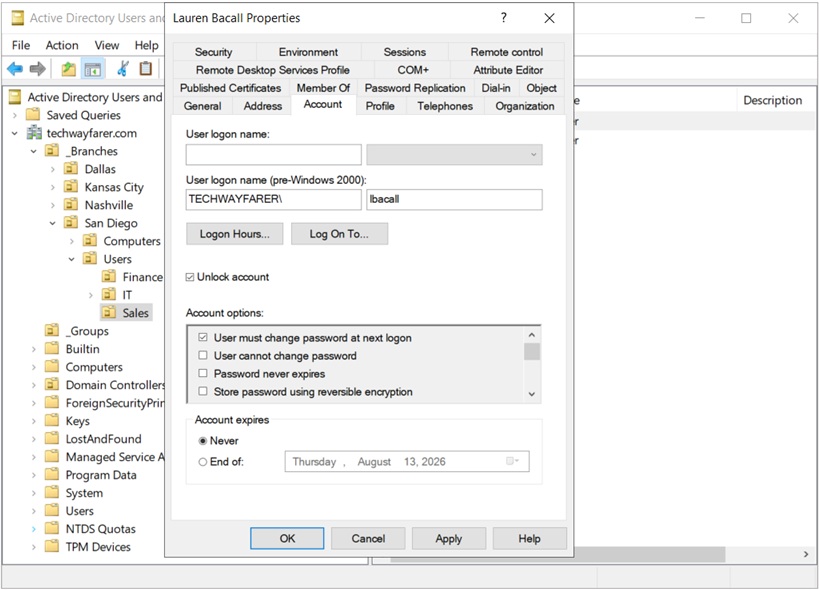
There are multiple ways of identifying the Sales user and the Global group to which the user will belong. For our lab we chose to use the Security Account Manager (SAM) Account Name, an attribute in AD that provides compatibility with older Windows systems.
To find the SAM Account Name for each Sales user:
- Open ADUC and choose View > Advanced Features in the top menu.
- In the Branches OU open a branch OU (e.g., San Diego), then the Users OU, and then the Sales OU.
- Right click on a Sales user and choose Properties.
- In the Properties window choose the Account tab.
- The SAM Account Name is listed under “User logon name (pre-Windows 2000).”
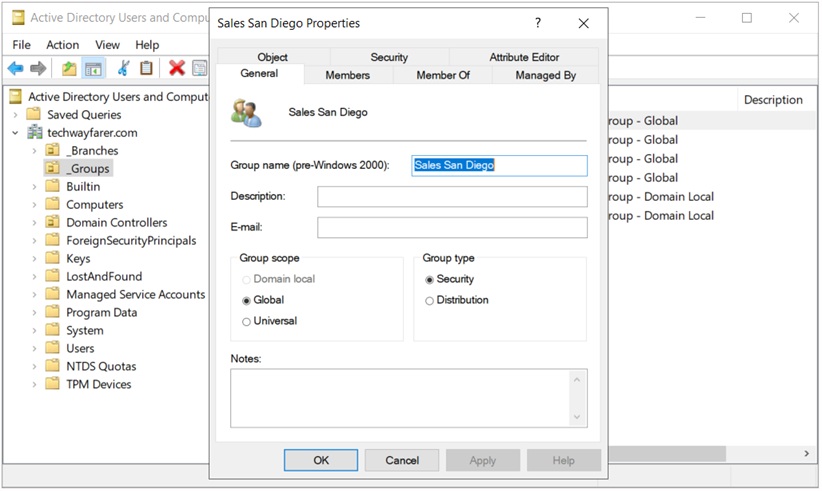
To find the SAM Account Name for each Global group:
- Open ADUC and choose View > Advanced Features in the top menu.
- In the Groups OU right click on a group (e.g., Sales San Diego) and choose Properties.
- In the Properties window choose the General tab.
- The SAM Account Name is provided in the field “Group name (pre-Windows 2000).”
In PowerShell ISE click on the green arrow to run the script.
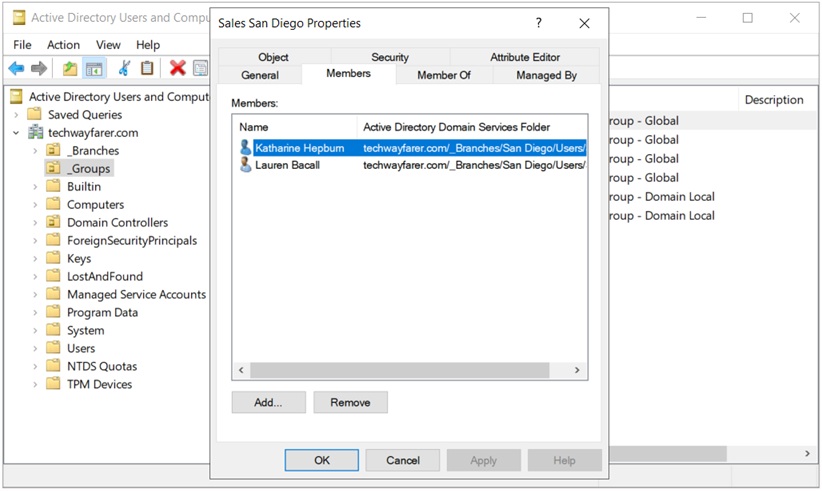
Check ADUC to make sure the Sales users were added to their corresponding Global groups as follows:
- Open the Groups OU.
- Right click on a Global group (e.g., Sales San Diego) and choose Properties.
- In the Properties window open the Members tab.
6. Make Global Groups Members of Domain Local Groups
In this portion of the lab the Global groups in the subdomains become members of the Domain Local groups in the parent domain. The steps for completing this section will be similar to the prior section “Add Sales Users to Global Groups in PowerShell.”
Open PowerShell ISE and copy the following command into the top half of the PowerShell ISE window:
Import-Csv ".\add-gg-dlg.csv" | ForEach-Object {
Add-ADGroupMember -Members $_.GGSam -Identity $_.DLGSam
}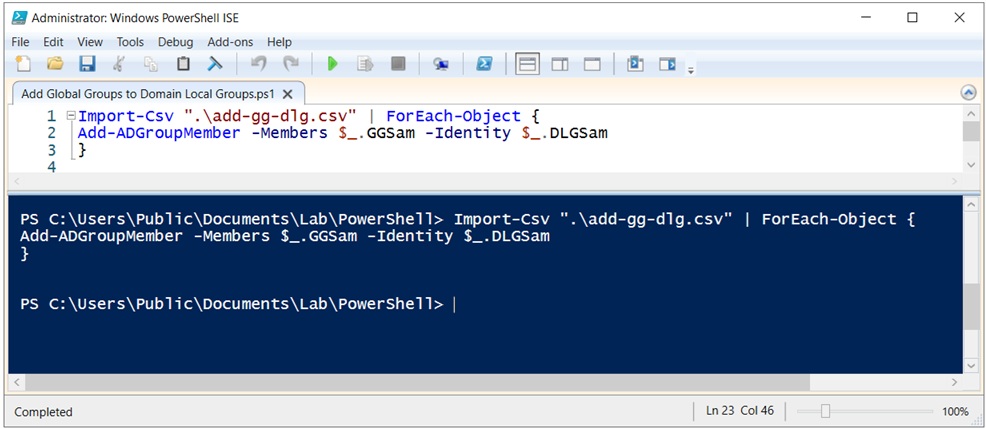
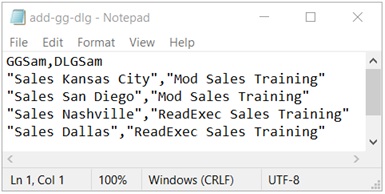
The PowerShell script will access each Global group record in the add-gg-dlg.csv file and send it (using a pipe I) to the Add-ADGroupMember command.
In the Add-ADGroupMember command:
- The Members parameter specifies the Global group that will become a member of a Domain Local group, using the GGSam field in the CSV file.
- The Identity parameter specifies the Domain Local group that receives the new member, using the DLGSam field in the CSV file.
The add-gg-dlg.csv file contains only two fields for each Global group record. We chose the names GGSam and DLGSam. GGSam represents the SAM Account Name for the Global group. DLGSam represents the SAM Account Name for the Domain Local Group.
In PowerShell ISE click on the green arrow to run the script.
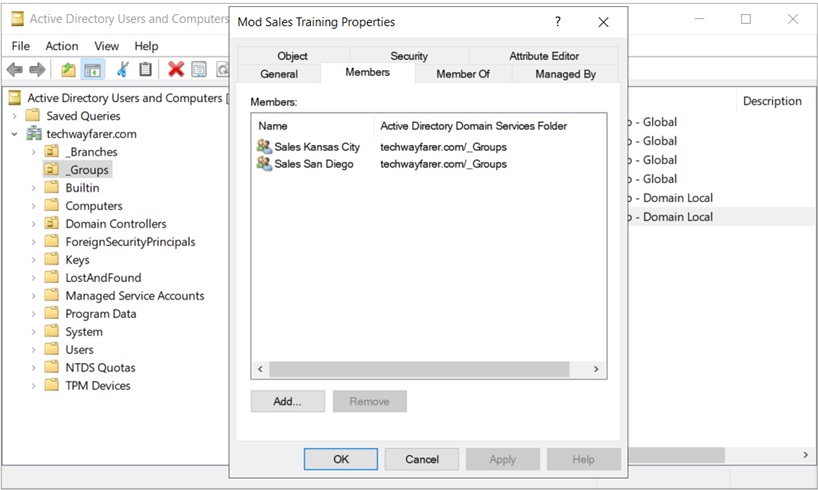
Check ADUC to make sure the Global groups were added to the Domain Local groups as follows:
- Open the Groups OU.
- Right click on a Domain Local group (e.g., Mod Sales Training) and choose Properties.
- In the Properties window open the Members tab.
7. Give Domain Local Groups Access to Sales Training Folder
In this portion of the lab the two Domain Local groups receive access to the Sales Training folder. Domain Local Group #1 is given modify permissions, and Domain Local Group #2 is given read and execute permissions.
There are two types of permissions that work together to provide access to a shared network folder: sharing and security. Sharing permissions allow the Domain Local groups to see the Sales Training folder on the network. Security permissions allow the Domain Local groups to access the contents of the folder.
Create Sales Training Folder and Document in Parent Domain
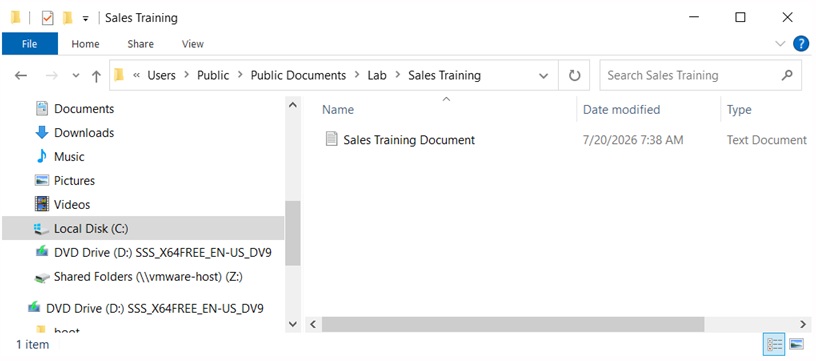
Create a training folder for the Sales users that is located in the DC. We will title the folder Sales Training and place it at C:\Users\Public\Documents\Lab\Sales Training.
Then add a document into the folder that can be edited. We chose to use Notepad to create a text document (e.g., Sales Training Document). Later we will test that Sales Users can access and modify the document.
Share Sales Training Folder on Network
In this step the two Domain Local groups are given permission to view the Sales Training folder on the network.
In File Explorer right click on the Sales Training folder and choose Properties.
In the window “Sales Training Properties” choose the Sharing tab.
Click the Advanced Sharing button.
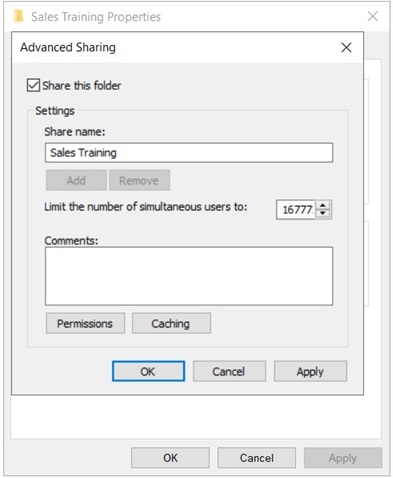
In the window “Advanced Sharing” click the checkbox next to “Share this folder.” Choose a name for the folder that will be visible on the network (e.g., Sales Training). Click the Permissions button.
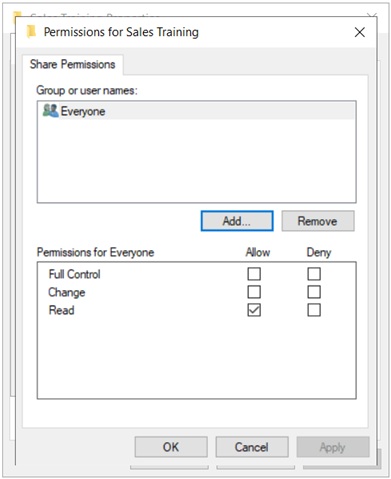
The window “Permissions for Sales Training” lists the users or groups that currently have the ability to view the Sale Training folder on the network. Click the Add button.
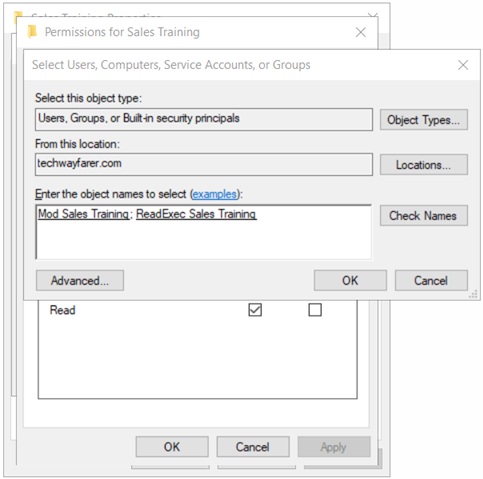
In the window “Select Users, Computers, Service Accounts, or Groups” enter the first word of a Domain Local group (e.g., Mod) and click the Check Names button. The full name of the Domain Local group should appear (e.g., Mod Sales Training).
Enter the first word of the other Domain Local group (e.g., ReadExec) and click the Check Names button. The full name of the Domain Local group should appear (e.g., ReadExec Sales Training). Click OK.
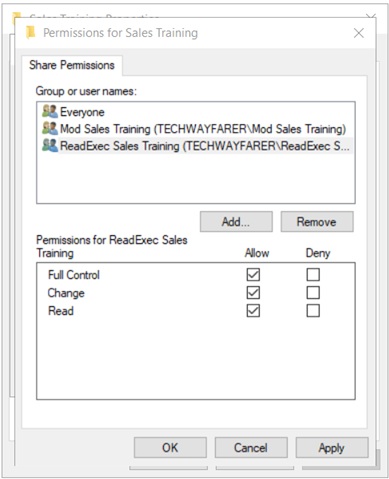
In the window “Permissions for Sales Training” the two Domain Local groups now appear under “Group or user names.” Click each Domain Local group and then the Full Control permission level. Then click Apply and OK.
In the window “Advanced Sharing” click Apply and then OK.
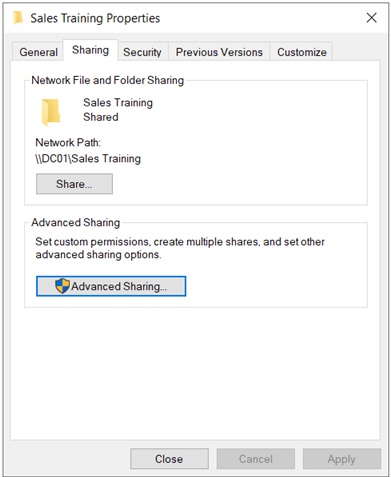
In the window “Sales Training Properties”, under the Sharing tab the Network Path now appears (e.g., \\DC01\Sales Training).
Give Domain Local Groups Security Access to Sales Training Folder
In this step the two Domain Local groups are given security permissions for the Sales Training folder, allowing the groups to access the contents of the folder.
In File Explorer right click on the Sales Training folder and choose Properties.
In the window “Sales Training Properties” choose the Security tab and click the Advanced Sharing button.
In the window “Advanced Security Settings for Sales Training” click Add.
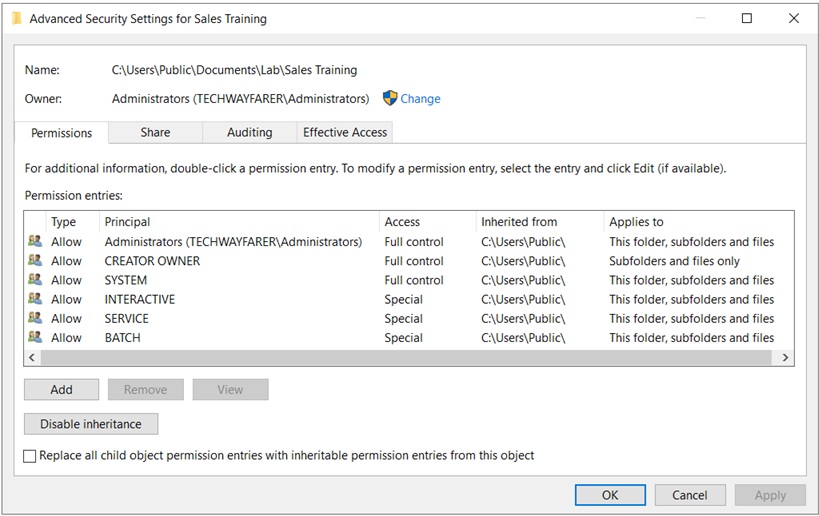
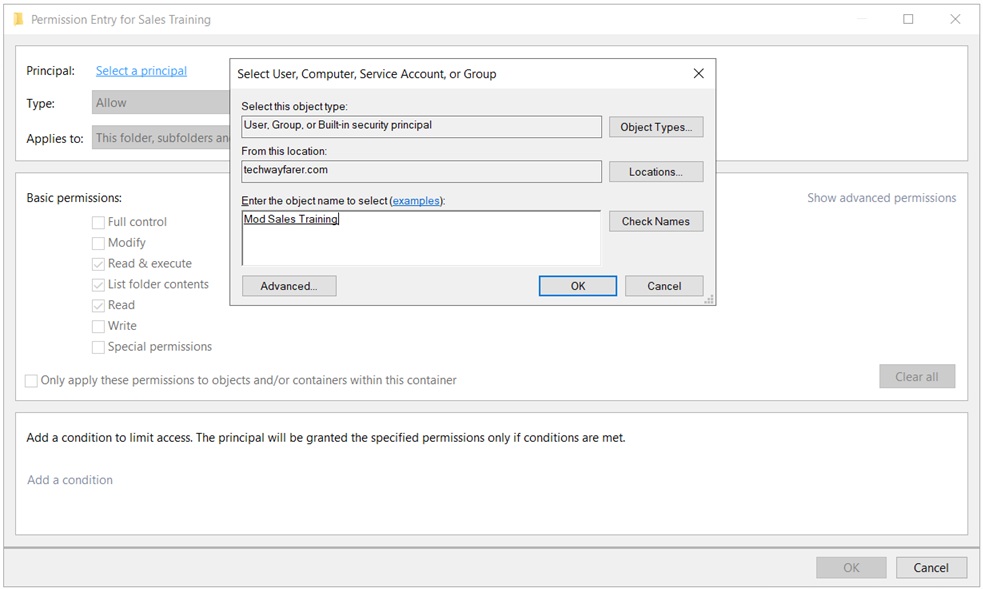
In the window “Permission Entry for Sales Training” click “Select a principal.”
In the window “Select Users, Computers, Service Accounts, or Groups” enter the first word of a Domain Local group (e.g., Mod) and click the Check Names button. The full name of the Domain Local group will appear (e.g., Mod Sales Training). Click OK.
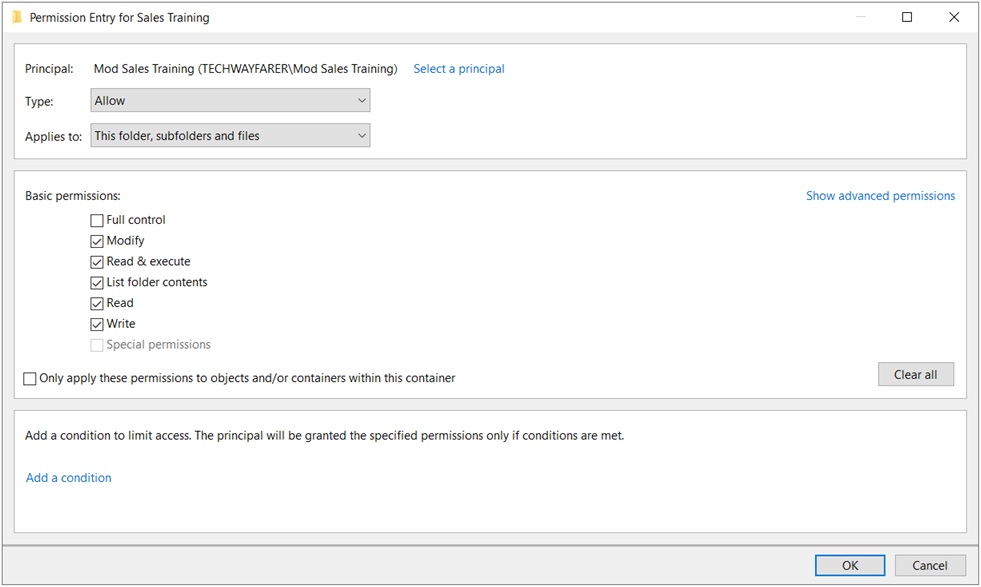
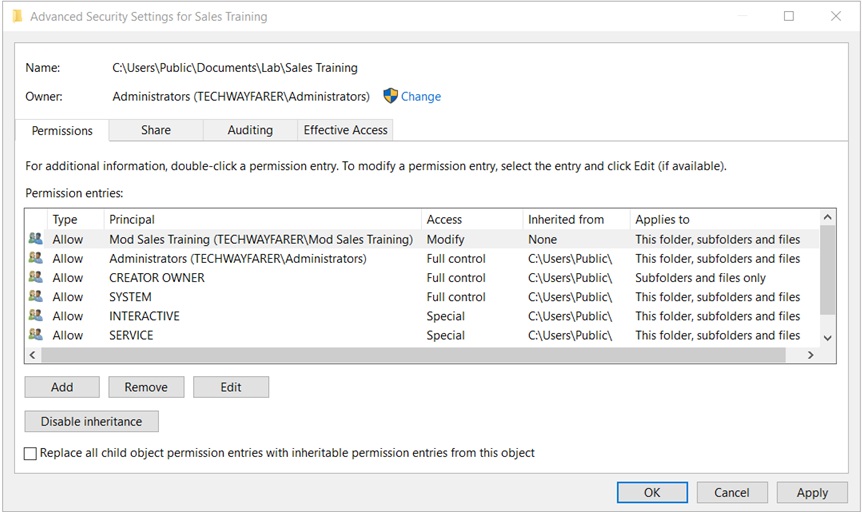
In the window “Permission Entry for Sales Training”, under Basic permissions select Modify since the “Mod Sales Training” Domain Local group is receiving Modify permissions. Click OK.
In the window “Advanced Security Settings for Sales Training” the “Mod Sales Training” Domain Local group now appears with Modify permissions for the Sales Training folder.
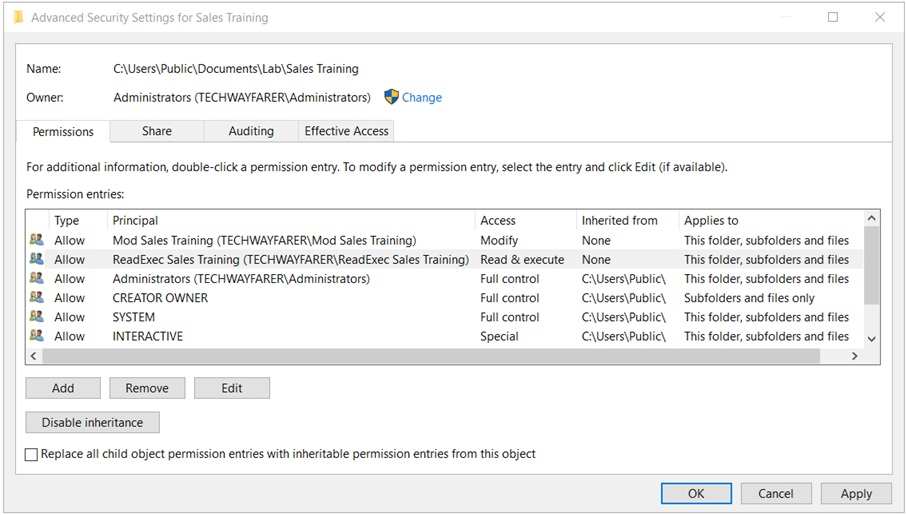
Repeat the above steps to add permissions for the “ReadExec Sales Training” Domain Local group.
In the window “Advanced Security Settings for Sales Training” click Add.
In the window “Permission Entry for Sales Training” click “Select a principal.”
In the window “Select Users, Computers, Service Accounts, or Groups” enter the first word of the other Domain Local group (e.g., ReadExec) and click the Check Names button. The full name of the Domain Local group will appear (e.g., ReadExec Sales Training). Click OK.
In the window “Permission Entry for Sales Training” under Basic permission make sure “Read & execute” is the highest level of permission given and click OK.
In the window “Advanced Security Settings for Sales Training” the “ReadExec Sales Training” Domain Local group now appears with Read & execute permissions for the Sales Training folder. Click Apply and then OK.
In the window “Sales Training Properties” the Security tab now shows that the “Mod Sales Training” Domain Local group has modify permission, and the “ReadExec Sales Training” Domain Local group has read & execute permission.
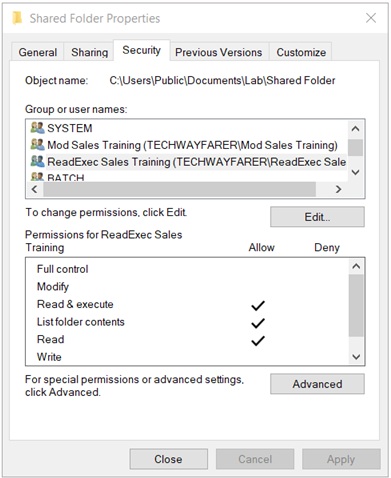
The two Domain Local groups and all of their members (the Global group and Sales users in each subdomain) now have the ability to see the Sales Training folder on the network. The “Mod Sales Training” Domain Local group has modify permission for the contents of the Sales Training folder. And the “ReadExec Sales Training” Domain Local group has read & execute permission for the contents of the Sales Training folder.
8. Verify Sales Users Can Access Sales Training Folder
In this step we verify that the Sales users can access the Sales Training folder.
Earlier in this post, Sales users in the Kansas City and San Diego subdomains were granted modify permissions for the Sales Training Folder. Sales users in the Nashville and Dallas subdomains were granted read & execute permissions.
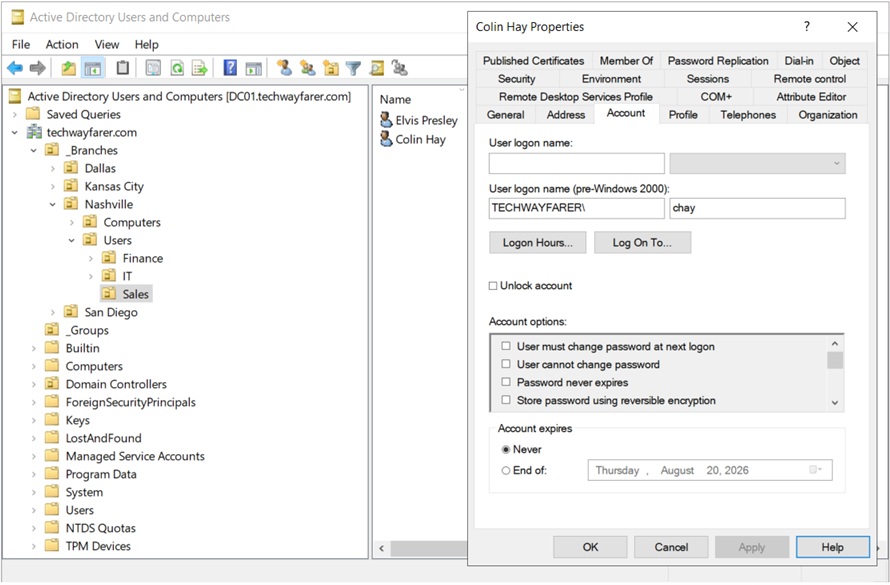
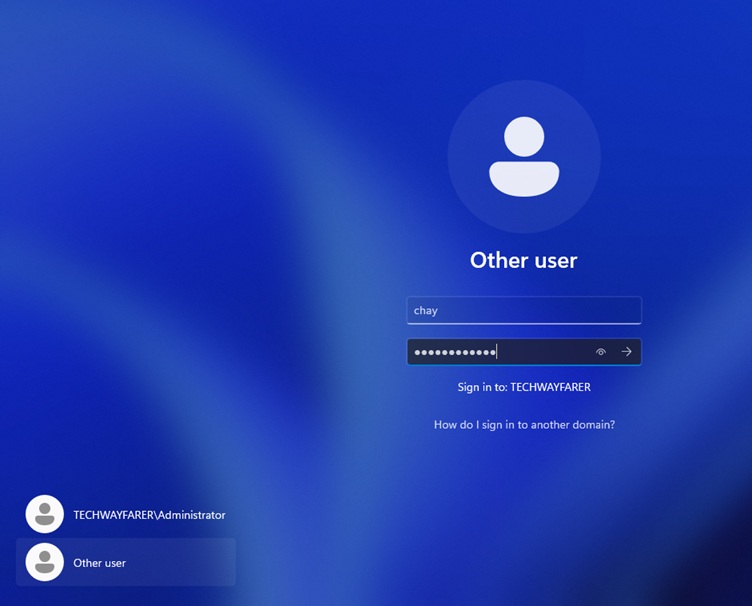
We will log into the Windows 11 client using one of the user accounts created earlier (e.g., Colin Hay). The user is located in the Nashville OU and is part of the Sales Nashville group.
In our lab a user’s logon name is the first letter of the first name followed by the last name, as one word in all lowercase (e.g., chay).
In an earlier post we created a Windows 11 virtual machine (VM) and joined it to the domain. Start the Windows 11 VM.
At the Windows 11 logon screen click “Other user” and enter the logon information for the user. Earlier in this post, new user accounts were created with an initial password of P@55w0rd and the requirement to change the password during the initial login.
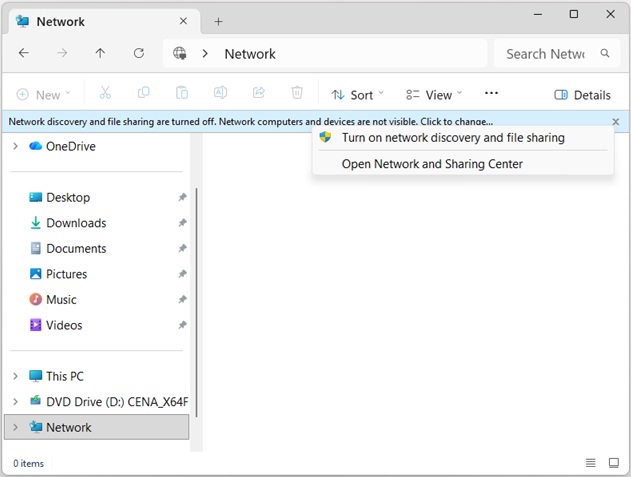
Once logged into Windows 11, open File Explorer and click on the Network button in the left menu. If prompted choose “Turn on network discovery and file sharing.”
In the File Explorer address field, enter the network path of the Sales Training folder. Earlier in this post a network share was created for the Sales Training folder (e.g., \\DC01\Sales Training).
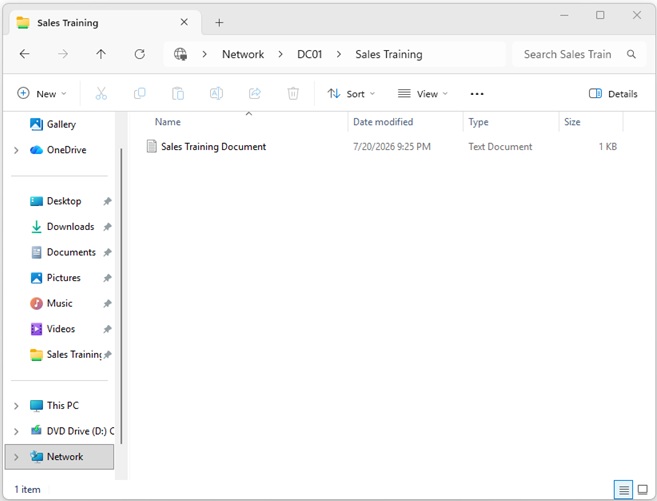
We are logged into the Windows 11 PC as a Sales user in the Nashville subdomain that has read & execute permissions for the Sales Training folder. The user should be able to view a document in the folder but not modify it. If the file “Sales Training Document.txt” is opened in Notepad, text can be added to the file, but the file cannot be saved.
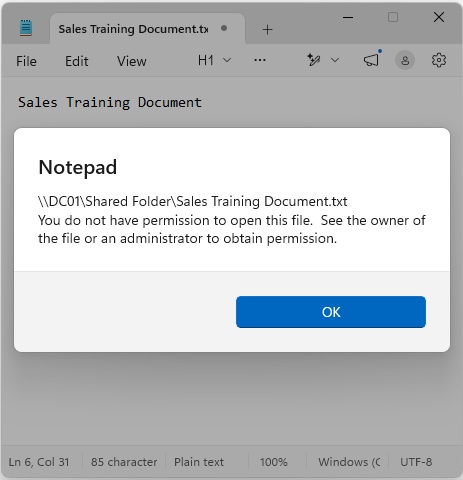
We can also log into the Windows 11 PC as a Sales user in the Kansas City subdomain that has Modify permissions for the Sales Training folder. The user will be able to view and modify a document in the folder. If the file “Sales Training Document.txt” is opened in Notepad, text can be added to the file, and the file can be saved
Conclusion
We are done creating groups in Active Directory.
Key Takeaways:
- There are three types of security groups: Global, Domain Local, and Universal.
- Users gain access to resources through group membership instead of their OUs.
- Groups are usually stored in a central OU in AD, instead of under branch OUs.
- When accessing resources across domains:
- Global groups contain individual users and are members of Domain Local groups.
- Domain Local groups have permission to access resources.
In the next post group policy objects are created in Active Directory.
Next Post >> Create Group Policy Objects in Active Directory