This post is part three of a Microsoft Azure and Entra ID home lab. In this post, a virtual machine (VM) is created in Microsoft Azure. First a resource group (RG) is created in Azure to hold the resources for this lab. Then a virtual network (VN) is created. And finally, the VM is created and deployed to the VN.
Posts in Microsoft Azure and Entra ID Home Lab
Table of Contents This Post
Before discussing how to create a virtual machine in Azure, we will review the Azure management hierarchy and global infrastructure.
Azure Management Hierarchy
The Azure management hierarchy is composed of the following elements:
- Management Groups
- Subscriptions
- Resource Groups
- Resources
- Resource Groups
- Subscriptions
Management Groups
Management groups are the top level of the Azure hierarchy. They provide a way to organize and manage multiple Azure subscriptions. They enable organizations to apply policies, role-based access controls (RBAC), and compliance rules across all the child resources within the group.
Subscriptions
An Azure subscription is an agreement between Microsoft and a customer that grants access to Azure services and resources. A subscription is often used as a boundary for security, automation, and billing. A subscription is tied to one billing account and one Entra ID tenant.
Organizations may have multiple subscriptions that are used to designate different geographical areas (e.g., US and India) or different business areas (e.g., production and development). Multiple subscriptions can have the same Entra ID tenant.
Resource Groups
A resource group is a logical container inside a subscription. It contains metadata about the resources it contains and their deployment.
Resource groups are used for management and administrative purposes. For instance, an organization can use a RG to determine who will be allowed to manage, create, and configure the resources in the group. Or a RG can be used to view the billing for all the resources it contains.
A RG is often used to organize and manage resources that share a common lifecycle. For instance, a resource group may contain a VM, a VN, a VM disk, and a backup, all of which are all related to the same virtual machine.
Resources
Resources are the cloud elements that you create and manage. A resource is a single instance of an Azure service such as a virtual network, VM, database, storage account, or web app. A resource must be deployed to only one resource group and one subscription.
Azure Global Infrastructure
The Azure global infrastructure is composed of the following elements:
- Geographies
- Regions
- Availability Zones
- Data Centers
- Availability Zones
- Regions
Geographies
A geography is a global boundary at the top level of the Azure infrastructure. It contains a fault-tolerant, high-capacity networking system. Each geography is defined to meet specific data residency, sovereignty, and compliance requirements. Examples of geographies include the United States, Canada, Europe, Asia Pacific, Middle East, and Africa.
Regions
A region is a defined physical area located within a geography. A region contains one or more datacenters that are connected by a high-capacity, low-latency network. Azure services are deployed within regions and availability zones.
Azure currently provides over 70 regions globally. Examples of regions in the United States include East US, Central US, and West US 2.
Availability Zones
An availability zone (AZ) is a group of one or more physically separate data centers. An AZ is located within a specific region. Each AZ has its own independent power, cooling, and networking.
Data Centers
A data center is the physical facility that houses Azure servers, storage, and networking equipment. Datacenters are typically located in large metropolitan areas.
A customer cannot choose a data center in which to place resources. Instead, he can place resources in particular availability zones.
Choose a Region
In the following sections we will create resources in Azure including a VN and a VM. The resources will be contained within the same region. Before creating any resources, we will first determine the region in which the resources will reside.
In a previous post an Azure account was created that provides a 30-day free trial. The trial version of Azure provides access to a subset of the total Azure regions.
We will see the list of available regions, in an Azure trial version, during the process of creating a VM later in this post. In the US there are three regions available: Central US, East US, and West US 2. We will choose East US as the region to contain our lab resources.
Create a Resource Group
In this section a RG is created that will contain the resources for our lab (a VN and a VM). A RG can exist in a different region than the resources it contains. Yet in this lab the RG is created in the East US region where the VN and VM will be deployed.
To create a RG, login to the Azure portal. From the Azure home page the Resource Groups page can be accessed using one of the following methods:
- Enter “resource groups” in the search field and choose it from the list of services.
- Click on the menu icon in the top left corner and choose “Resource groups.”
- In the main window under “Azure services” click on “More services.” At the “All Services” page enter “resource” in the filter field, and choose “Resource groups.”
- In the main window under Navigate click on “Resource groups.”
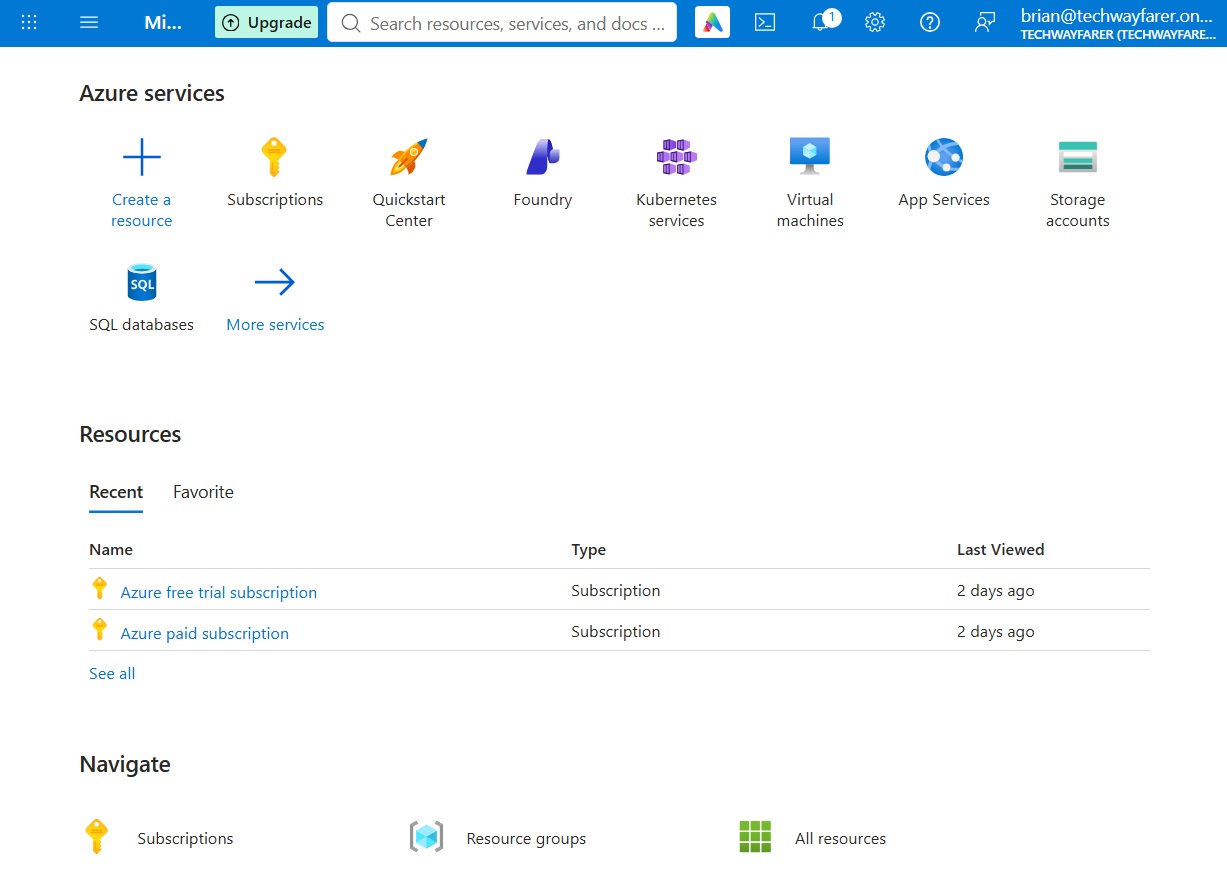
The “Resource Manager | Resource groups” page opens. Click the Create button.
The “Create a resource group” page opens. Under the Basics tab enter the following:
- For Subscription select the free trial subscription created in an earlier post (e.g., Azure free trial subscription).
- For “Resource group name” enter a name (e.g., vmnet1-rg).
- For Region select the region that you decided upon earlier in this post (e.g., East US).
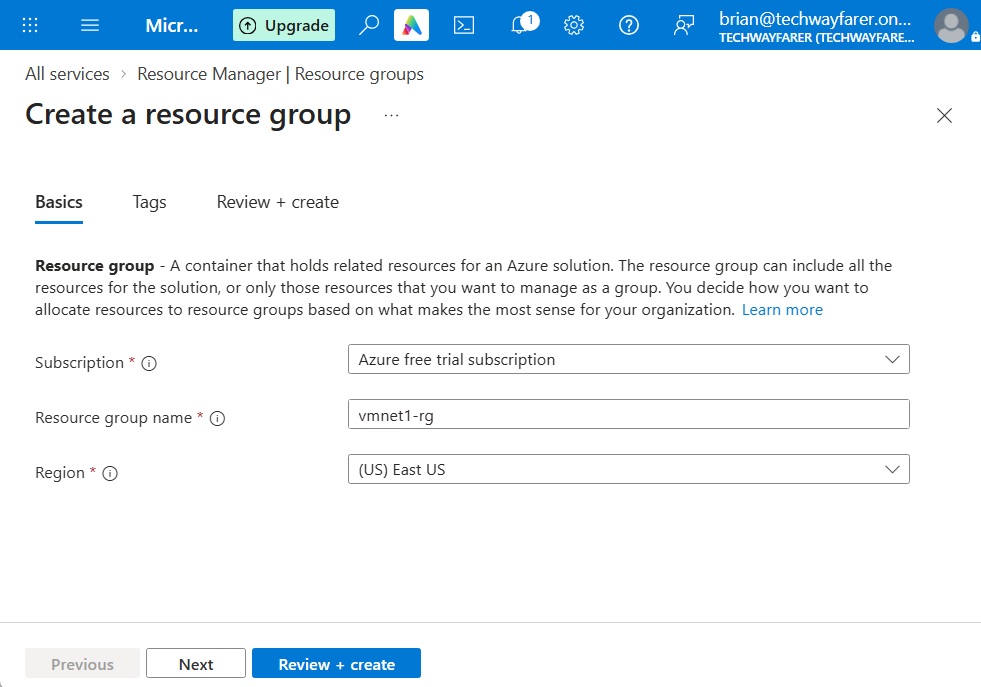
In this lab, we will not enter Tags. So click “Review + create.” Verify the information entered is correct and click Create.
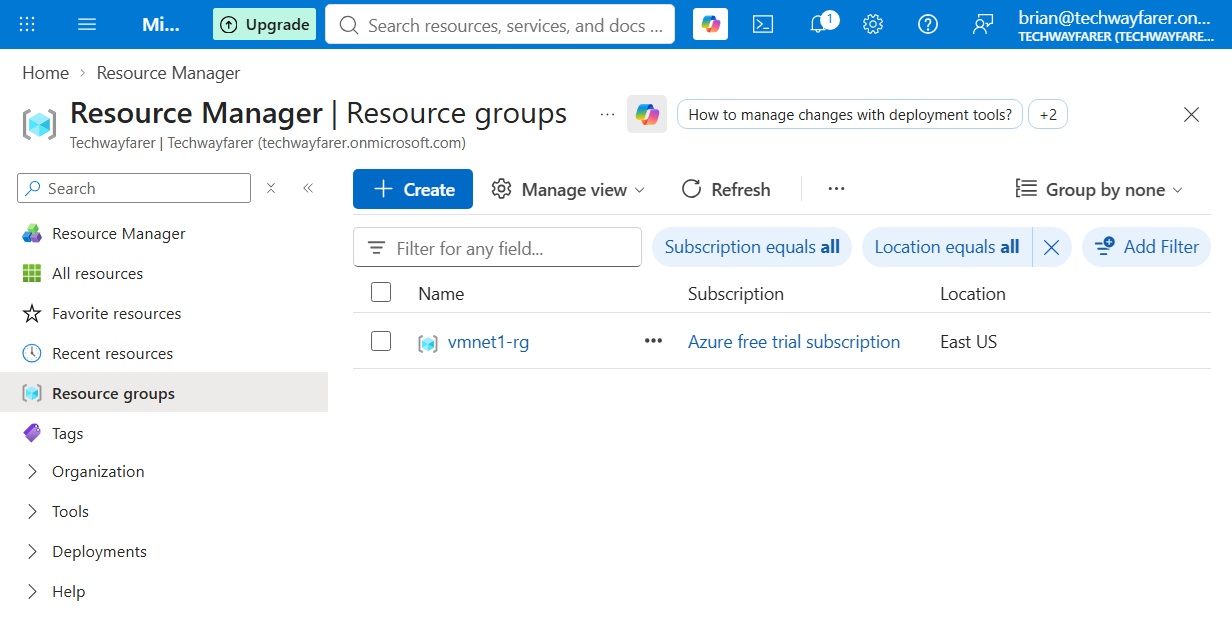
The “Resource Manager | Resource groups” page displays the recently created RG.
Create a Virtual Network
In this section we will create a VN that will be used by a VM later in this post. The VN needs to be created in the same region where the VM is deployed.
On the Azure home page enter “virtual networks” in the search bar and choose the “Network foundation | Virtual network” option from the list.
The “Network foundation | Virtual networks” page opens. Click the Create button. The “Create virtual network” page opens.
VN Basics Tab
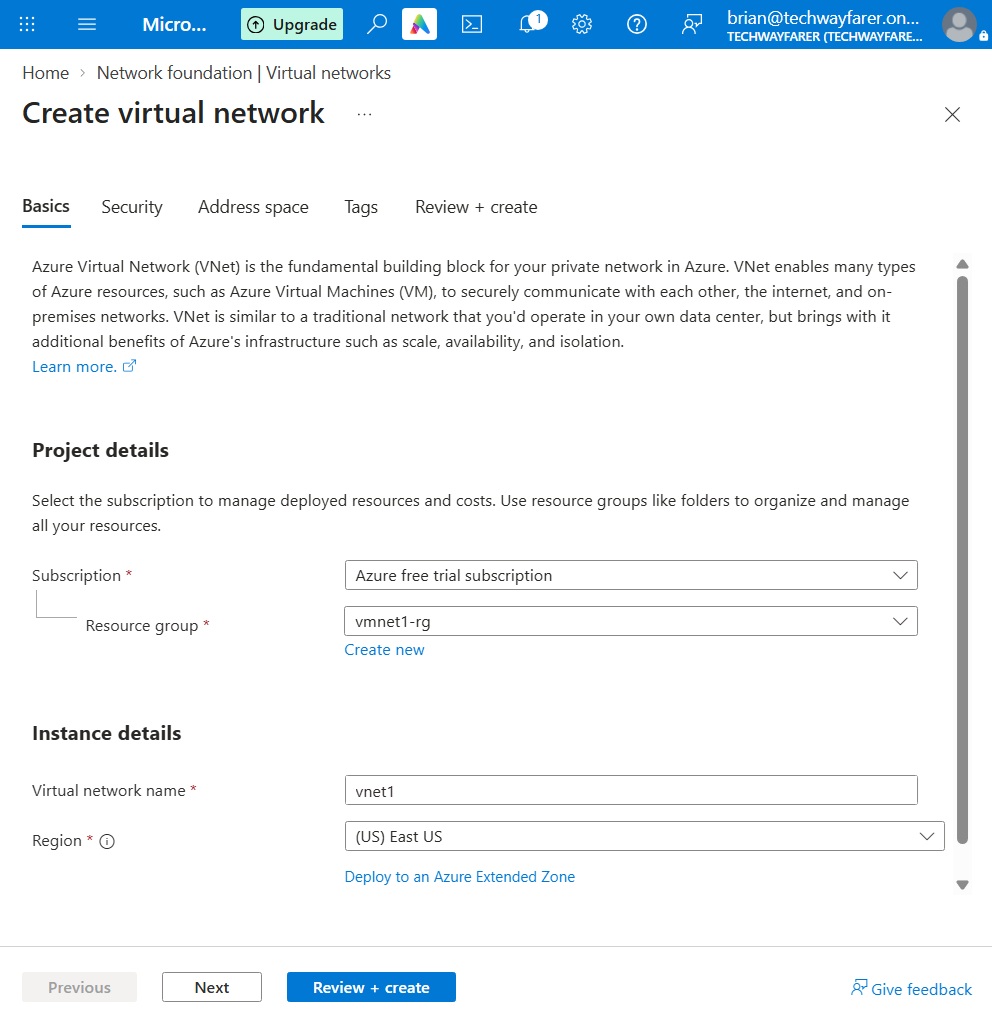
In the Basics tab:
- For Subscription select the free trial subscription created in an earlier post (e.g., Azure free trial subscription).
- For Resource Group select the RG created earlier in this post (e.g., vmnet1-rg).
- For “Virtual network name” enter a name (e.g., vnet1).
- For Region select the region that you decided upon earlier in this post (e.g., East US). When you click the down arrow all the regions available under the free trial subscription are listed.
Click Next.
VN Security Tab
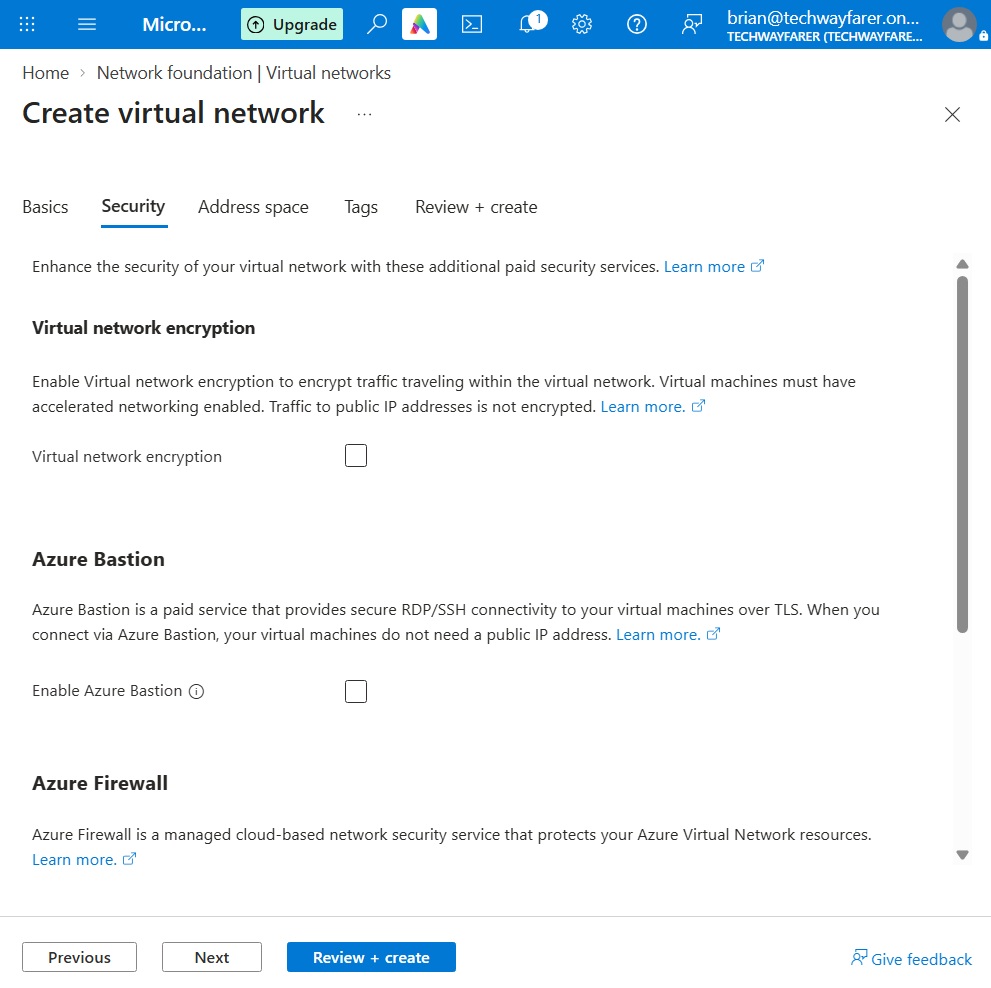
The Security tab opens Do not select any of the security features (Virtual network encryption, Azure Bastion, Azure Firewall, and Azure DDoS Network Protection) since they are needed in this lab. Click Next.
VN Address Space Tab
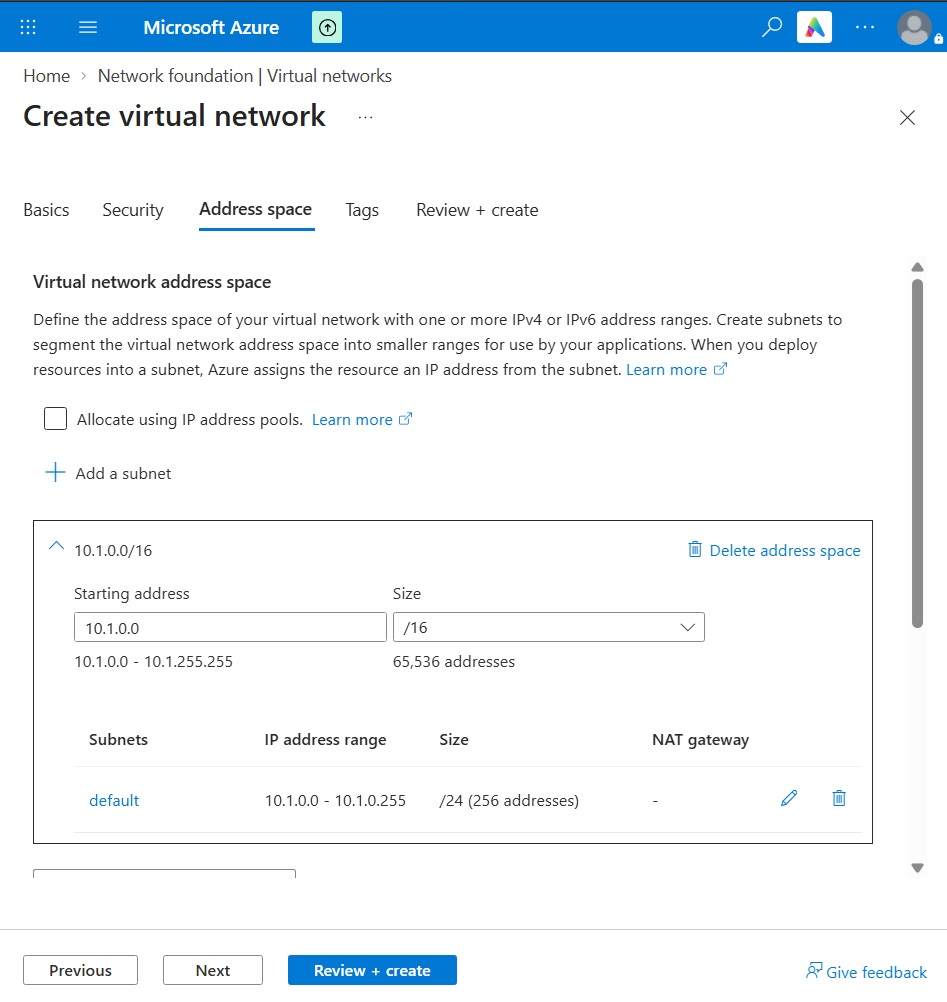
The “Address space” tab opens where the VN address space, and any subnets within the space, are created.
Many companies have a hybrid cloud infrastructure in which on-premises resources are used with cloud resource. Many companies use the 192.168.x.x address space for their on-premises network devices, which we did in an earlier lab on Windows Server and Active Directory. It is common to use 10.x.x.x address spaces in Azure to avoid IP address conflicts between on-premises and cloud resources. And it is common for the Azure address space to use the 10.x.0.0/16 CIDR range and the subnets to use a /24 range.
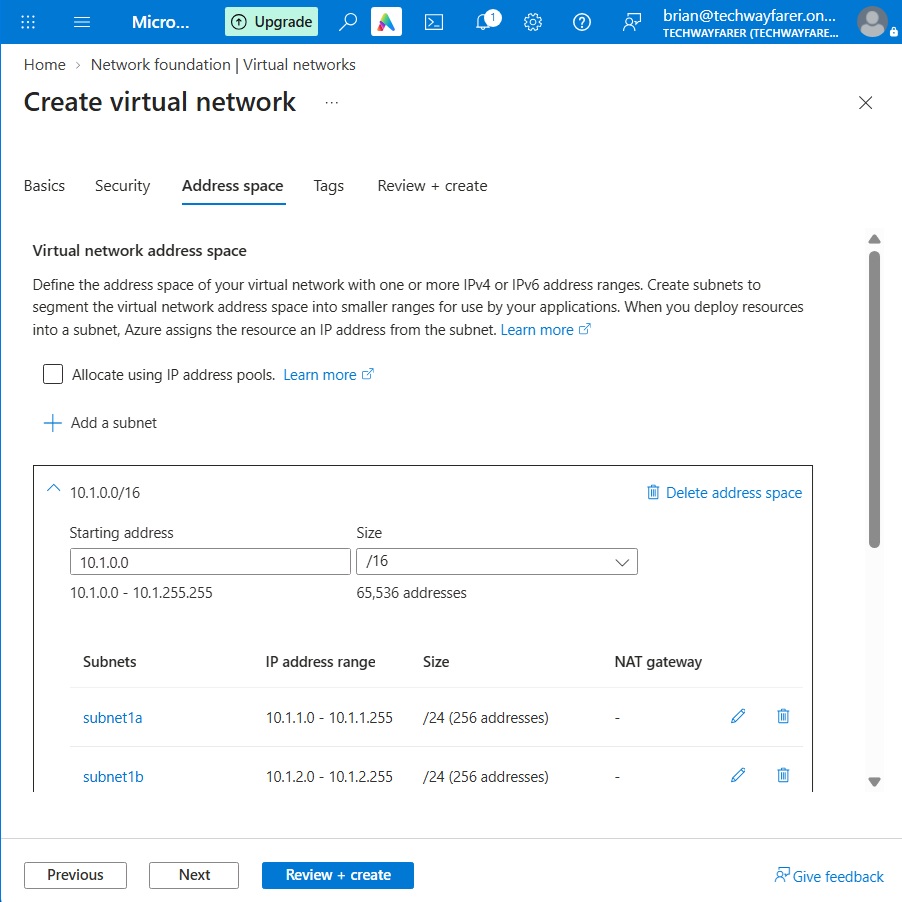
For this lab the address space will be 10.1.0.0/16. And the subnets within the address space will use /24 address ranges.
- 10.1.0.0/16 – address space
- 10.1.1.0/24 – subnet1a
- 10.1.2.0/24 – subnet1b
Enter a Starting IPv4 address for the address space (e.g., 10.1.0.0/16).
Add Subnet #1
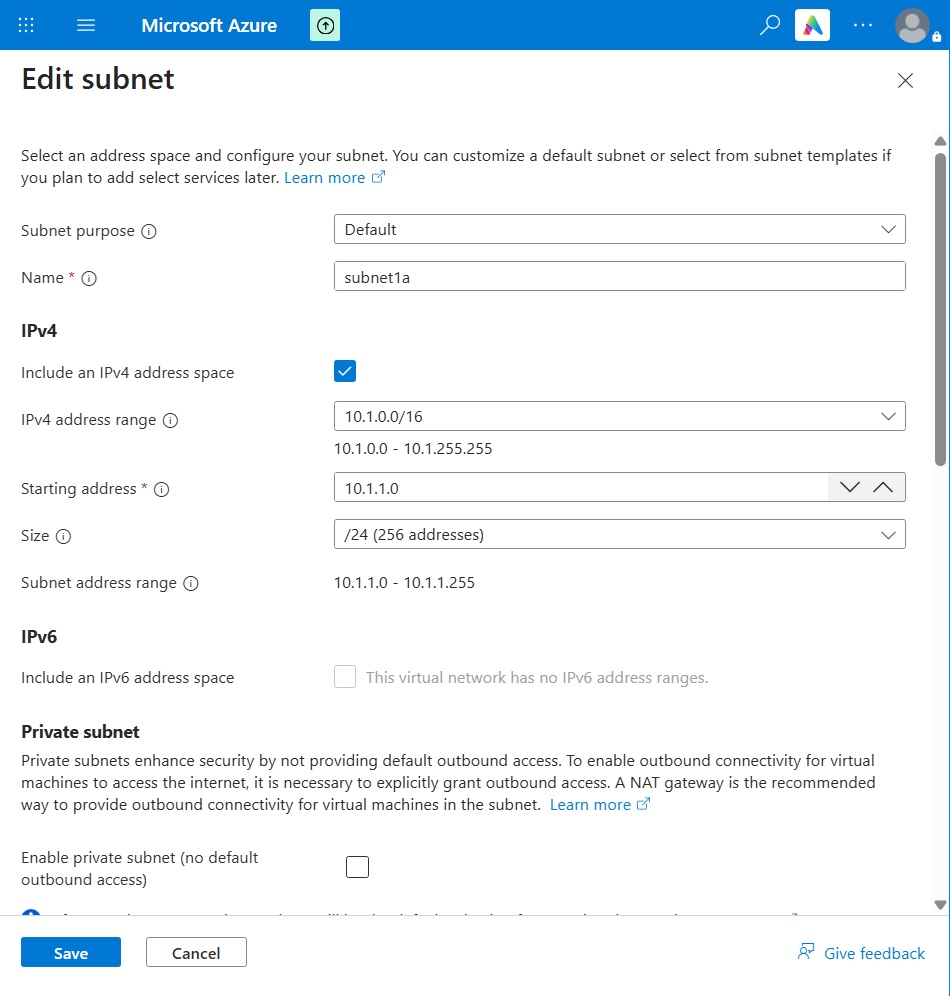
Click on the edit button next to the default subnet. The “Edit subnet” page opens.
Enter a name for the subnet (e.g., subnet1a).
Under IPv4 verify the correct address range is selected (e.g., 10.1.0.0/16).
Choose a starting address for the subnet (e.g., 10.1.1.0) and size (/24).
Under IPv6 the options are grayed out because we chose not to create an IPv6 address space for our virtual network.
Under Private subnet uncheck the box. Then any virtual machines created using the address space can connect to the internet.
The following is a brief description of the remaining options on the Edit Subnet page. Leave the default settings unchanged.
Under the Security section a NAT gateway can be set up that allows internal VMs in a subnet to access the internet (send outbound traffic) using network address translation (NAT). With a NAT gateway a static external IP address is visible from the internet while the internal VMs are not exposed to inbound internet traffic. A NAT gateway is useful if VMs need to perform tasks such as downloading OS patches or making API calls. We will not need a NAT gateway for this lab.
Also under the Security section, a network security group (NSG) can be configured to filter IP traffic in and out of the subnet. And a route table can be configured to route traffic within the virtual network.
In the Service Endpoints section, secure and direct access can be created for certain Azure resources, such as a storage account.
Subnet Delegation allows the subnet to be dedicated to a specific Azure resource.
Network Policy for Private Endpoints controls whether network security groups or routing tables apply to private endpoints in the subnet.
We are done reviewing the options on the “Edit subnet” page. Click Save.
We are taken back to the Create virtual network > Address space page.
Add Subnet #2
Click “Add a subnet” to create a second subnet with the IP address range of 10.1.2.0/24.
In the “Edit subnet” page, enter a name for the subnet (e.g., subnet1b).
Under IPv4 verify the correct address range is selected (e.g., 10.1.0.0/16).
Choose a starting address for the subnet (e.g., 10.1.2.0) and size (/24).
Under Private subnet uncheck the box.
Under Security, we will not create a NAT gateway for the subnet, so accept the default settings.
Leave the remaining settings unchanged.
Click Add.
Below is the finished address space and subnets.
VN Review + Create Tab
There is no reason to click Next since Tags will not be created. Click “Review + create.”
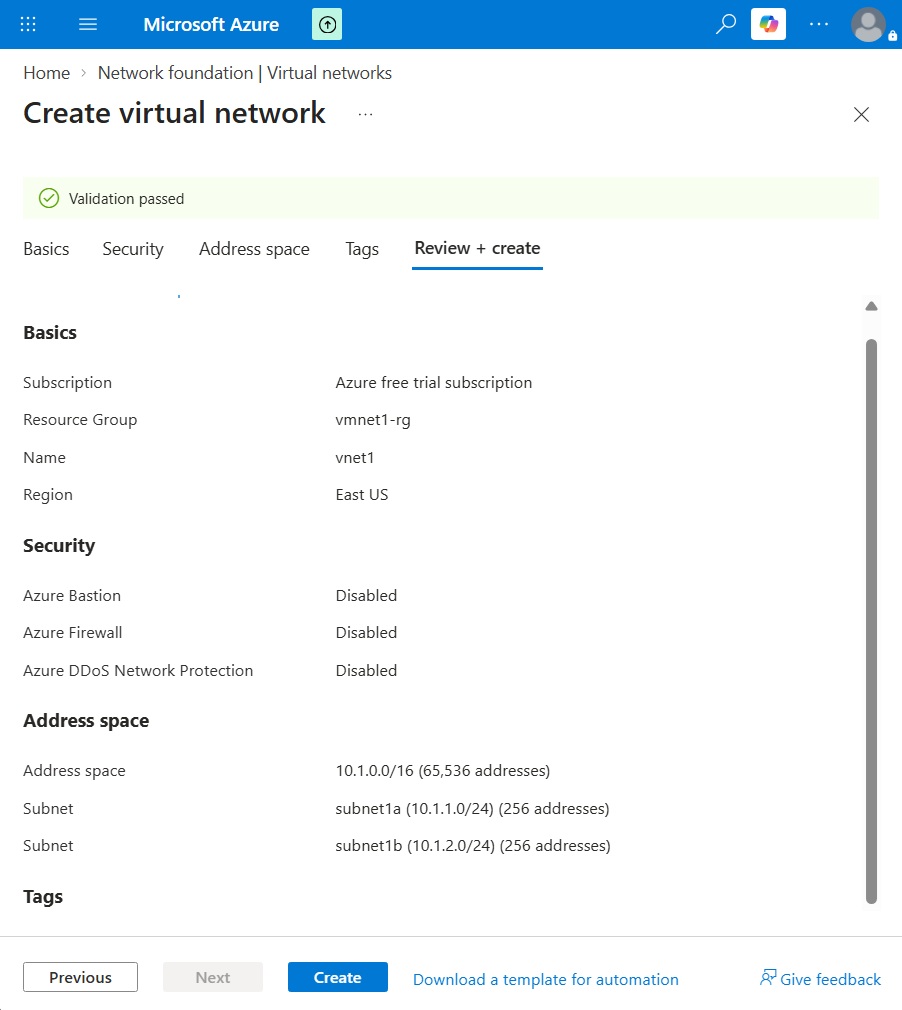
Under the “Review + create” tab a network validation test will run. When completed “Validation passed” will appear.
Deploy Virtual Network
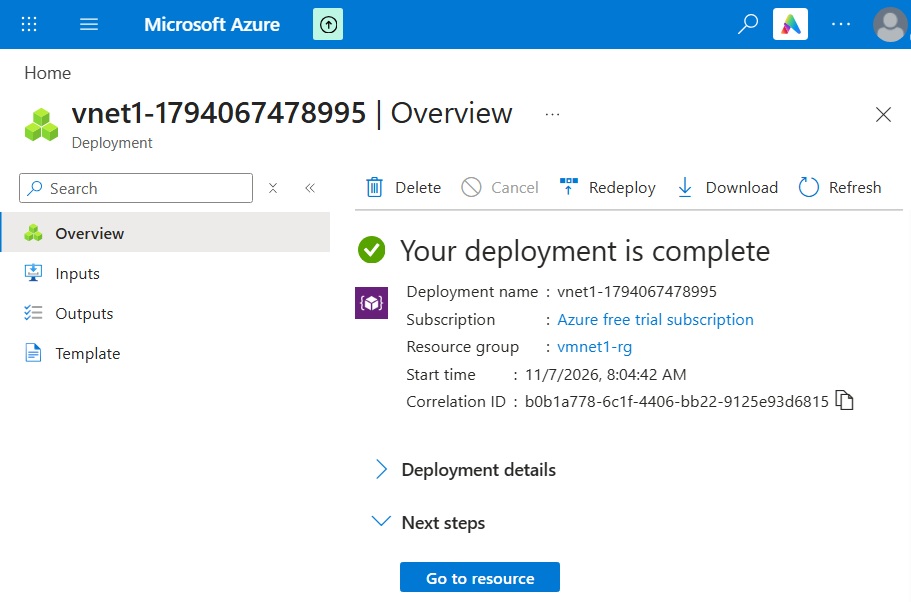
Click Create. The resource deployment in Azure will take a few minutes to complete.
View Virtual Network Details
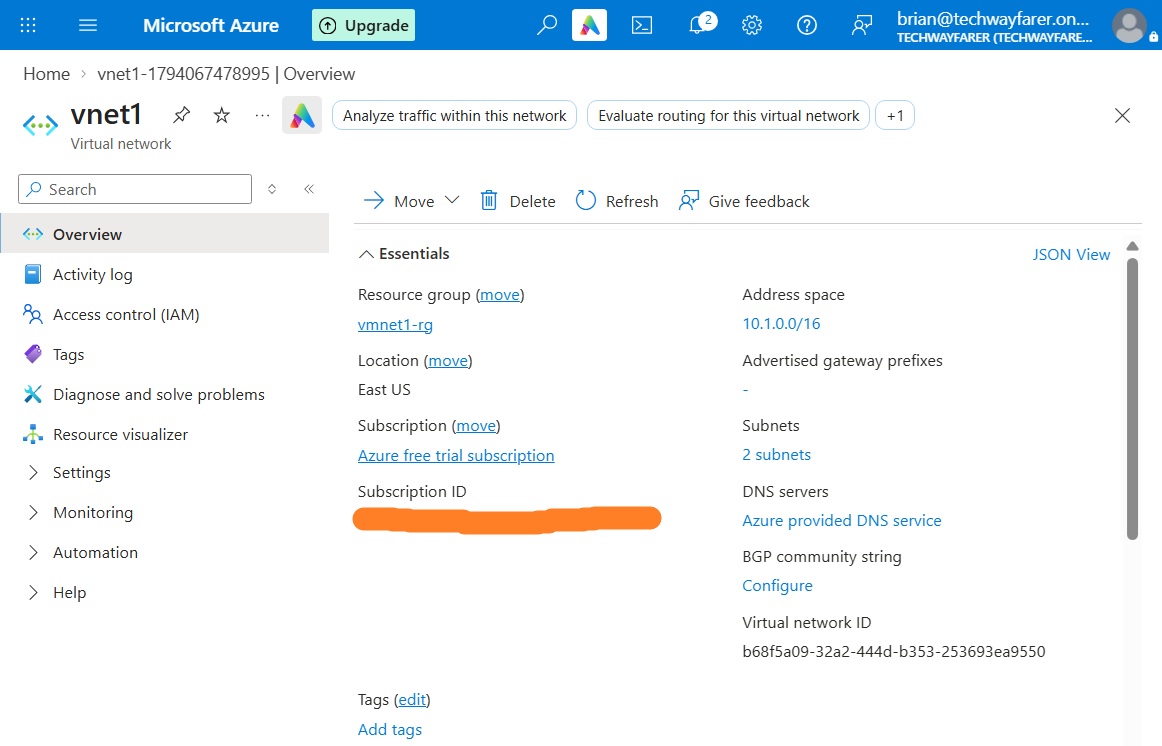
Click on “Go to resource” to see the details of the virtual network.
Create a Virtual Machine
In this section a VM will be created and deployed to the existing VN created earlier.
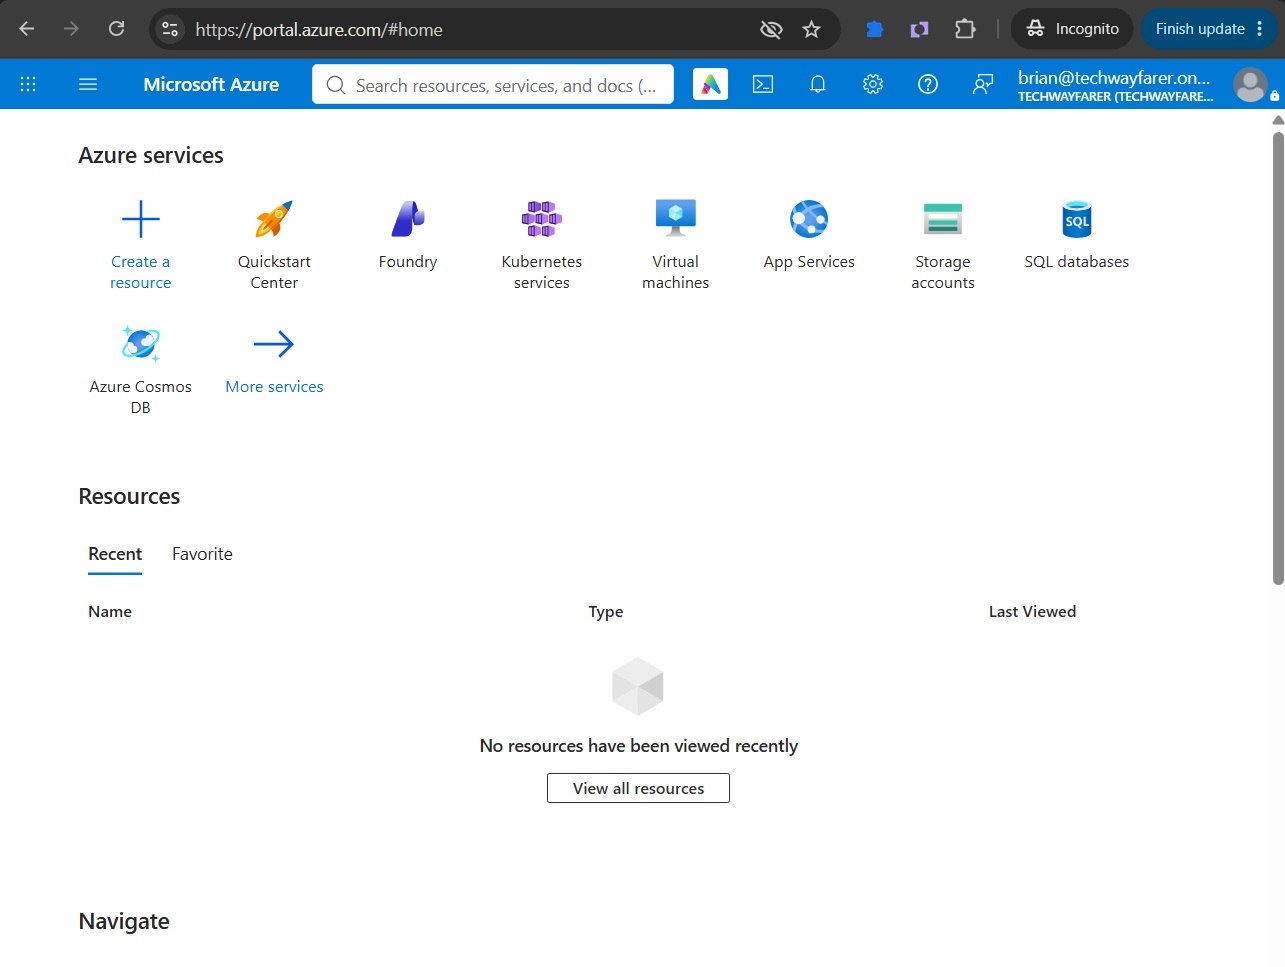
Login to Azure. Search for “virtual machines” in the search bar, or you can choose “Virtual machines” under “Azure services.”
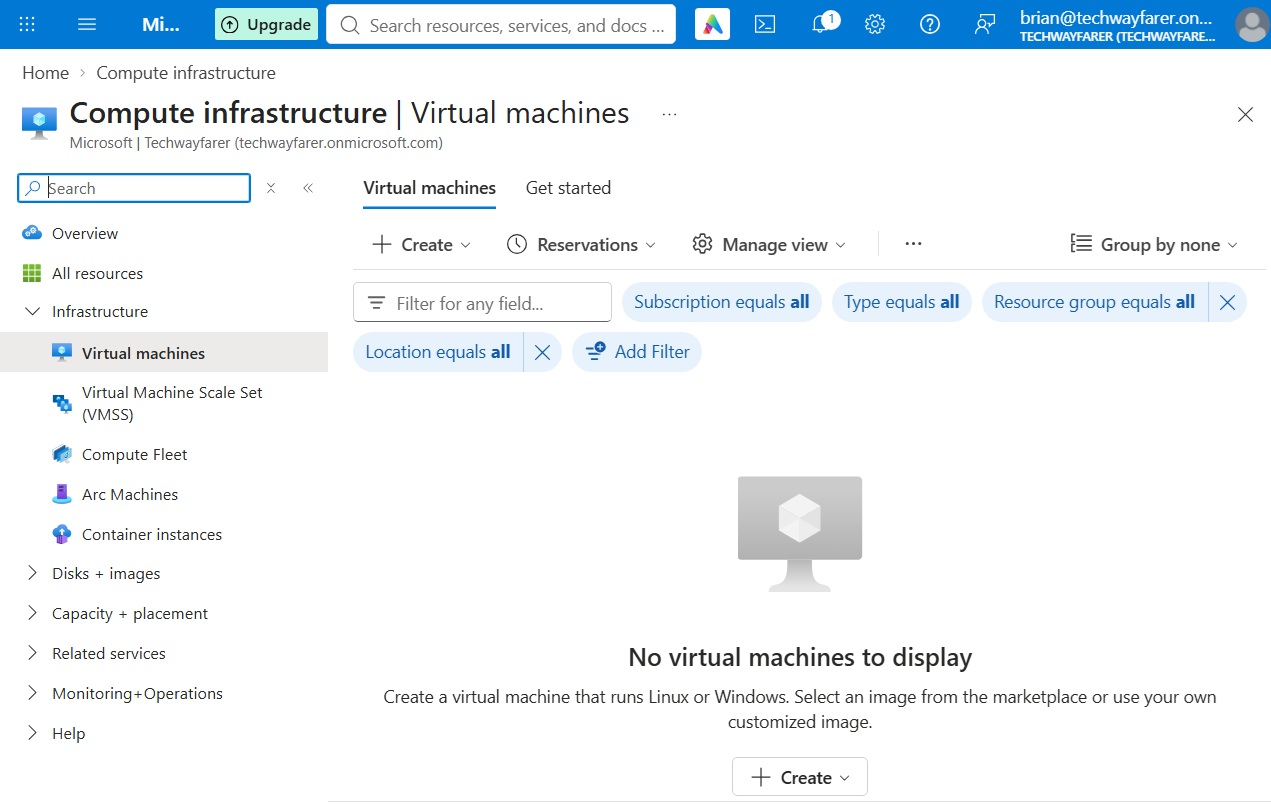
In the “Compute infrastructure | Virtual machines” window click Create > Virtual machine to begin the process of creating a new VM.
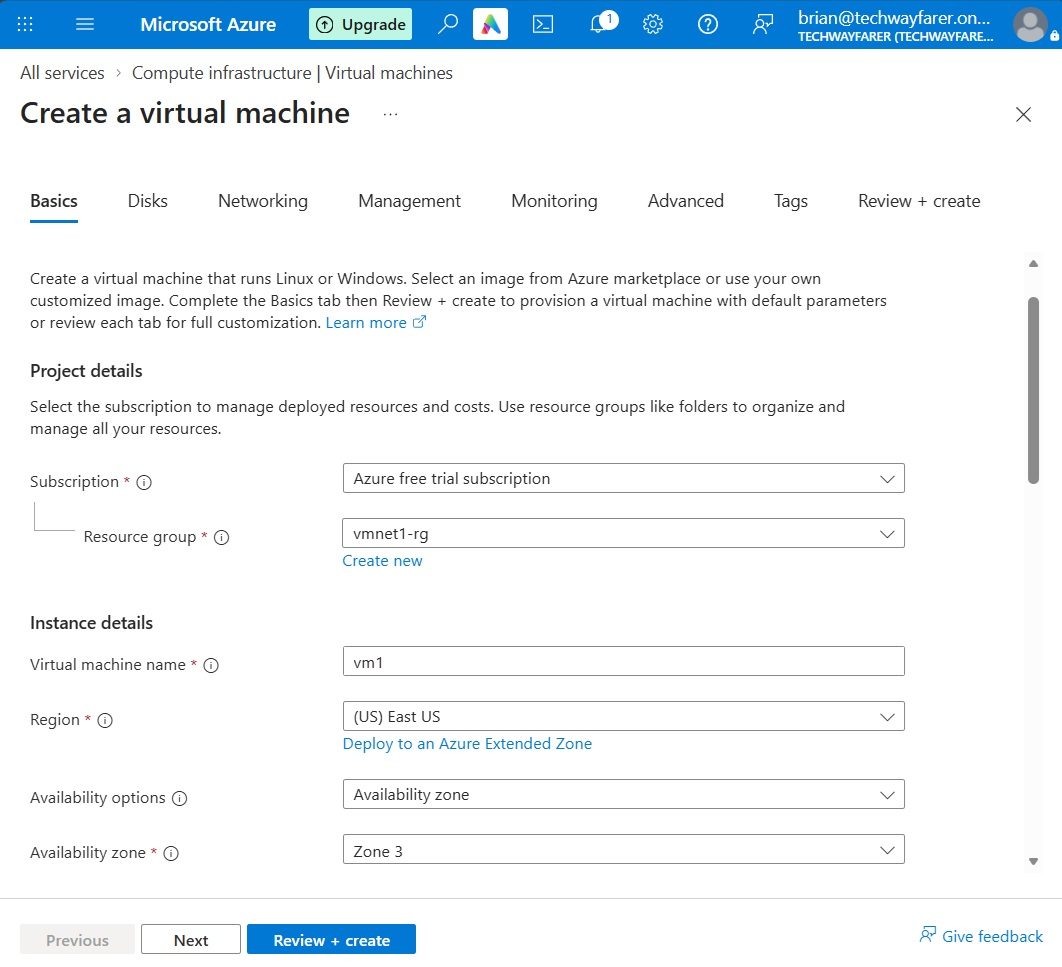
The window “Create a virtual machine” opens.
VM Basics Tab
In the “Create a virtual machine” window choose the Basics tab.
For Subscription choose the free trial subscription created in a previous post (e.g., Azure free trial subscription).
For “Resource group” select the resource group created earlier in this post (e.g., vmnet1-rg).
Under “Instance details”, for “virtual machine name” enter a name (e.g., vm1).
For Region select the region chosen in an earlier section (e.g., East US).
For “Availability options” we can choose particular zones that exist within the region. Choosing more than one AZ offers redundancy. In this lab, for “Availability options” we will choose “Availability zone.” And for the “Availability zone” field we will choose “Zone 3.”
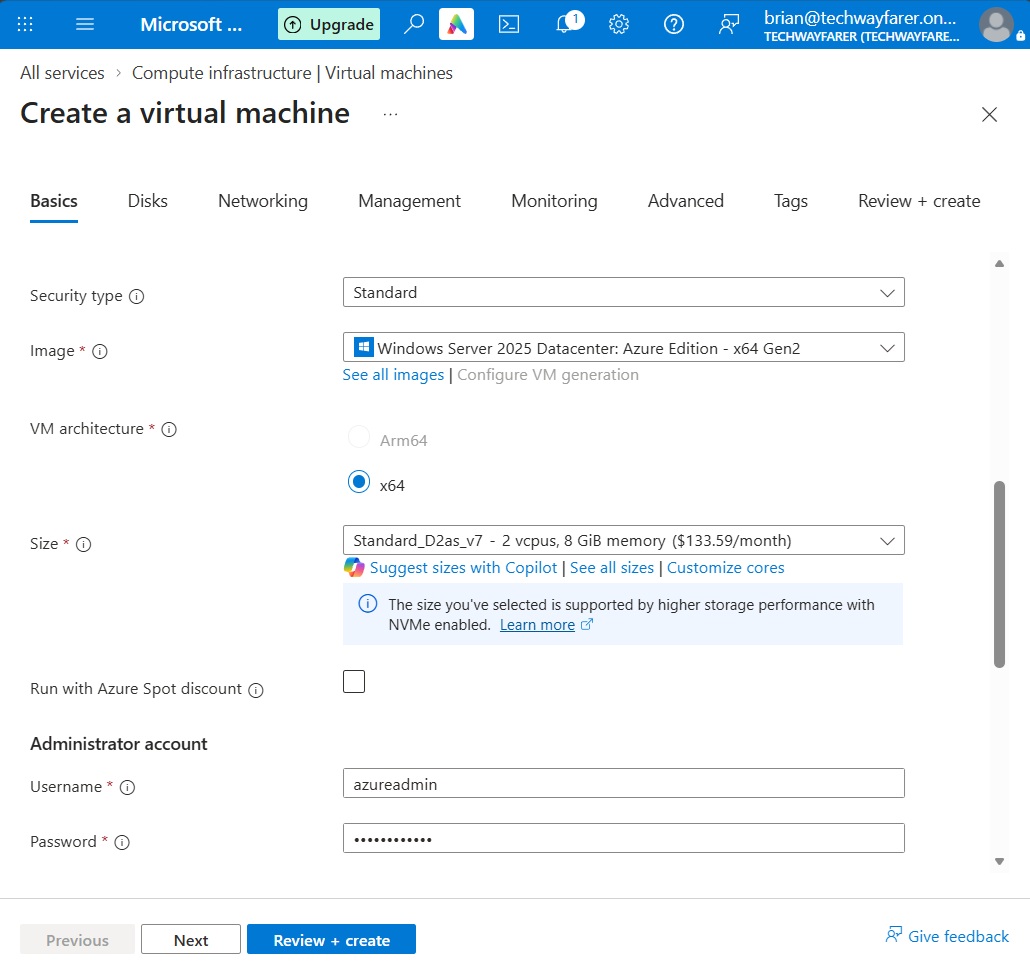
Scroll down. For Security type choose Standard.
For Image we will choose “Windows Server 2025 Datacenter: Azure Edition – x64 Gen2.” And for Size we will choose an option with 2 virtual CPUs and 8 GiB of memory. The monthly cost is not important since the VM will be deleted after the lab is finished.
Under Administrator account enter a Username and Password. Then scroll down.
Under “Inbound port rules” for “Public inbound ports” choose None. We will configure access to the VM in another tab.
Click Next.
VM Disks Tab
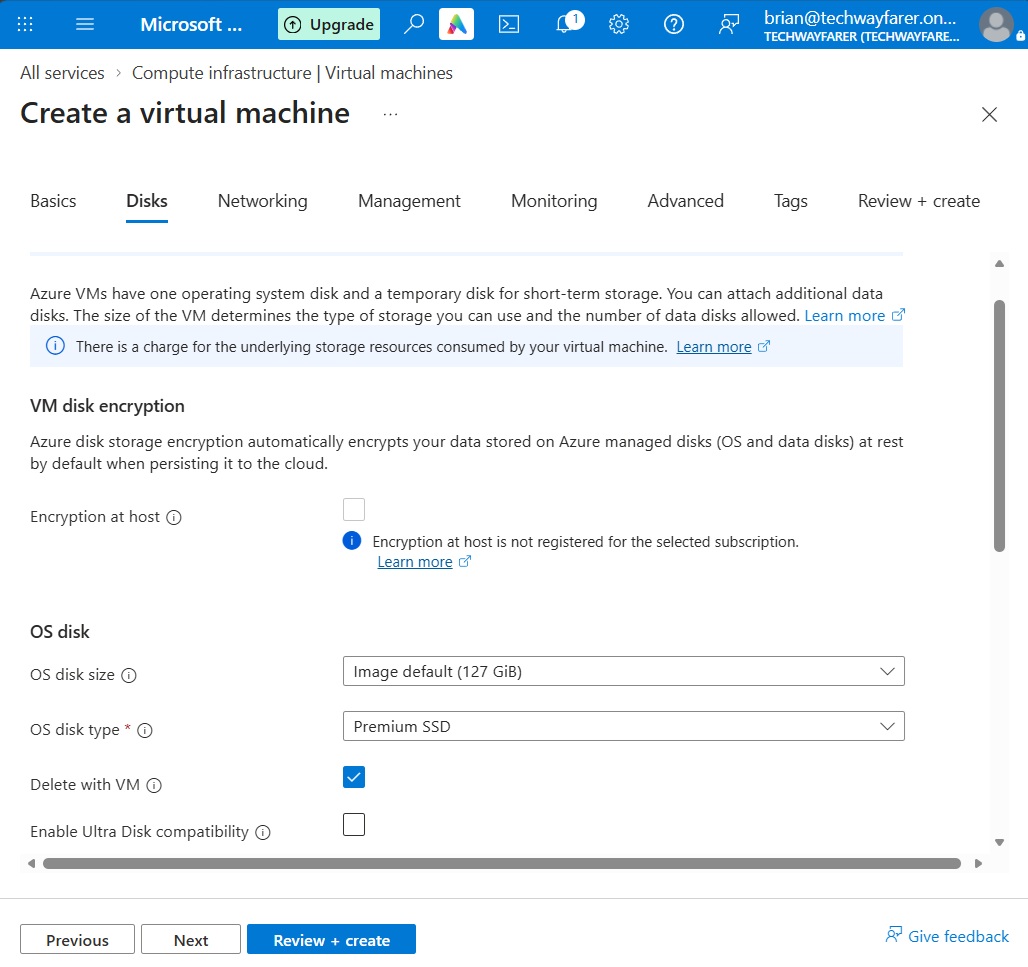
In the Disks tab accept the default settings. It is okay to choose “Premium SSD” for the “OS disk type” since the VM will be deleted after the lab is finished.
Click Next.
VM Networking Tab
The Networking tab opens.
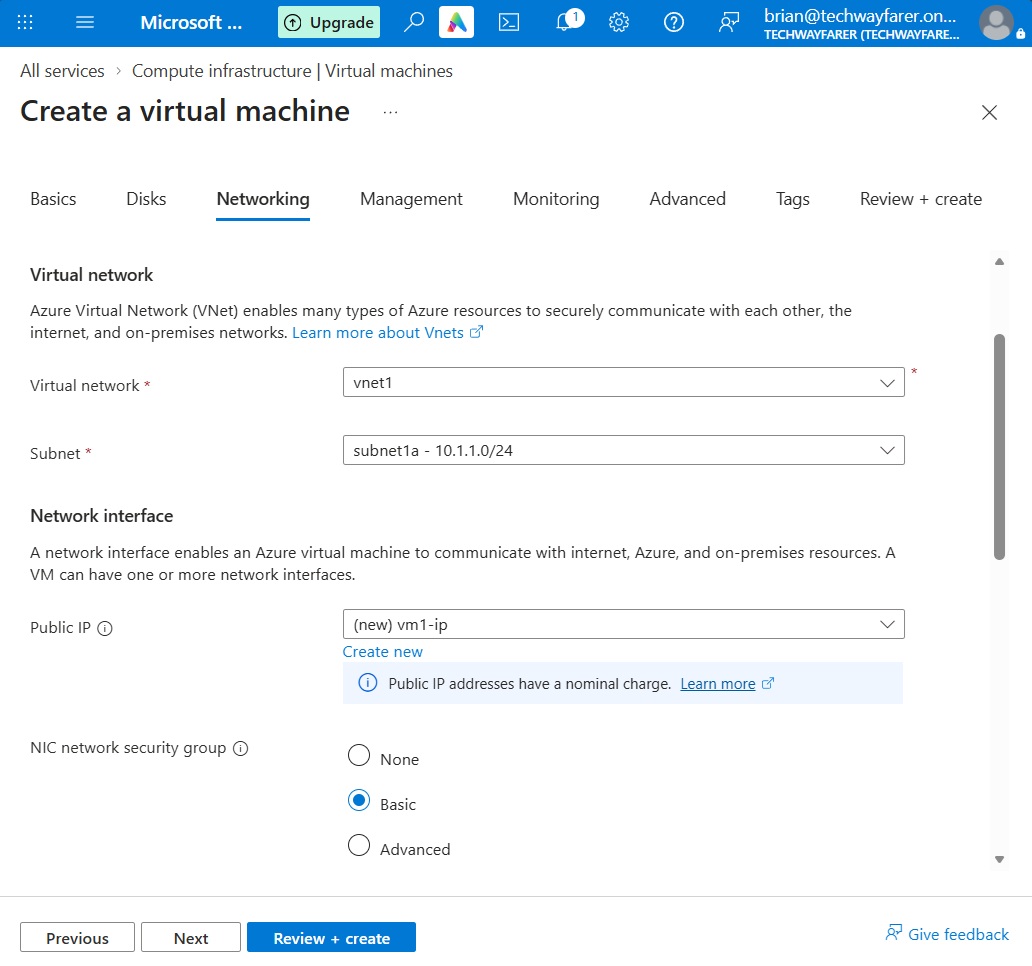
Under the “Virtual network” section, choose the “Virtual network” created earlier (e.g., vnet1). And for Subnet choose one of the subnets created earlier (e.g., subnet1a).
Under the “Network interface” section, for “Public IP” allow a new one to be created. We will need a public IP to login to the VM remotely.
For “NIC network security group” choose Basic.
Scroll down.
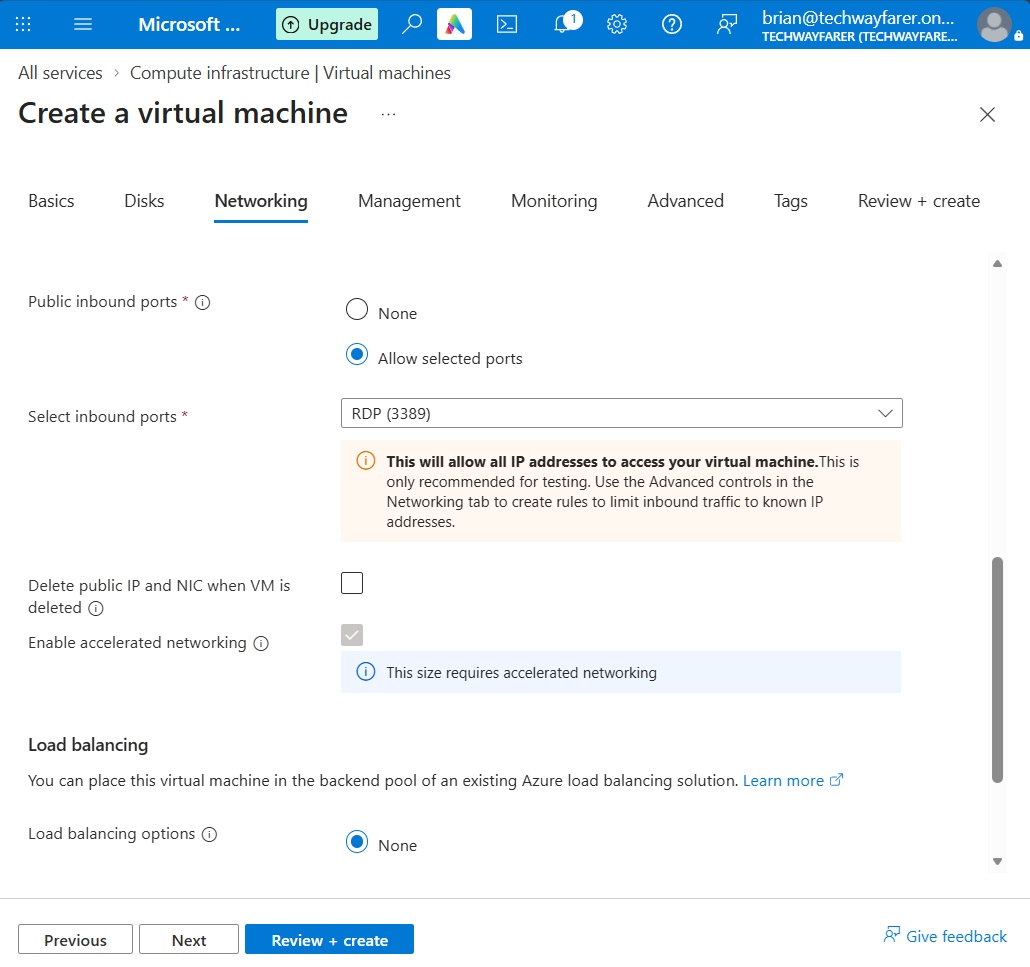
For “Public inbound ports” choose “Allow selected ports.” And for “Selected inbound ports” choose “RDP 3389.” We will log into our Windows VM using remote desktop protocol (RDP) that opens port 3389 on the VM. To avoid opening ports you could also log into the VM using a bastion host, which is not covered in this lab.
Under “Load balancing”, for “Load balancing options” choose None since it it not needed for this lab.
Click Next.
VM Other Tabs
In the Management tab accept the default options and choose Next.
In the Monitoring tab, under Diagnostics choose to disable “Blog diagnostics.” Click Next.
In the Advanced tab accept the default options. Click Next.
In the Tags tab accept the default options and click the “Review + create” button.
VM Review + Create Tab
In the “Review + create” tab a validation test is run. When it finishes, we see a summary of the VM that is about to be created.
A message reminds us that using RDP to remotely connect to the Windows Server will leave a port open on the VM. Since the VM will be deleted when the lab is completed, the message can be disregarded.
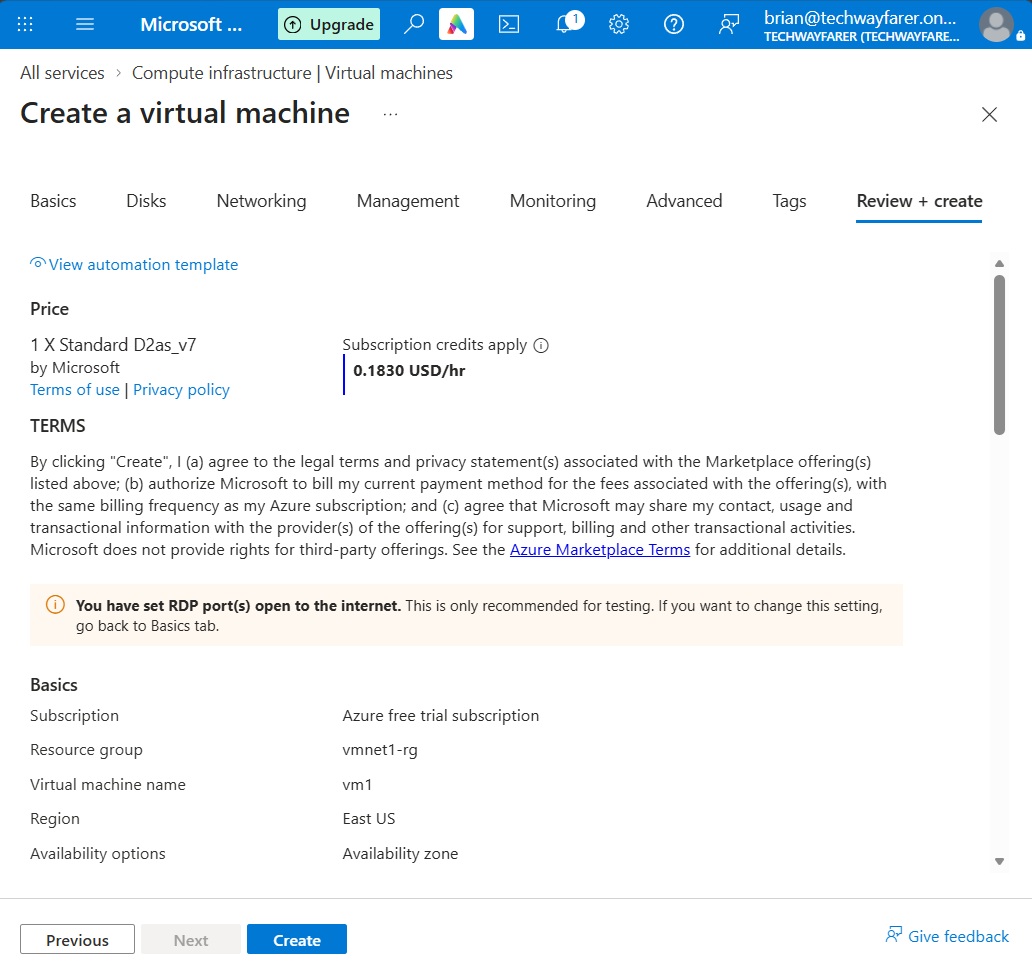
Scroll down and review the settings.
Deploy Virtual Machine
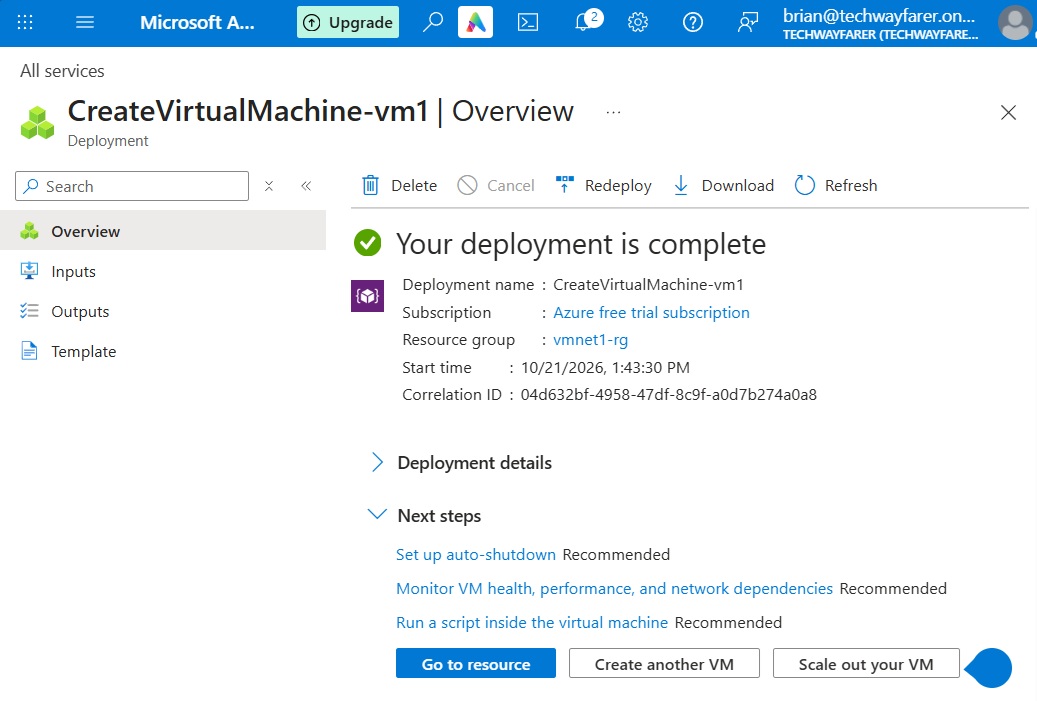
Click Create. The resource deployment in Azure will take a few minutes to complete. After the VM is created a message appears stating “Your deployment is complete.”
View Virtual Machine Details
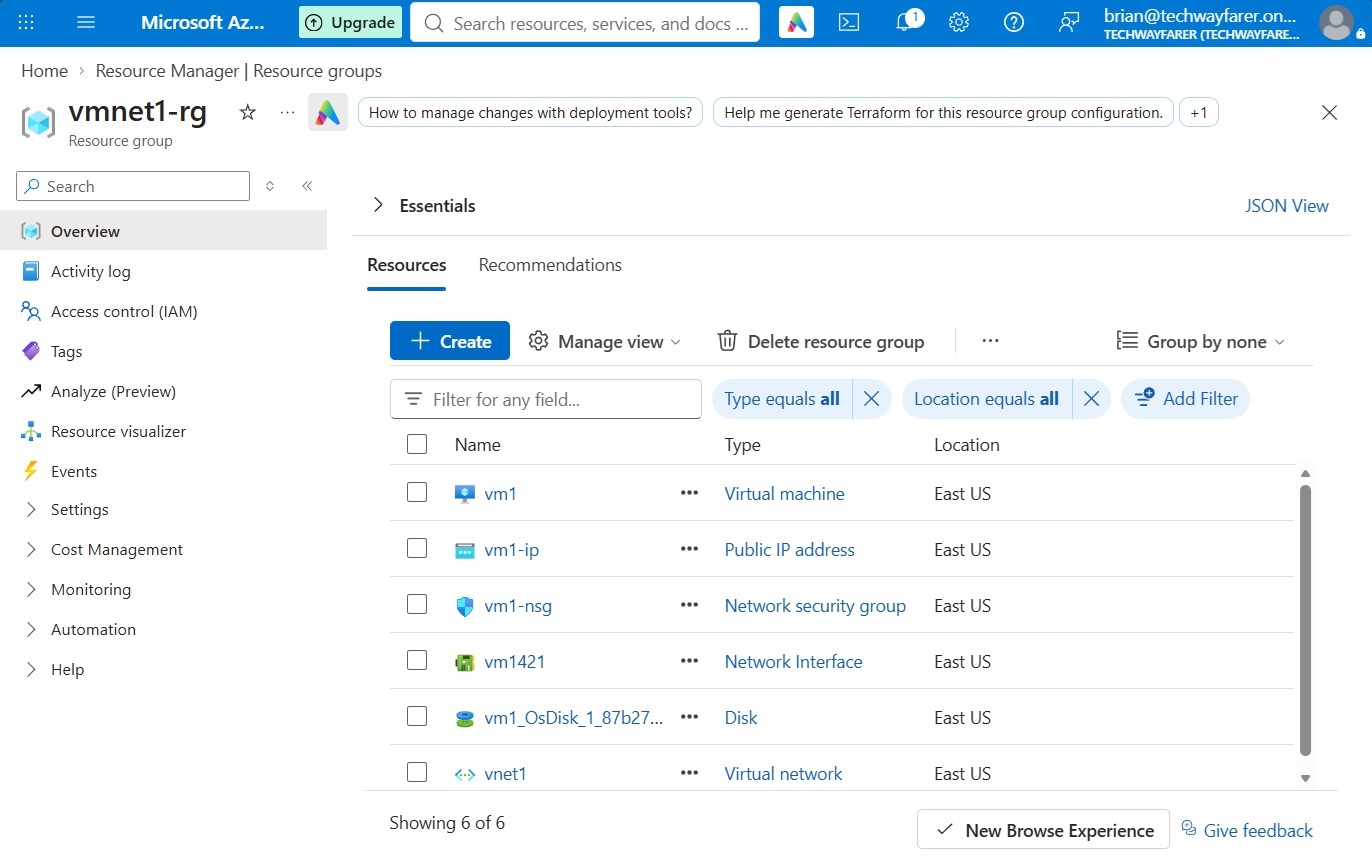
Click on the name of the Resource group (e.g., vmnet1-rg). A page opens with the details of the resource group.
Under the Resources tab are displayed all the resources contained within the resource group. The virtual machine (vm1) requires a public IP address, network security group, network interface, disk, and virtual network.
Login to VM Remotely
While reviewing the details page for the resource group (see above), in the Resources tab click on the name of the virtual machine (e.g., vm1). The details page for the VM opens.
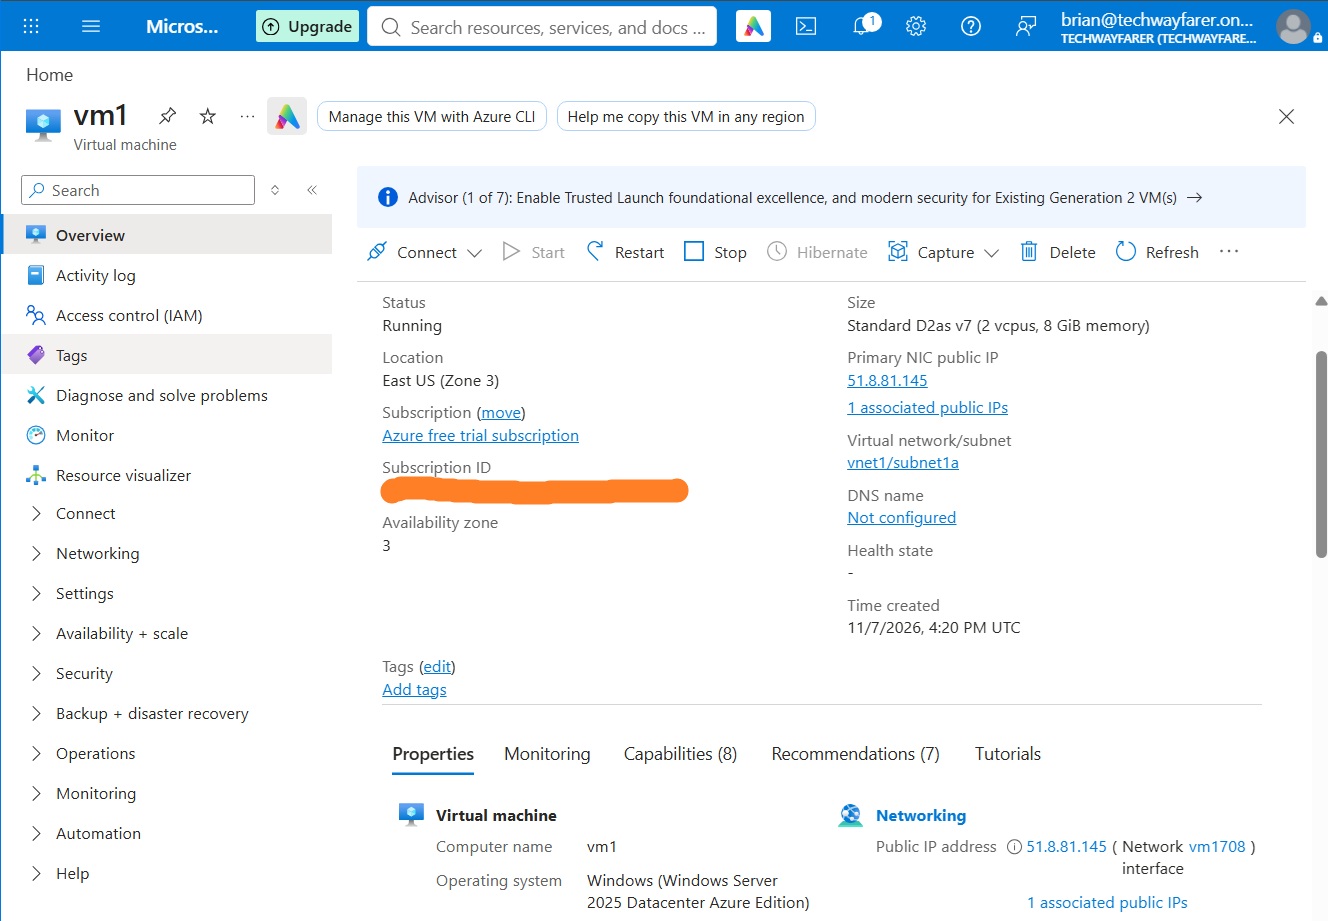
In the top menu click Connect > Connect. The “vm1 | Connect” page opens.
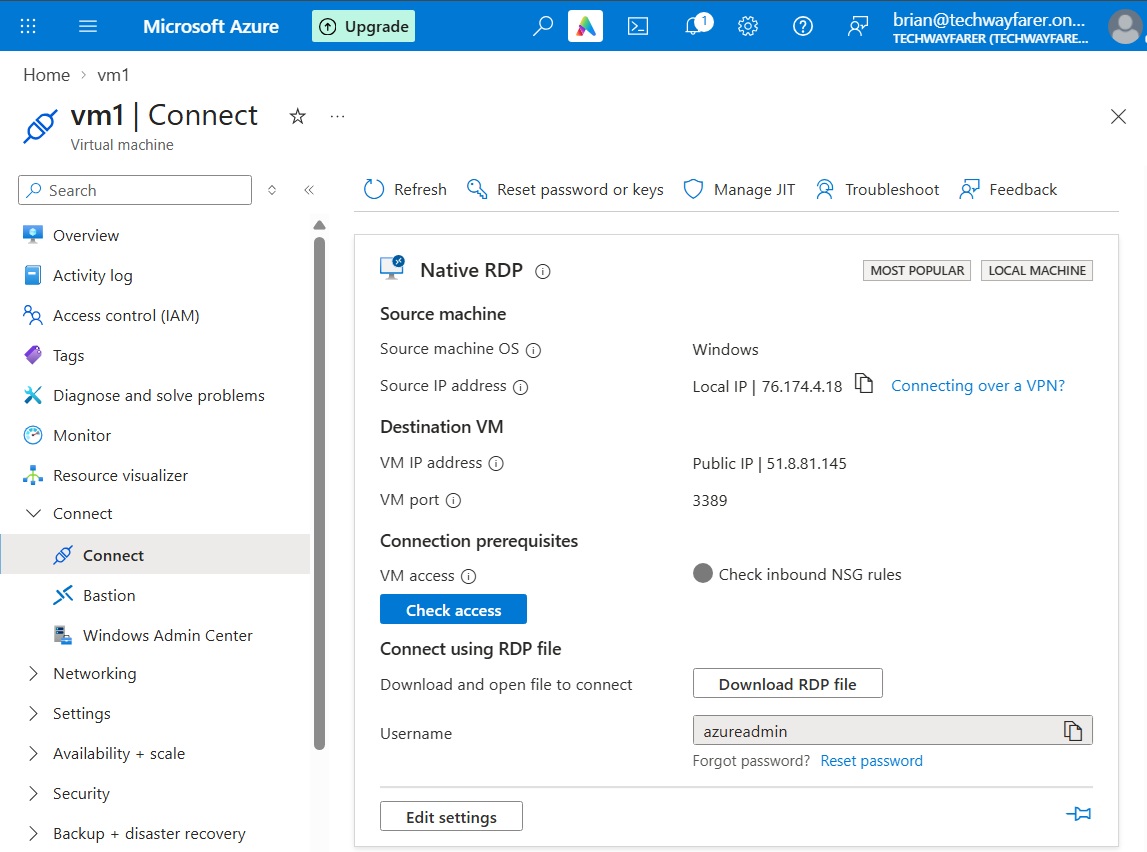
Under “Connection prerequisites” click the “Check access” button to verify that you can access the VM using RDP. After a minute a message appears letting you know that port 3389 is accessible.
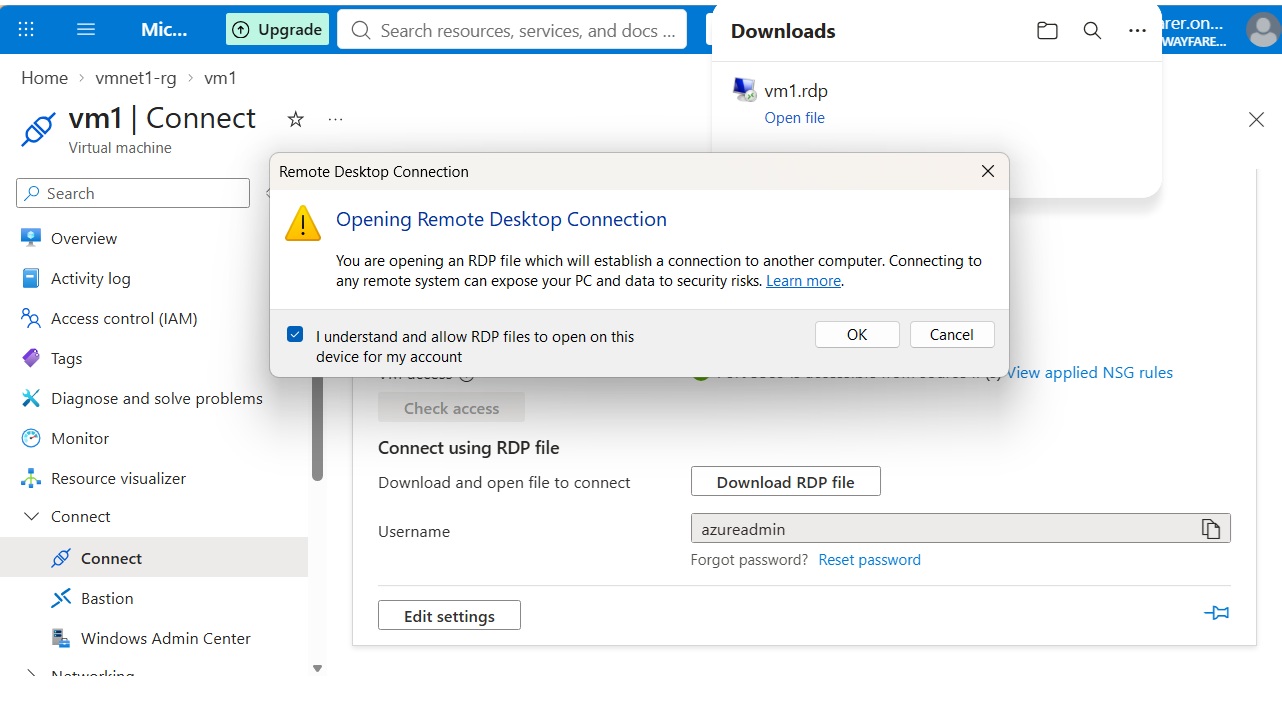
Click the “Download RDP file” button. Download the file onto your computer and open the file. A “Remote Desktop Connection” pop-up window opens. Click OK.
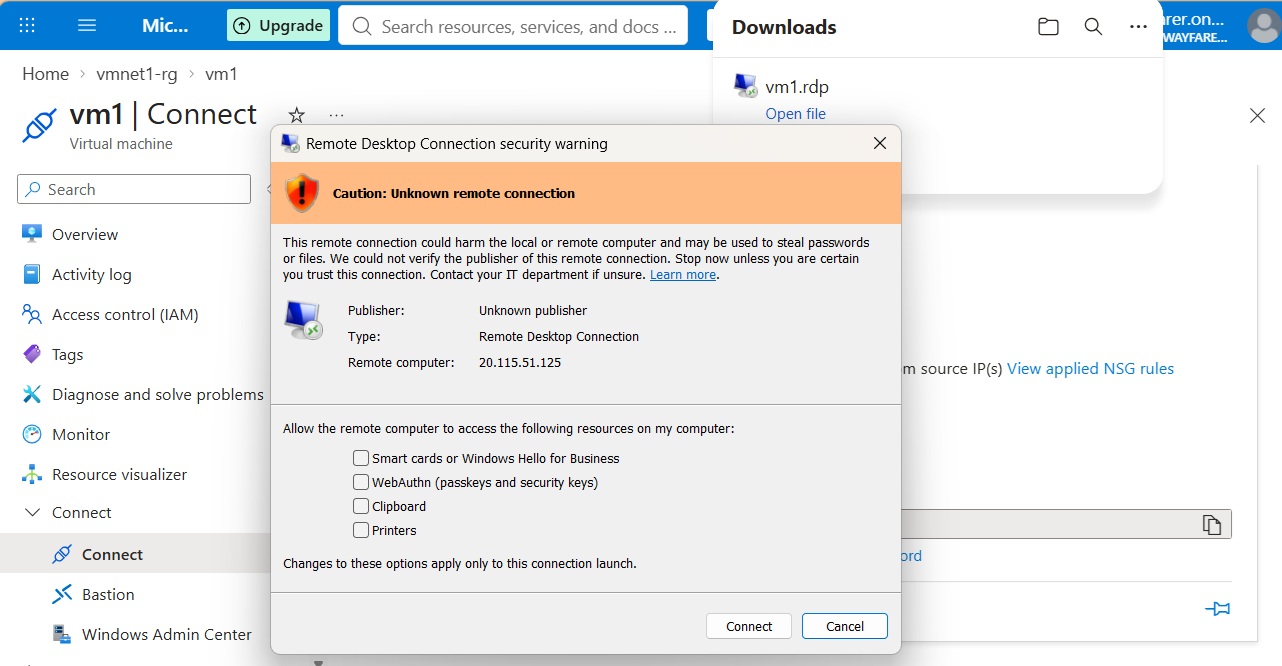
At the “Remote Desktop Connection security warning” window click Connect.
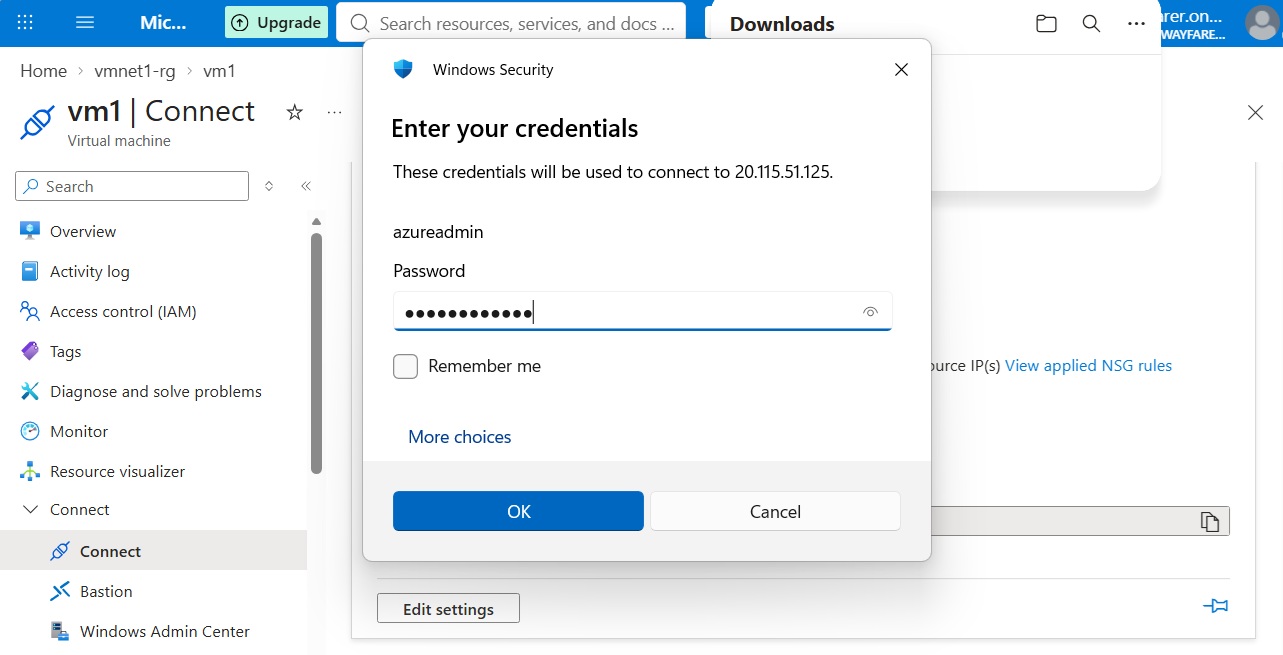
We are prompted to enter a password for the administrator account created earlier. Then click OK.
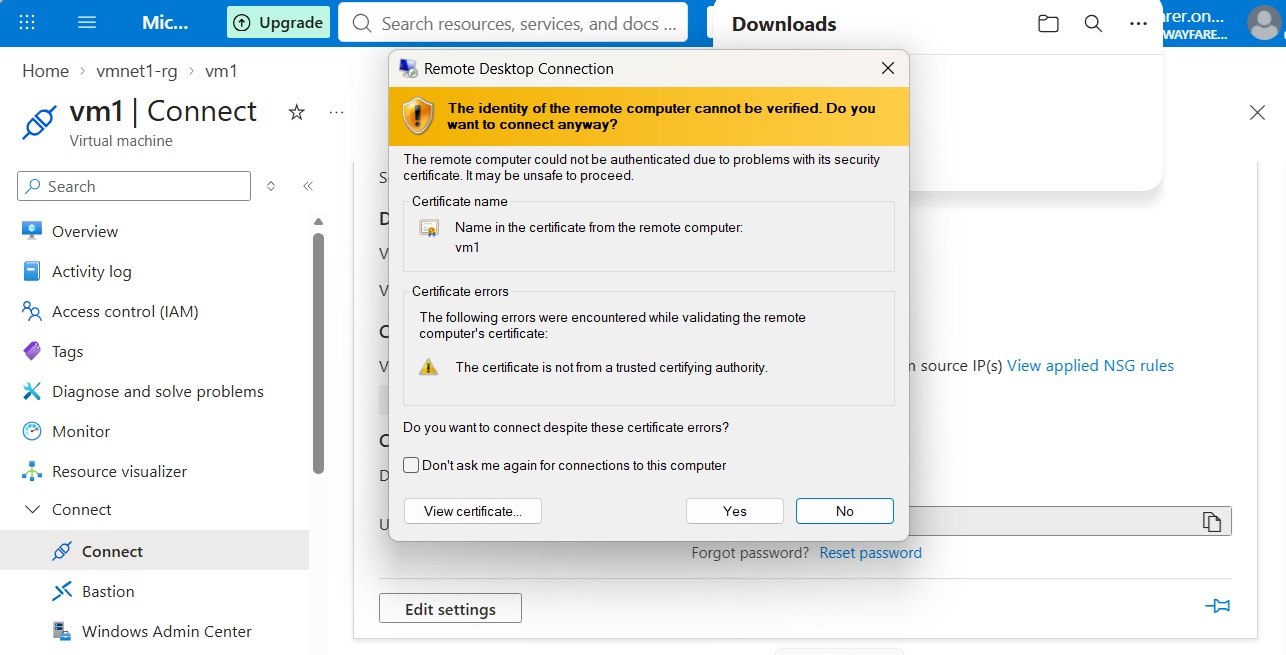
Another warning pop-up appears. Click Yes.
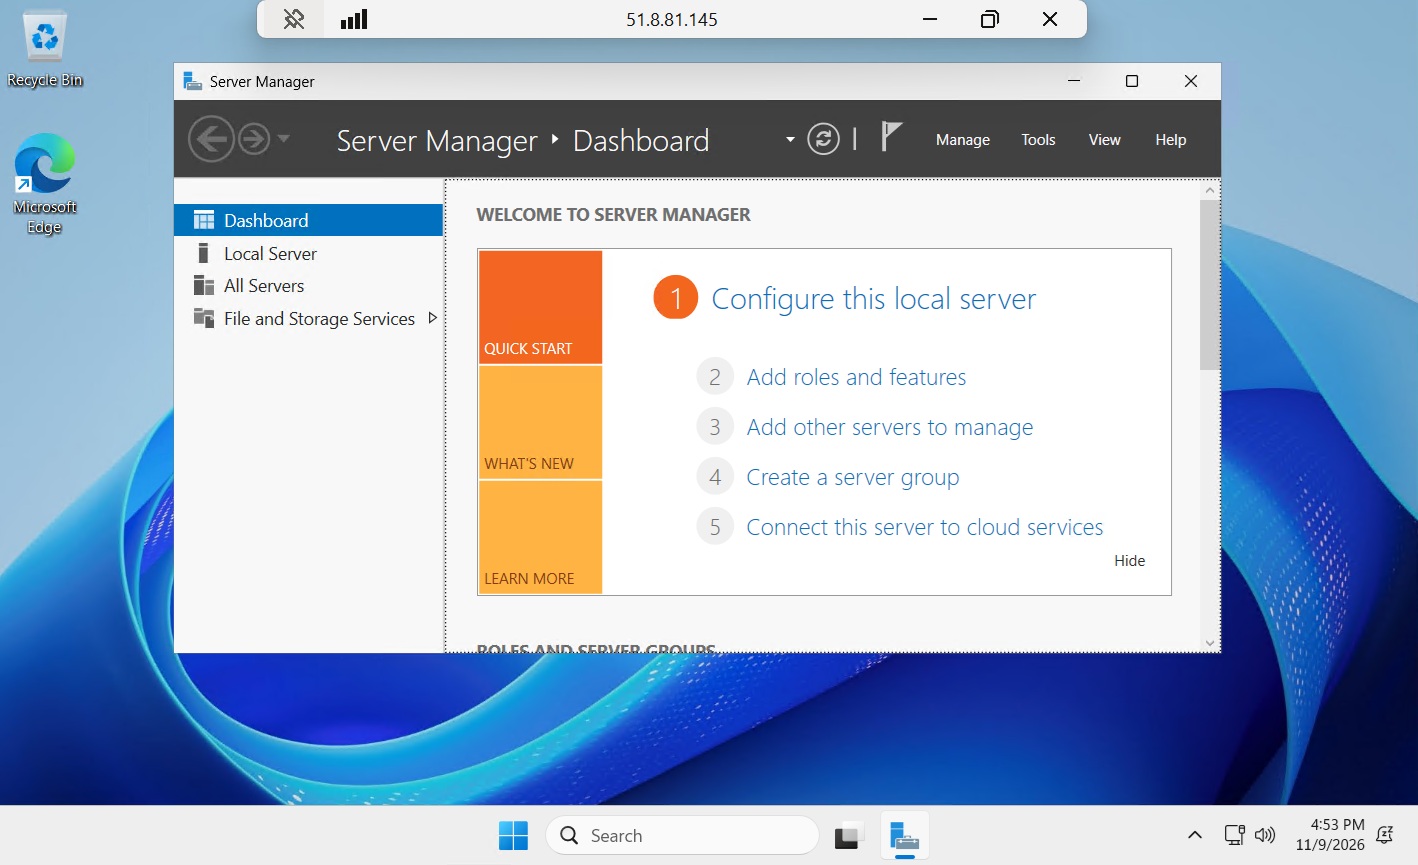
You are logged onto the Windows Server 2025 VM.
Configure Windows Server
In this part of the lab the Windows Server VM will be configured to act as an on-premises Domain Controller (DC) and DNS server. Then in another post Entra Cloud Sync will be installed on Server to synchronize Active Directory (AD) objects with Azure.
This lab cover only the basics of configuring a Windows Server to act as a DC and DNS server. You can reference a previous lab for the detailed steps of configuring a Windows Server.
Rename Server
Open the Server Manager window and open the Local Server section. You can see the default settings for the server.
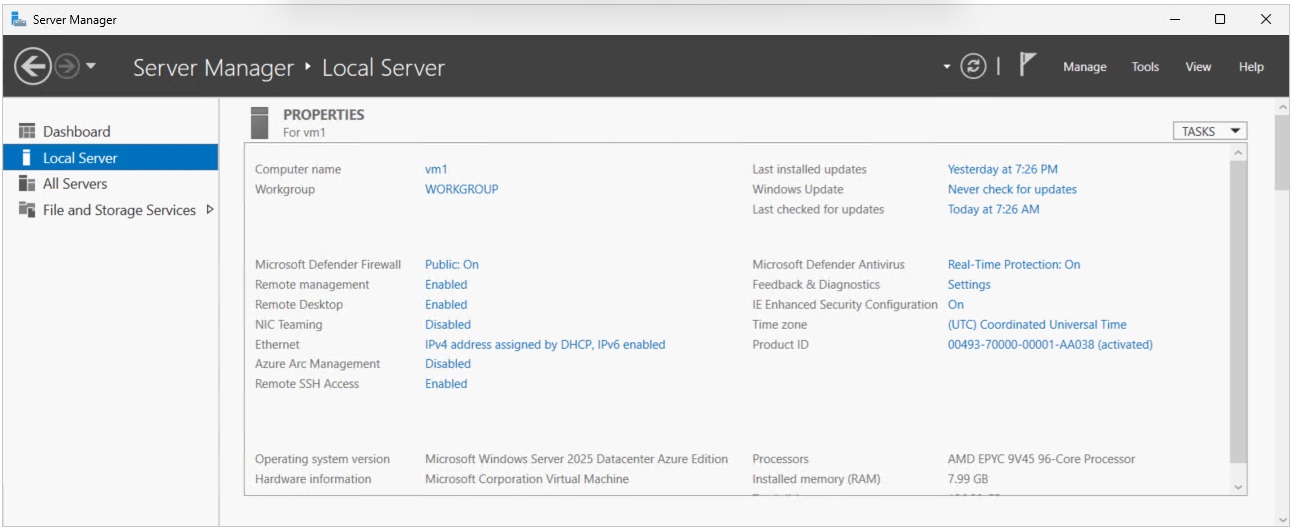
We will change the name of the Windows Server to something more meaningful. Click the hyperlink next to Computer Name. A System Properties window will open with the Computer Name tab selected.
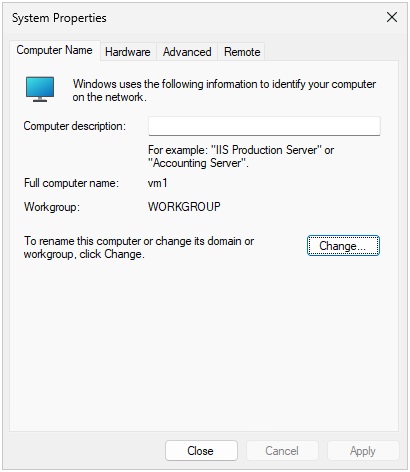
Click the Change button.
The “Computer Name/Domain Changes” window opens. In the Computer name field enter the new name for the server. For now we will leave the server in a Workgroup. The server will be upgraded to a domain controller (DC) later in the lab.
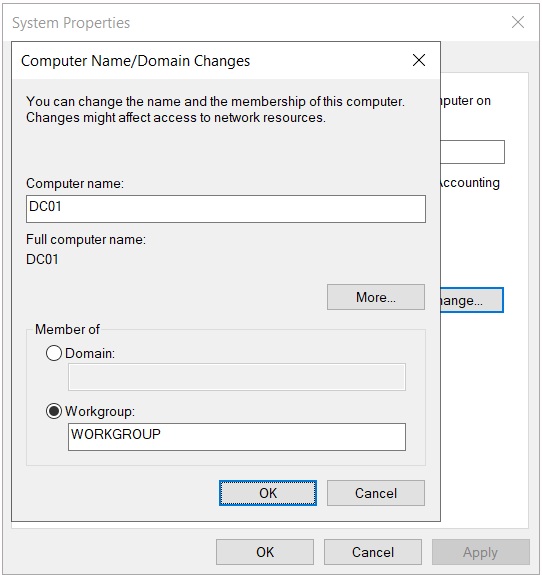
Click OK twice. In the System Properties windows click the Close button. Restart the server for the name change to take effect.
IP Settings
In this section the IP settings of the Windows Server will be modified, so it can act as a DNS server.
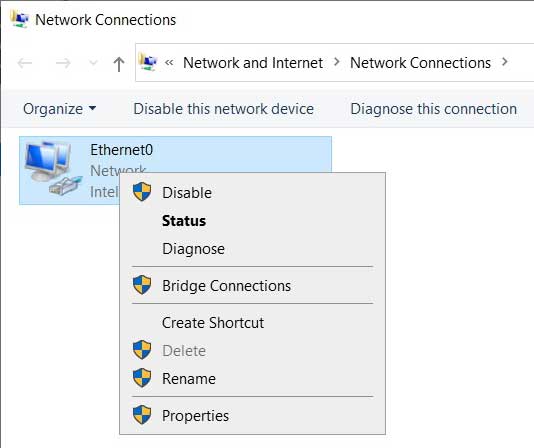
In Server Manager > Local Server click the text next to Ethernet0 to open the Network Connections window. Then right click Ethernet0 and choose Properties.
The Ethernet0 Properties window opens.
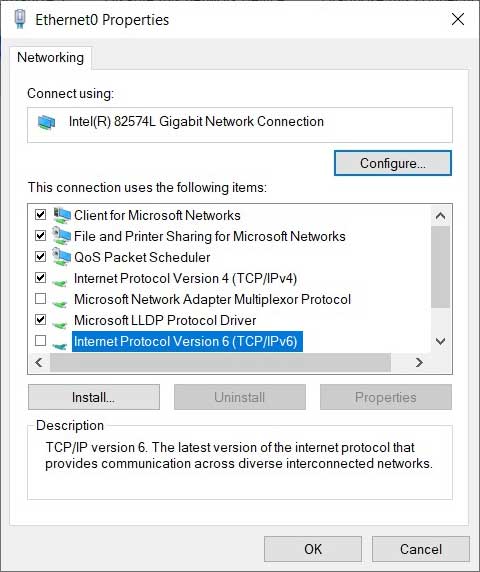
Turn off IPv6 for the server by clearing the check box next to “Internet Protocol Version 6 (TCP/IPv6).” We currently do not have a need for the IPv6 protocol.
Click “Internet Protocol Version 4 (TCP/IPv4)” and then the Properties button. The “Internet Protocol Version 4 (TCP/IPv4)” window opens where we can statically assign an IP address and a DNS server address.
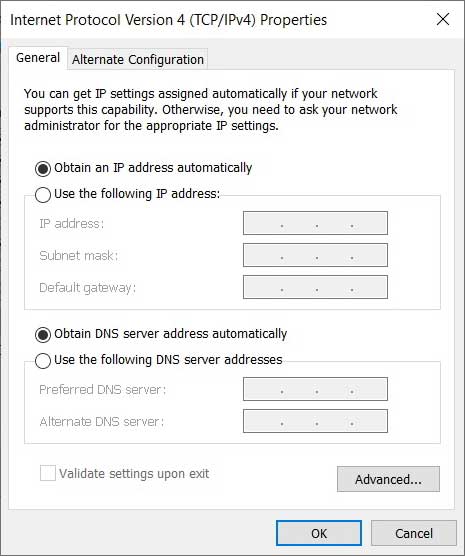
A DC in a real business environment is assigned a static IP address. In another post we walked through the process of deciding upon an IP address for a server and assigning a static address. In this lab, we don’t need to statically assign an IP address since no client devices will be added to the on-premises domain.
When Active Directory is setup later in this post, a DNS database will be created. The server needs to know the address of the DNS server in order to setup the DNS database. Since the Windows Server will become both a DC and DNS server we want the Preferred DNS server field to point to the Window Server, so enter the loopback address (127.0.0.1).
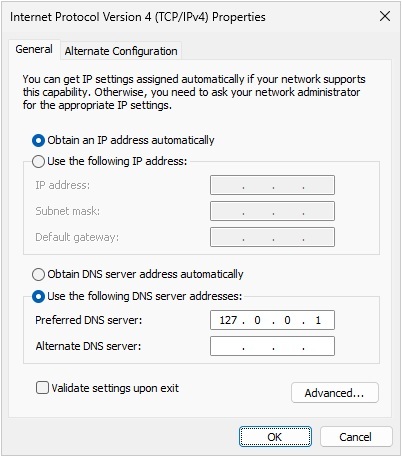
Click OK to close the IPv4 Properties window. Then in the Ethernet0 Properties window click Close.
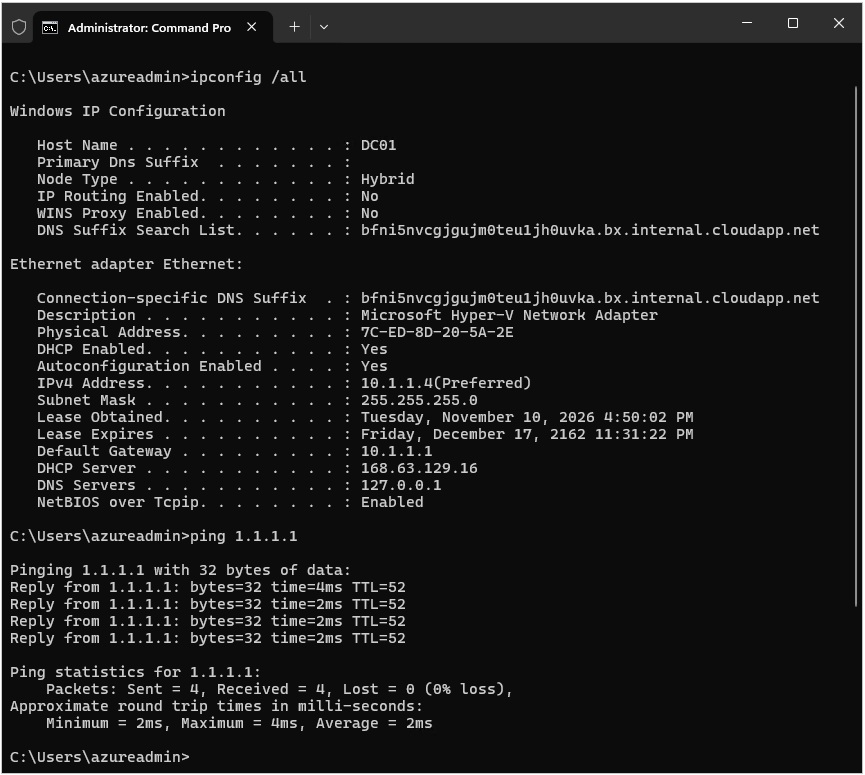
Open the Administrator Command Prompt window.
At the C prompt enter ipconfig /all to verify the changes made to the IP settings.
Then at the next C prompt enter ping 1.1.1.1 to verify that the server has internet access. Even though there is internet access, it may not be possible to visit a website in a browser until the DNS service is installed.
Install Active Directory Domain Services
In this part of the lab Active Directory Domain Services is installed on the server, so that later the server can be promoted to a domain controller.
In Server Manger choose Manage > “Add roles and features” in the top menu.
The “Add Roles and Features Wizard” will open.
In the “Before You Begin” tab click Next.
In the Installation Type tab choose “Role-based or feature-based installation” and click Next.
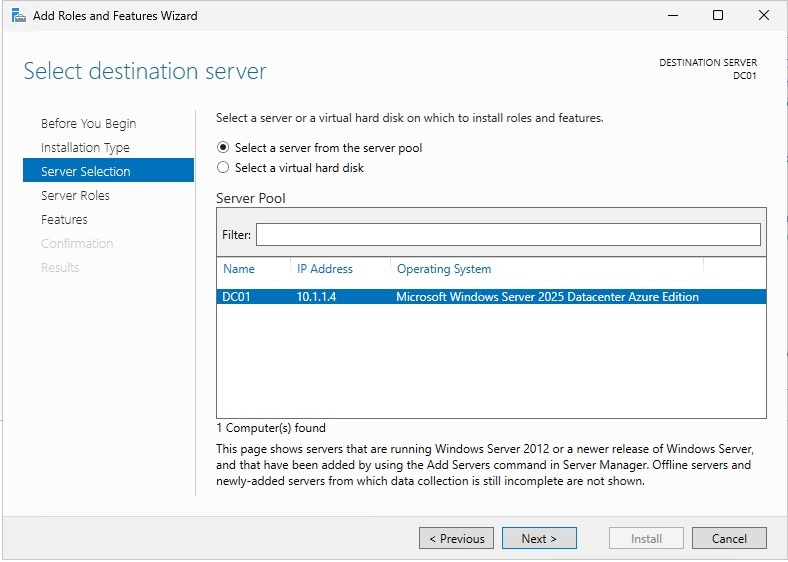
In the Server Selection tab make sure the server you created is chosen from the server pool and click Next.
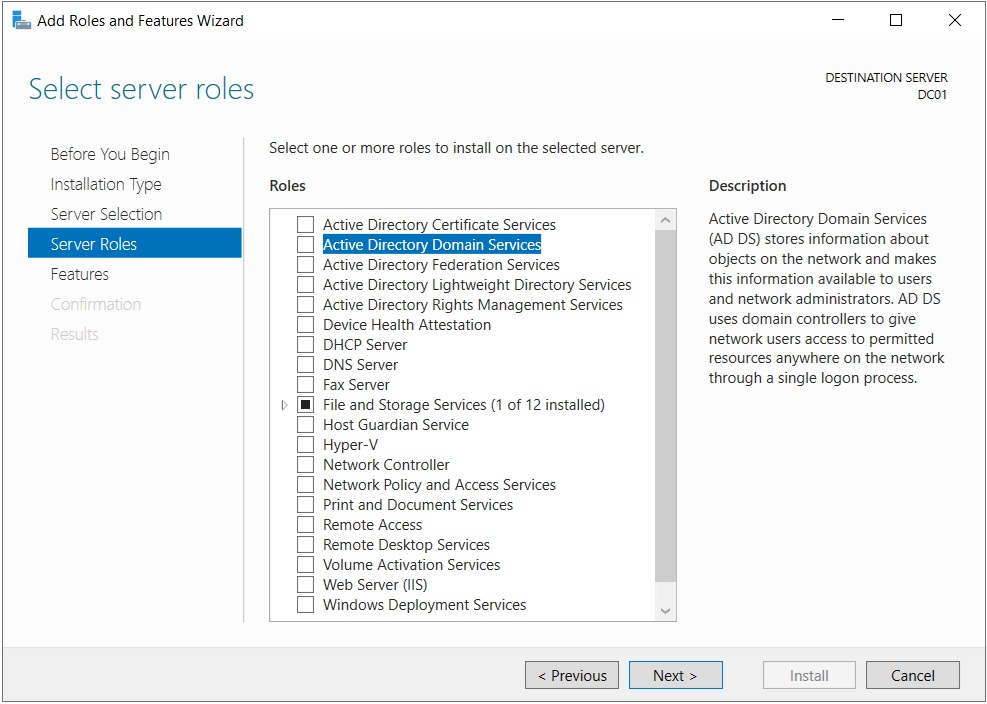
In the Server Roles tab choose “Active Directory Domain Services.”
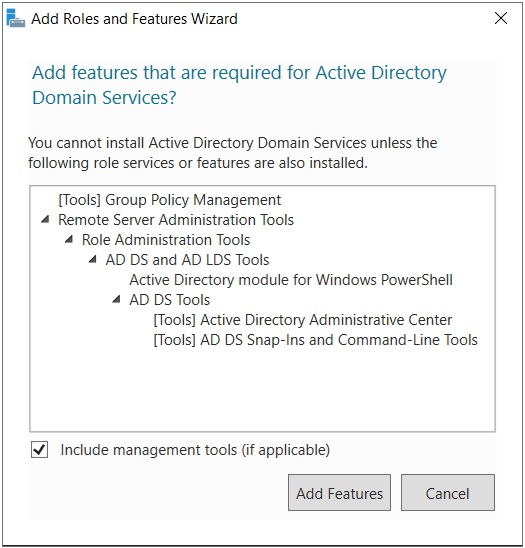
In the “Add Roles and Features Wizard” window click Add Features.
Back in the Server Roles tab click Next.
In the Features tab do not choose any other features and click Next.
The AD DS tab appears since we are installing Active Directory.
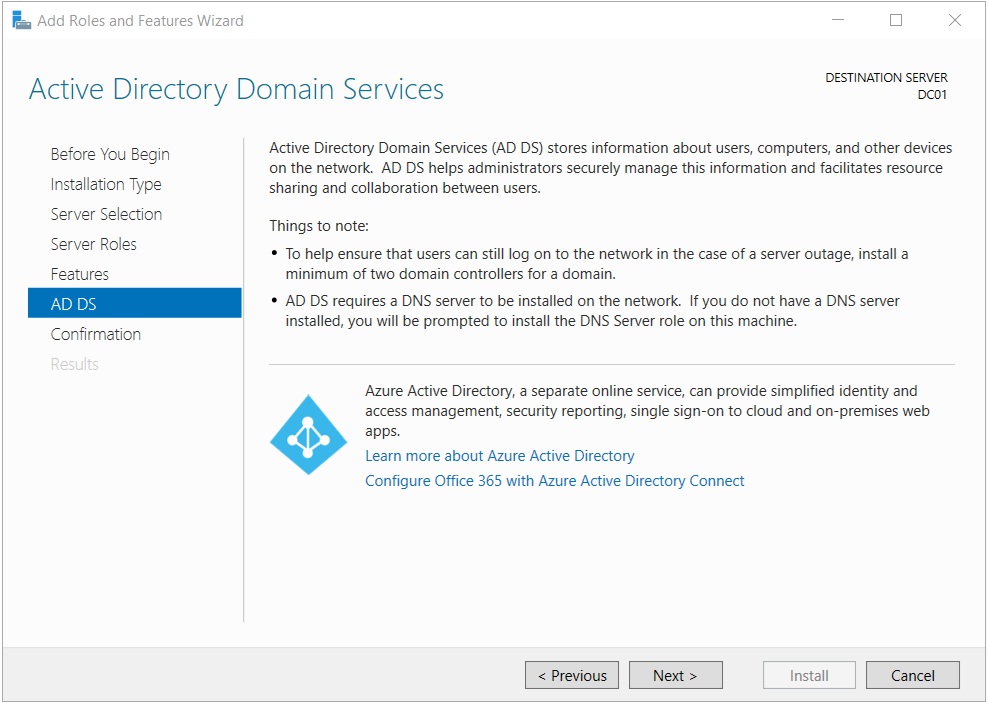
We are reminded that a DNS server is required on the network. Since this is the first server on the network, DNS will be installed. Click Next.
In the Confirmation tab click Install, and the Active Directory software will be installed on the server.
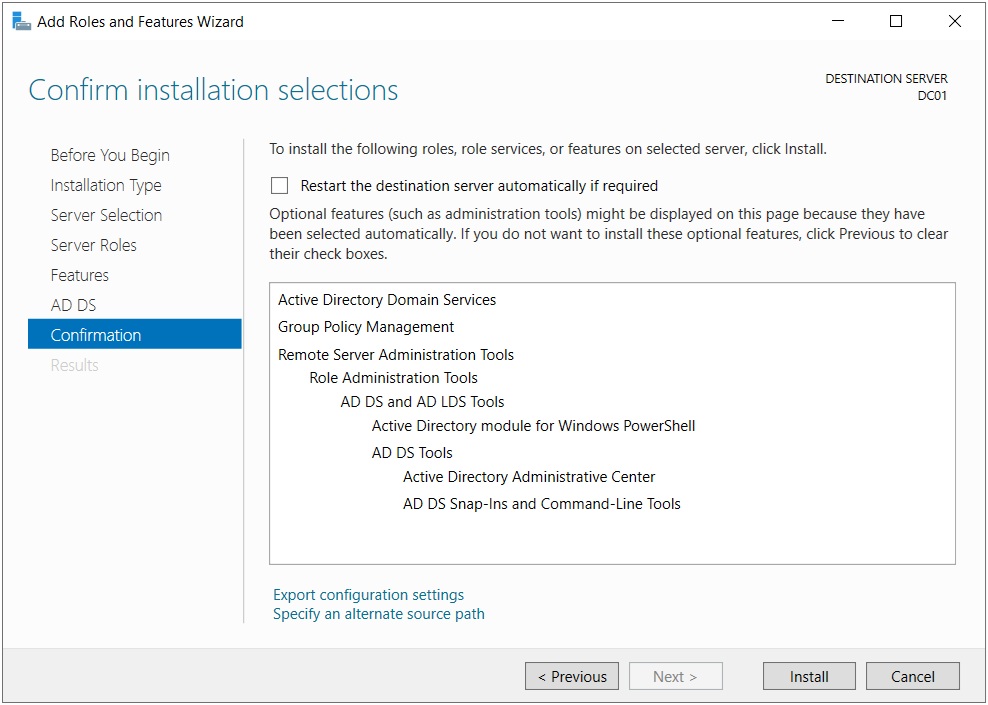
When the Active Directory software installation is complete click Close.
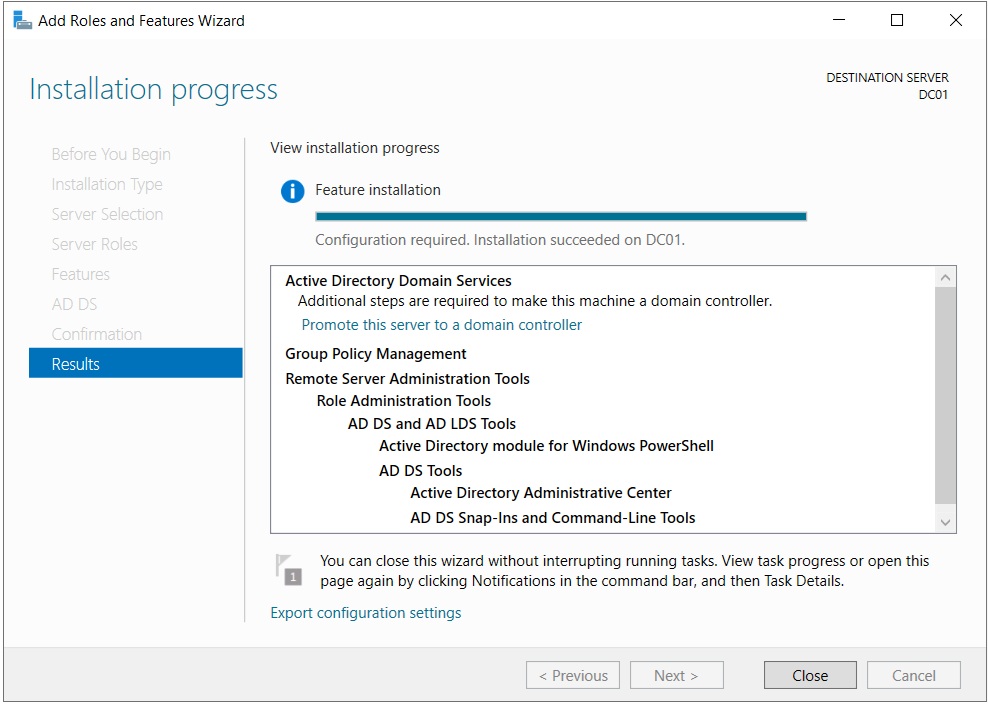
Create a Domain Controller
At this point in the lab the Active Directory software is installed on the server, but the server is not yet a domain controller. In this section we will promote the server to a DC.
Begin by clicking on the notification icon in the top right corner of the Server Manager Dashboard.
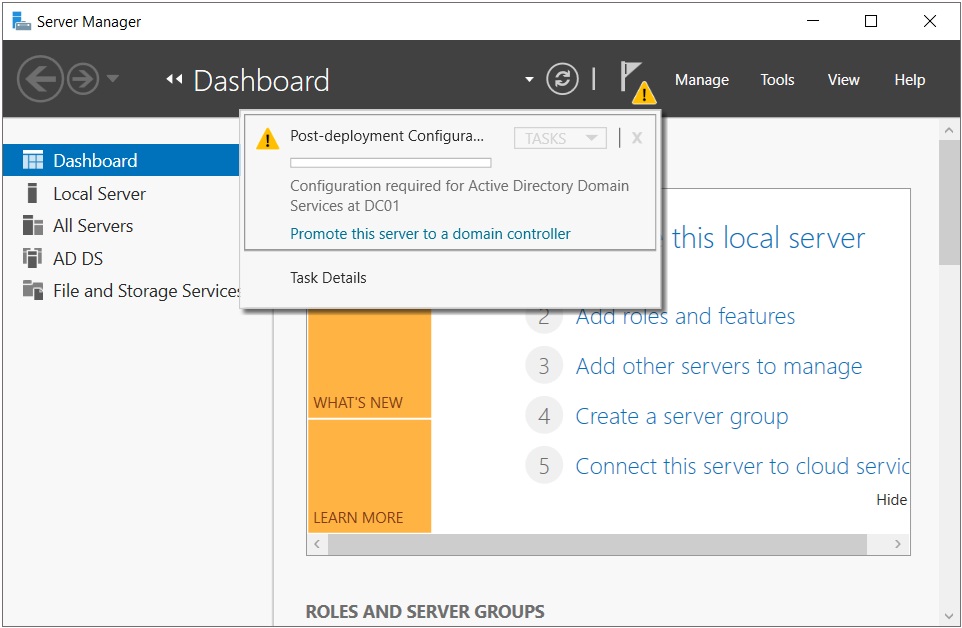
Click the link “Promote this server to a domain controller.” The “Active Directory Domain Services Configuration Wizard” window will open.
In the Deployment Configuration tab chose how to deploy the new DC. Since we have yet to create a domain or a forest, choose “Add a new forest” and enter the name of your new domain.
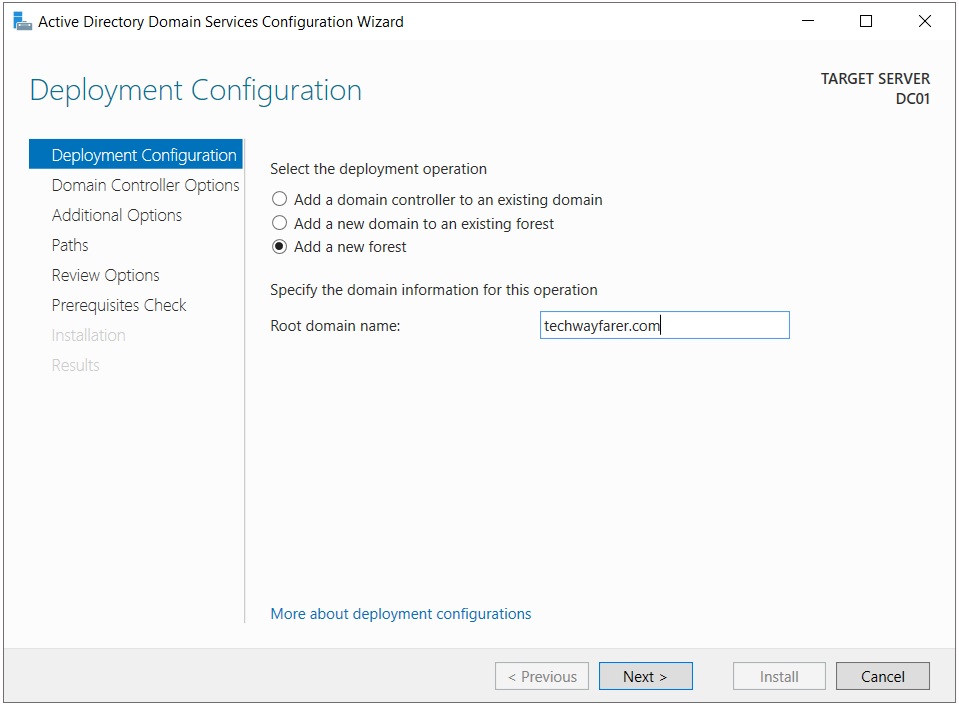
In the “Domain Controller Options” tab begin by choosing the functional level of the domain and forest. A new DC in a forest is constrained by older controllers already in the domain. Since this is a new domain, we can choose the latest functional level, which is Windows Server 2025.
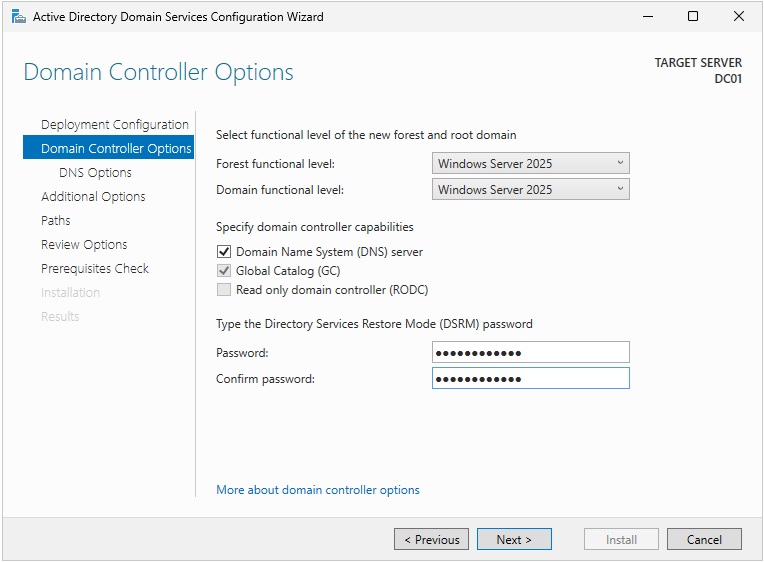
A domain needs a DNS server. So choose to add DNS server capability to our DC.
Choose to add a Global Catalog (GC) in case we decide to add other domains to the forest.
You will have to enter a DSRM password. DSRM provides the option of restoring Active Directory from backup. Then click next.
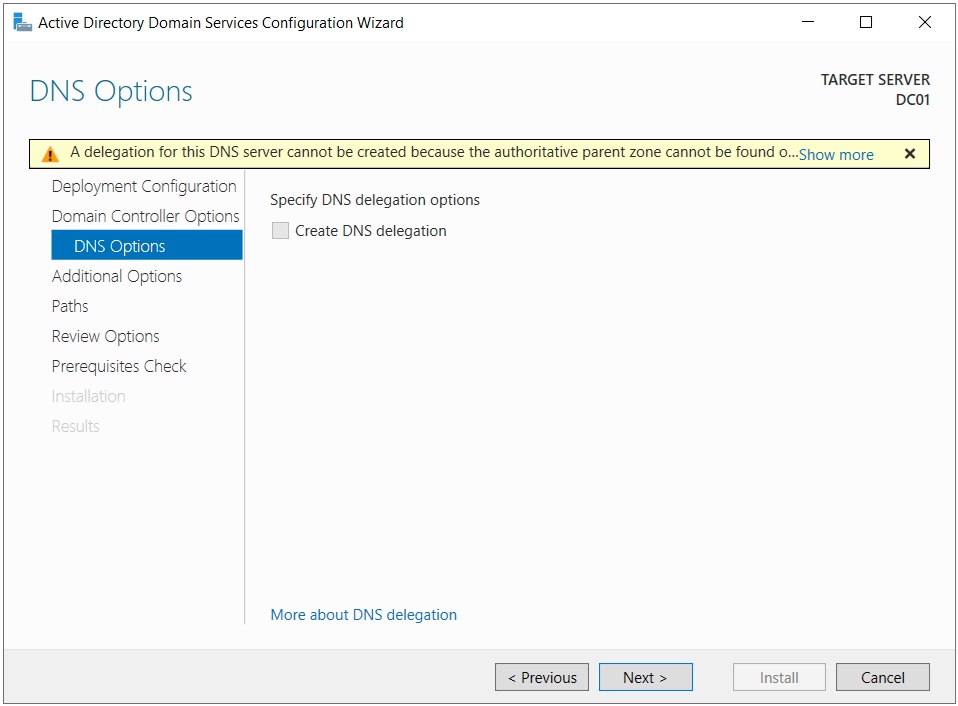
In the DNS Options tab a warning message appears because DNS is not yet installed on the server. Ignore the warning and click Next.
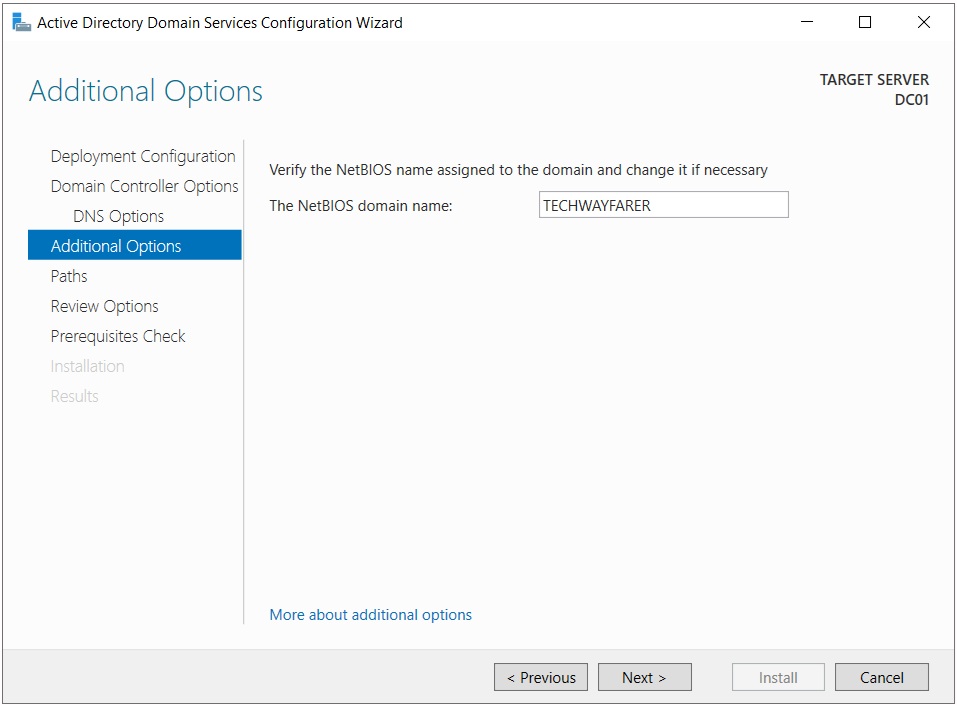
In the Additional Options tab your domain name will autofill in the NetBIOS domain name field. NetBIOS is an older technology used to allow older devices to connect to the domain. Click Next.
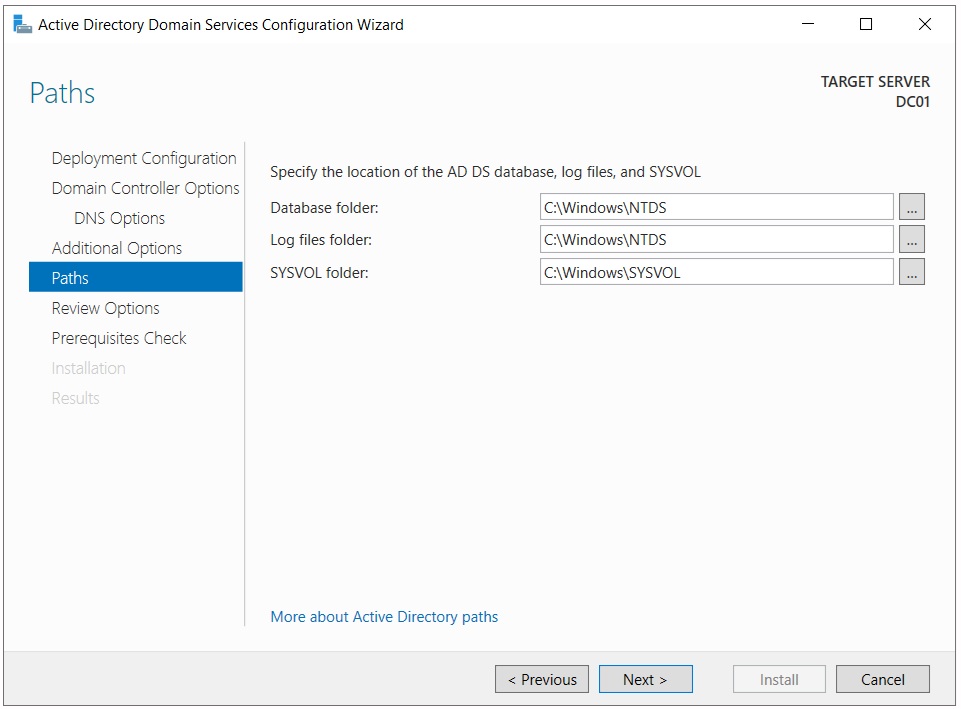
In the Paths tab, you are asked to enter the storage location for the database and logs. Accept the default options and click Next.
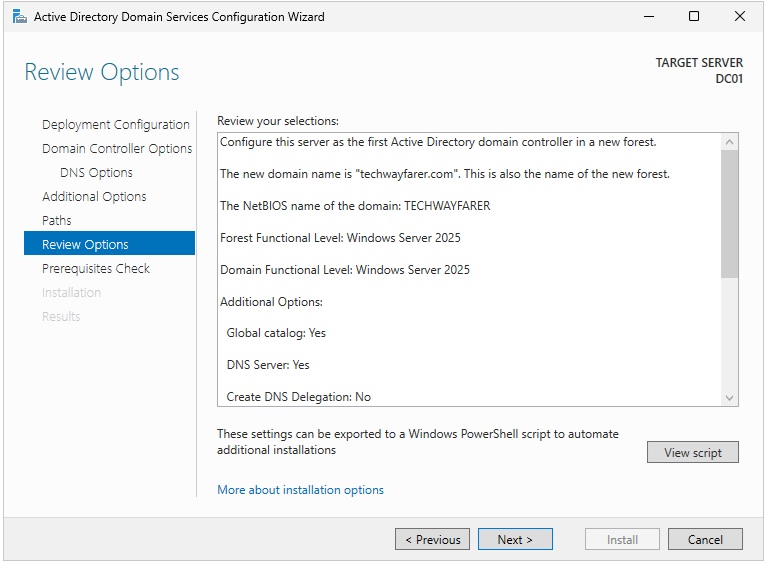
The Review Options tab provides a summary of your configuration choices for the DC. Click Next.
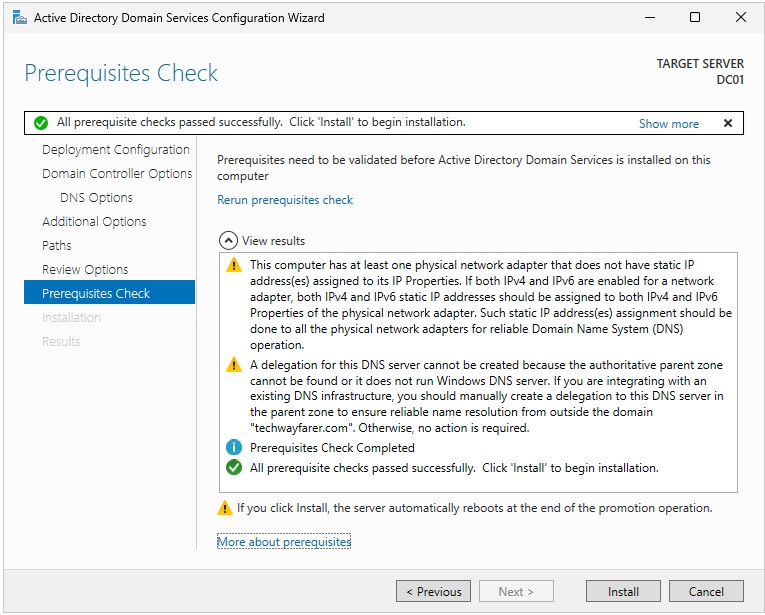
The Prerequisites Check window should indicate that you have passed and can begin installation.
The first warning message about a missing static IP address is not important for our lab. The second warning message about DNS delegation was shown in an earlier screen. We are about to install DNS and make the warning irrelevant.
Click Install to create the DC.
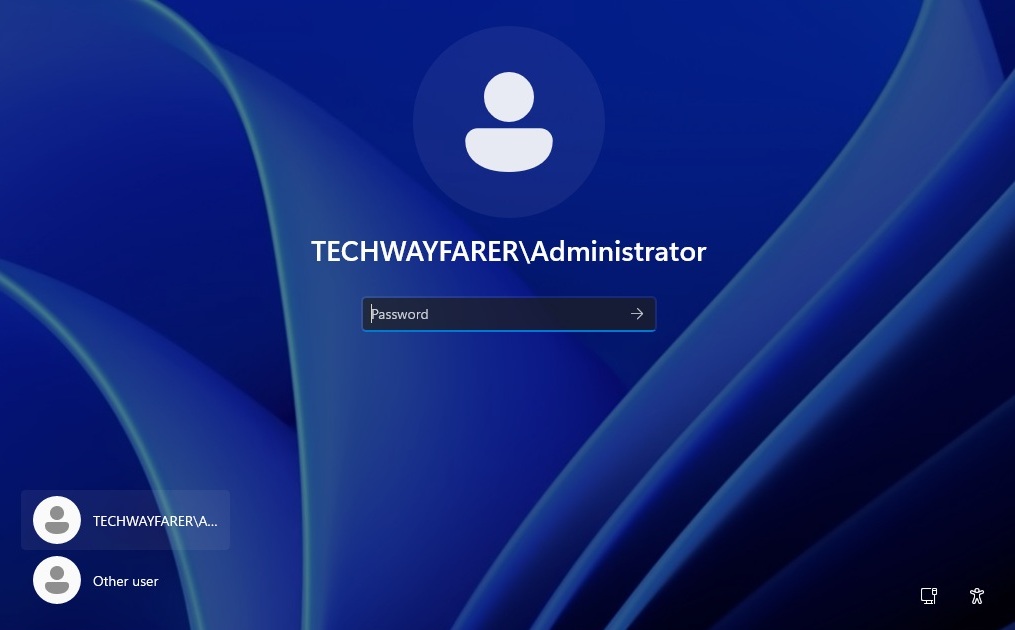
When the installation is finished the VM will reboot. The login screen will change to reflect that the Windows Server is now part of a domain (e.g., TECHWAYFARER\Administrator).
When Windows Server was installed earlier in the lab, a local administrator account was created. You can login to the domain using your previously created password.
Conclusion
We are done creating a virtual machine in Azure.
Key Takeaways:
- The Azure management hierarchy is composed of management groups, subscriptions, resource groups, and resources.
- The Azure global infrastructure is composed of geographies, regions, availability zones, and data centers.
- When creating a virtual machine in Azure, first create a resource group. Then create a virtual network. And finally create the VM.
- When creating a VN in Azure it is common practice to use a 10.x.x.x address space to avoid IP address conflicts between on-premises and cloud resources. The address space often uses the 10.x.0.0/16 CIDR range and the subnets use a /24 range.
In the next post we will install and configure Microsoft Entra Cloud Sync on an on-premises Windows Server.
Next Post >> Microsoft Entra Cloud Sync Installation and Configuration