A ticketing system is the backbone of an effective IT support operation. It transforms the noise of incoming support requests into an organized, trackable, and accountable workflow. Without an efficient ticketing system issues fall through the cracks, users get frustrated, and the IT department earns a reputation for being unresponsive.
This post covers IT ticketing systems, from the fundamental concepts to the best practices for keeping the queue clean and users happy. Jira Service Management will be used to illustrate some of the key concepts.
Table of Contents
- What is an IT Ticketing System?
- Key Components of an IT Ticketing System
- How to Properly Log a Ticket
- Ticket Lifecycle
- Service Level Agreements (SLAs)
- Best Practices for a Ticketing System
- Choosing a Ticketing System
- Jira Service Management
- Conclusion
What is an IT Ticketing System?
A ticketing system is a tool used by IT support teams to track, manage, and resolve support requests efficiently. A ticketing system streamlines communication, provides transparency, enhances productivity, increases response times and user satisfaction, and organizes workflows.
An effective ticketing system allows users to easily create a support request and receive frequent updates on the status of the request. Every request is logged into a system, allowing the IT support staff to prioritize and organize the workload of outstanding tickets.
Most IT ticketing systems use software to convert every incoming support request into a structured record called a ticket. Each ticket functions as a digital case file, capturing all relevant details about the issue.
The key processes in a ticketing system are:
- Intake – requests are received and logged.
- Triage – requests are prioritized and assigned to technicians
- Escalation – challenging and important tickets are escalated to technicians with the expertise to resolve the issue.
IT support departments rely on ticketing systems to:
- Identify who created the ticket and when it was submitted.
- Identify the device or system involved.
- Prioritize new tickets based on the urgency level in resolving the issue.
- Categorize tickets.
- Assign work to the right technician.
- Hold technicians accountable for their assigned tickets. When every request has a unique identifier and an assigned owner, nothing gets lost in someone’s email inbox.
- Track progress in resolving each issue.
- Enforce response deadlines to increase user satisfaction.
- Communicate with users directly through the ticket interface.
- Organize workflows for resolving support requests.
- Maintain historical records for auditing.
- Generate performance reports.
- Document everything done on support requests including troubleshooting steps, communication with the user, and ticket resolution. Then the documentation can be referenced when a similar issue occurs, the issue is escalated to a new technician, or management wants to analyze trends in recurring problems.
Some of the most widely used ticketing platforms in the industry today include:
- Jira Service Management bridges the gap between IT support and software development teams. We will look at Jira in more detail later in this post.
- ServiceNow is a heavyweight enterprise platform used by large organizations with complex ITSM needs.
- Freshservice is a cloud-native tool known for its clean interface and ease of configuration.
- Zendesk is popular among organizations that want a ticketing solution with strong customer service roots.
- Spiceworks is a free option that is a common starting point for small IT teams and MSPs.
Key Components of an IT Ticketing System
While different platforms have their own terminology, the following components appear in virtually every major ticketing system.
Ticket ID
Every ticket is assigned a unique identifier, or reference number, the moment it is created. It may be numeric (e.g., #8675) or alphanumeric (e.g., TW-2026-0812). Support technicians refer to the ticket ID in their communications with users, in escalation emails, and in management reports. The ticket ID is also used for searching historical records.
Reporter Information
The reporter is the person who has an issue and opens a ticket. The reporter’s contact information is recorded on the ticket such as name, email, department or business unit, phone number, and employee ID. Technicians can contact the reporter to gather more information or provide status updates.
Reporter information also helps IT teams analyze ticket data over to identify departments with recurring issues, users who may need additional training, and patterns that point to systemic problems.
Issue Categories
Categorizing tickets enables IT teams to route incoming work to the right people and generate meaningful metrics about the demand for support resources. Standard top-level categories include:
- Hardware – physical devices such as laptops, monitors, printers, and peripherals
- Software – application errors, licensing questions, and installation requests
- Network – connectivity problems, VPN access, and bandwidth issues
- Security – malware, phishing, account compromise, and access anomalies
- Access management – password resets, new account provisioning, permission changes, and offboarding tasks
Creating subcategories within each top-level category allows more granular classification, which is helpful for trend analysis and automating ticket routing.
Priority Levels
The priority level of a ticket determines how quickly a technician is expected to respond to an issue and resolve it. Assigning the correct priority levels to tickets is essential to resolving issues in the correct order.
Not all issues carry the same weight. For instance, a server outage affecting hundreds of employees demands an immediate response, while a request to install optional software can wait.
When priority levels are assigned correctly critical business operations are addressed immediately, and less urgent work is handled in an orderly queue. When priority assignment is handled incorrectly then either: (1) everything becomes “urgent” and the support agents waste time focusing on unimportant issues, or (2) genuinely critical issues sit unaddressed because someone underestimated their impact.
Priority is typically set based on two factors:
- Urgency indicates the time-sensitivity of the issue.
- Impact indicates how many people or how much of the business is affected by the issue.
A reliable approach to priority assignment is a two-axis matrix that scores each issue on urgency and impact independently, then combines those scores into an overall priority rating. Most organizations use a four- or five-tier priority scale.
| Priority | Impact | Example Scenario | Standard Response Time | Standard Time to Resolve |
| Highest / Critical (P1) | Organization-wide or business-critical system, no known workaround | A core ERP system is down, and no one can process transactions. | 30 minutes | 4 hours |
| High (P2) | Serious problem, significant functional impact, affects large user group | The sales team’s CRM is inaccessible during a quarter-end push. | 1 business hour | 8 business hours |
| Medium (P3) | Default priority, minor issue, low time sensitivity, affects single user or small group, workaround available | An employee’s laptop has a broken keyboard, but they have a spare. | 4 business hours | 24 business hours |
| Low (P4) | Minor issue with easy workaround | A typo exists on the company website | 8 business hours | 48 business hours |
| Lowest (P5) | Trivial issue, non-pressing, convenience, future need | A request to install a new font package for design work. | 24 business hours | 60 business hours |
A few principles help teams apply these levels consistently.
- Impact generally outweighs urgency when the two conflict. A server that fails silently at 3 AM is critical even if no one has called in yet.
- Priority should be assigned based on actual business impact, not on how aggressively a user is requesting escalation.
- Priority should be adjusted as circumstances change. For instance, a network issue initially classified as medium priority becomes critical if it turns out more systems are affected than originally reported. Many organizations build SLA timers directly into their priority structure. When a ticket is created at a given priority level, a countdown clock begins and escalation alerts fire automatically if deadlines approach without resolution. We will discuss Service Level Agreements (SLAs) in more detail later in this post.
Assigned Technician
Once a ticket is created and categorized, it is assigned to a technician who resolves the issue. Proper assignment ensures that someone with the right skills is accountable for each ticket.
Assignment can be manual in which a dispatcher or team lead reviews and assigns incoming tickets. Or assignment can take place automatically using rules that take into account the ticket’s category, priority, keywords, or the reporter’s department.
Support Team Structure
Most support teams include three tiers:
- Tier 1 technicians handle the more basic support requests. They are frequently provided a defined list of questions and tasks they are authorized to complete in resolving a ticket. Tickets are escalated to a higher-level technician when they require action beyond the authorized scope or expertise of the tier 1 technician.
- Tier 2 technicians have greater knowledge and authorization to resolve tickets. If they lack the detailed expertise required to resolve a ticket then the issue is escalated to the next level.
- Tier 3 technicians work on critical business issues and those involving high-level expertise in a particular subject.
Ticket Status
Ticket status is the real-time indicator of where an issue sits in the support workflow. A well-designed status model gives every stakeholder (the user waiting for a fix, the technician working the issue, and the manager watching the queue) an accurate and shared understanding of what is happening.
By reviewing status fields technicians, managers, and users can understand at a glance whether work has started, whether the ticket is waiting for additional information, or whether the issue has been resolved. Below are common status fields in ticketing systems.
| Status | Meaning | Who Typically Sets It |
| New / Open | Ticket has been created but no technician has begun work on it | System (automatic on creation) |
| Assigned | A technician or team has been designated to handle the ticket | Dispatcher, manager, or routing automation |
| In Progress | Active troubleshooting or fulfillment work is underway | Assigned technician |
| Pending — User Response | The technician needs additional information from the reporter before proceeding | Assigned technician |
| Pending — Third Party | Resolution depends on a vendor, external provider, or another internal team | Assigned technician |
| On Hold | Work is intentionally paused, often for a scheduled maintenance window or approved delay | Assigned technician or manager |
| Escalated | The ticket has been transferred to a higher tier of support or a specialist | Assigned technician or manager |
| Resolved | The fix has been applied, and the issue appears to be corrected; awaiting user confirmation | Assigned technician |
| Closed | The user has confirmed resolution, or the ticket has been closed per policy after a set period without user response | Assigned technician, manager, or system automation |
Effective support teams manage the ticket status in the following ways:
- Tickets do not sit in “In Progress” status for days without an update. If work has stalled, the status reflects the reason.
- When a ticket moves to “Pending — User Response,” many organizations send the user an automatic reminder after 24 or 48 hours. The ticket is automatically closed if the user does not response within the defined window. As a result, the ticket queue does not fill up with stale tickets that cannot move forward.
Notes, Work Logs, and Attachments
When a ticket is opened initial fields are populated in the system. Then a ticket accumulates additional information as work progresses.
Technicians add internal notes to document troubleshooting steps, observations, and hypotheses. Work log entries record how much time was spent on the issue. Attachments like screenshots, error logs, and configuration files are linked to the ticket.
By documenting and saving everything done to resolve an issue, a ticketing system is transformed from a simple task manager into a knowledge base.
Resolution
When an issue is resolved, it is best practice to document the root cause and the specific steps that fixed the problem. The additional information helps the next technician who encounters the same issue, feeds into knowledge base articles, and supports post-incident reviews for major outages.
How to Properly Log a Ticket
The way in which a ticket is created (or logged) greatly influences how efficiently it will be resolved. A poorly written ticket with vague descriptions and missing details forces the assigned technician to play detective before any real troubleshooting can begin. A well-written ticket, on the other hand, gives the technician everything they need to get started immediately.
Capture Reporter’s Information
Record the user’s full name, email, department, and phone number. In shared device environments (e.g., call centers) record the device name or asset tag of the affected system, since the user submitting the ticket may not be the person who uses the affected machine.
Describe the Issue
The issue should be described clearly and in detail. Vague descriptions like “the computer is acting weird” or “the system is slow” are not actionable. Encourage users to answer four key questions when submitting a ticket:
- What exactly is happening?
- What were you doing when it happened?
- What is the error message, if any?
- When did the issue start?
The following is an example of correctly logged ticket that gives an agent a head start in resolving the issue: “Microsoft Outlook crashes immediately after I click Send on any email with an attachment. The issue started happening yesterday morning after the overnight Windows updates. The error message says: Microsoft Outlook has stopped working. The system is a Dell Latitude 5520 running Windows 11.”
Document the System
When creating the ticket include the device name, the operating system and version, and the version of any relevant application. This context matters enormously for troubleshooting. For instance, a browser compatibility issue behaves differently on Chrome versus Edge. Or a software crash might by caused by a specific OS patch. Without all the relevant information the technician may spend an unnecessary hour replicating an environment before they can even reproduce the problem.
Set the Category and Priority
Whoever logs the ticket (whether it is the user through a self-service portal or a help desk agent taking a call) is responsible for determining the the initial ticket category and priority level. The initial category and priority does not need to be perfect since technicians reviewing the queue can make adjustments. Yet a reasonable initial categorization ensures the ticket lands in the right team’s queue quickly rather than sitting in a generic inbox awaiting triage.
Add Attachments
Screenshots of error messages, event logs, network traces, and photographs of physical hardware issues are all vert useful in resolving tickets. Training users to attach screenshots as a standard part of ticket submission can cut resolution time significantly for software-related issues. Prominently display the attachment option in the self-service portal to encourage user adoption.
Add Internal Notes
The ticket should include everything done by the support team. As troubleshooting progresses, every meaningful step should be logged in the ticket notes. For example:
- Tested rebooting the device — issue persists.
- Reinstalled the application — issue persists.
- Ran diagnostics — no hardware faults detected.
- Escalated to Tier 2 for deeper investigation.
This running log serves as a hand-off document if the ticket is escalated, a reference if the issue recurs later, and a source of data for post-incident review.
Ticket Lifecycle
Every ticket follows a journey from the moment a user experiences a problem to the moment the issue is resolved and the ticket is archived. Understanding this lifecycle helps technicians know what is expected of them at each stage and helps managers identify bottlenecks.
Stage 1 — Open Ticket
A ticket is opened when a user encounters a problem and submits a service request. The ticket is stamped with a creation time, and SLA clocks typically begin.
Tickets are submitted through various channels:
- Self-service web portal
- Email-to-ticket integration
- Phone call to the help desk
- Live chat interface
- Monitoring systems can automatically create tickets before humans report them
Stage 2 — Triage and Categorization
In the triage stage incoming tickets are reviewed by a dispatcher, a tier 1 technician, or automated routing rules to confirm the correct category, priority, and assignment. Mislabeled or misrouted tickets get corrected in the triage stage, so the appropriate technician can start working the issue and delays in ticket resolution are avoided.
Stage 3 — Initial Response and Acknowledgment
The assigned technician reaches out to the user to confirm receipt of the ticket and to gather any additional details that are needed. Users who receive a prompt response when their ticket is submitted, even one that simply confirms their ticket is in the queue, are more tolerant of wait times than users who hear nothing and do not know whether their request was received.
Stage 4 — Investigation and Troubleshooting
In the investigation stage the actual technical work occurs. The technician works through the problem systematically, testing hypotheses, applying fixes, and documenting each step in the ticket notes. Good documentation is important for escalation and knowledge base contributions.
Stage 5 — Escalation
A ticket is escalated when a lower level support agent hands off a ticket to a higher level agent to resolve. Escalation occurs when:
- The assigned technician reaches the limit of his expertise, diagnostic tools, or authorization. For instance, an issue might require specialized expertise to resolve.
- After reviewing the issue, an agent assigns a higher priority level to the ticket.
- A ticket has been left unresolved for too long and is about to exceed the resolution time limit established in the SLA.
There are many benefits to ticket escalation. Issues get resolved more efficiently. Support teams improve their resolution times. And customer satisfaction improves.
When a ticket is escalated both the reporter and the higher level agent should be notified. Communication with the reporter helps to manager his expectations. The reporter should receive:
- An explanation of why the ticket is being escalated
- The name of the new agent working on the ticket
- The estimated time to resolution
The higher level agent should be given the information needed to quickly resolve the issue. The warm handoff should include:
- Comprehensive notes that summarize the issue and document the steps taken so far to resolve the issue
- Screenshots and pertinent documents from the organizations knowledge base
- Notes from the reporter
Escalation works best when an organization has defined guidelines for escalating a ticket, and support managers review escalations on a regular basis to look for areas of improvement.
Escalations sometimes occur by mistake. An organization can avoid unnecessary escalations by training agents about when and how to properly escalate a ticket. For instance, lower tier agents can be empowered to access documentation and resolve tickets on their own.
De-escalation occurs when a ticket that has been escalated is sent back to the original agent. The initial agent may need to gather more information before the higher level agent can begin working on the ticket. Or the initial agent may have escalated the issue to the wrong person.
Stage 6 — Resolution
A ticket status is updated to Resolved when the technician applies a fix and verifies that the issue is corrected. The user is notified with a clear explanation of what caused the problem and what was done to address it. The explanation should be written in plain language and without technical jargon. So the user understands what was done and can apply any recommended preventive steps going forward.
Stage 7 — Confirmation and Closure
The ticket is marked Closed when the user confirms that the issue is resolved. If the user does not respond within the organization’s defined window, which is typically 48 to 72 hours, most platforms will automatically close the ticket. Closed tickets are archived but remain searchable, so their documentation lives on as institutional knowledge.
Stage 8 — Post-Resolution Review
Many organizations complete a post-resolution review for major incidents, critical-priority tickets, or issues that took significantly longer than the SLA to resolve. The review is a brief structured conversation or written analysis that examines the root cause, response effectiveness, and process changes that might prevent a recurrence.
Service Level Agreements (SLAs)
A Service Level Agreement (SLA) is a formal commitment that defines the response and resolution standards the IT support team is held to for different categories and priorities of tickets. SLAs can be legal contracts or internal policy documents.
Why SLAs Matter
SLAs transform a ticketing system from a passive tracking tool into an accountability mechanism. They remove ambiguity by establishing shared, written expectations that both IT teams and the people they support can reference.
SLAs help to prioritize tasks correctly based on the impact to business operations. Without SLAs, IT support teams operate in an environment where everyone defines “fast” differently. For instance, a manager in finance might believe that an IT issue affecting their team should be resolved within the hour. Yet a busy technician might consider a same-day resolution perfectly acceptable for the same issue.
SLAs also create the foundation for performance measurement and improvements to the IT support process. For instance, if the team is consistently missing the SLA on medium-priority tickets then changes to staffing, tooling, or the support work flow may be needed.
Key SLA Metrics
Response time refers to how quickly a technician acknowledges and responds to a new ticket. Resolution time is the outer limit within which the issue must be fully resolved.
Many organizations track time-to-first-response separately from time-to-resolution because the two metrics measure different aspects of service quality. For instance, a technician can respond to a critical ticket within 15 minutes by reaching out to gather information, even if the fix itself takes two hours.
SLA Structure by Priority
| Priority | Response Time Target | Resolution Time Target | Breach Consequence |
| Highest / Critical (P1) | 30 minutes | 4 hours | Immediate escalation to IT leadership; incident review required |
| High (P2) | 1 business hour | 8 business hours | Automatic escalation to senior technician; manager notified |
| Medium (P3) | 4 business hours | 24 business hours | Supervisor alert if SLA metric is approaching |
| Low (P4) | 8 business hours | 48 business hours | Logged for performance reporting; no immediate escalation |
| Lowest (P5) | 24 business hours | 60 business hours | Logged for performance reporting; no immediate escalation |
SLA clocks typically run during business hours. They are usually paused during off-hours or while waiting for a customer to respond with more information about an issue.
SLAs should account for real-world constraints. Most organizations specify that SLA clocks run only during business hours, with exceptions for critical-priority tickets that use a 24/7 clock regardless of when they are submitted. The SLA clock is often paused for tickets placed in a status of “Pending — User Response” or “Pending — Third Party”, since the delay is outside the IT team’s control.
SLA Breach Handling
When a ticket is at risk of breaching its SLA or has already breached it, most ticketing platforms will fire automated alerts to the assigned technician, their supervisor, and sometimes the reporter.
The response to a breach should be swift. The ticket is reviewed. Additional resources are allocated if needed. And the user receives proactive communication explaining the delay and the revised timeline.
Internal vs. External SLAs
IT teams operating within a single organization typically work against internal SLAs that are performance commitments to their colleagues and leadership.
Managed service providers (MSPs) and external IT contractors operate against contractual SLAs with their clients where breaches may trigger financial penalties, service credits, or contract termination clauses. The stakes are higher in contractual SLA environments, which is why MSPs invest heavily in automation, monitoring, and escalation workflows to protect their SLA compliance rates.
Best Practices for a Ticketing System
The value of a ticketing system is entirely dependent on how the technicians use it. The following practices determine whether a support team struggles to promptly resolve issues in the ticket queue or consistently delivers excellent service.
Respond Promptly
The first contact with the reporter sets the tone for the entire interaction. Make it a standard practice to respond to every new ticket as quickly as the SLA requires, even if no work has been done to resolve the issue.
Users experience time differently when they are waiting for IT support. A wait of four hours feels much shorter when an acknowledgment arrives within the first 30 minutes of opening a ticket.
Update Ticket in Real Time
A ticket should never go silent for hours while a technician is actively working it. Every significant action should generate a note in the ticket immediately. Each tool run, configuration change, call with a vendor, or question sent to the user should be noted. Consistent ticket updates have compounding benefits:
- Supervisors are kept in the loop.
- A clean hand-off record is available if escalation is needed.
- The technician can substantiate all his work on the ticket.
Communicate in Clear Language
Write resolution summaries that explain what happened in language that a non-technical person can follow. User satisfaction will improve and the user will be less likely to recreate the same issue in the future.
Not everyone reading the ticket updates has a technical background. If a resolution note states “reimaged hard drive from the gold image, issue resolved” a technician referencing your notes may understand what you did. Yet the user who opened the ticket may not understand.
Work Within the System
One of the most corrosive habits in IT support is the informal side channel in which technicians complete work that is not documented in the ticketing system. For instance, someone stops a technician in the hallway, or a manager sends a direct message asking for a favor.
All IT support work should have a ticket in order to correctly prioritize business needs and the limited resources of the IT staff. When work is done outside the ticketing system then SLA measurement is inaccurate, it is more difficult to recognize patterns in the tickets being opened, and less important issues get addressed before more important ones.
Categorize and Tag Properly
Use category and tag fields properly to improve ticket resolution times and post-incident reviews. The data your ticketing system generates is only as useful as the metadata on each ticket.
Consistent, accurate categorization enables meaningful trend analysis that can lead to improvements in the IT support process. For instance, if your team discovers that 30% of all tickets in a given month are password resets, then it may be useful to invest in self-service password reset capabilities.
Document Resolutions for Knowledge Base
Every ticket that involves a non-trivial troubleshooting process is a potential knowledge base article. When a technician resolves a tricky issue, he should consider: “Is this something another technician might encounter? Or is this something a capable user could resolve himself next time?” If the answer is yes, the resolution steps should be written up in a format suitable for the knowledge base.
Over time, a well-maintained knowledge base reduces ticket volume by empowering users to self-serve. And it reduces resolution time for technicians who can find documented solutions quickly.
Ticket Deflection
Ticket deflection is the practice of empowering users to find a solution to an issue on their own, instead of opening a support ticket. The result is a reduction in the number of tickets created in the system.
Both the users and the support staff benefit from ticket deflection. A users can more quickly resolve his issue instead of opening a ticket and waiting for a response.
With more ticket deflection the support staff has more capacity. They spend less time on smaller issues and have more time available to work on complex issues with greater impact on the business. Ticket resolution time decreases and user satisfaction improves.
The support teams should remove the historical tickets and identify the issues that can be deflected, such as simple and repetitive requests. Which tickets relate to issues that a user can be empowered to handle on his own? Can the system be improved to prevent the need to have the ticket?
With proper training and a well-documented knowledge base users can solve less complicated problems on their own (e.g., password resets or basic policy inquiries). Then users can resolve issues without even opening a ticket.
A robust knowledge base can include FAQs, tutorials, and videos. Users should be frequently reminded about the benefits of using the knowledge base and how to access it. Regular training sessions can teach users how to use the knowledge base and the benefits it provides. A user visiting the ticket intake page could see a prominent link to the knowledge base and a message encouraging him to use the resource and resolve the issue quicker.
When a ticket is opened regarding a simple issue, the triage process can include directing people to the company resources to resolve the issue more quickly on their own. A user who needs a password reset can be directed to a company web portal to complete the task himself. A user needing information on company policies can be directed to FAQ page populated by the human resources team.
After initiating a ticket deflection campaign regularly check the reporting metrics to verify improvements in resolution time and user satisfaction. And continue looking for ways to increase ticket deflection and free up support resources.
Review Ticket Queue Regularly
Reviewing the ticket queue on a regular basis ensures the system is quickly resolving issues. Stale tickets that slip through the cracks become a source of SLA breaches, user frustration, and inaccurate queue metrics.
There are many methods of finding inactive tickets. For instance, tickets sitting in “Assigned” status without updates for more than a day should be reviewed. And tickets awaiting user response that have passed the reminder threshold should be escalated or closed.
Use Reporting Data for Continuous Improvement
Ticket performance reports offer a lot of benefits. Organizations can track SLA performance, including tickets that are approaching their SLA deadlines. They can identify trends in tickets and use the information to improve business operations or identify technicians who need more training.
Ticketing system reports are not just for management. They are a tool for every member of the support team to understand where demand is coming from and whether their performance is improving over time. Teams that review their metrics regularly and use them to inform process changes consistently outperform teams that treat the ticketing system as a passive record-keeping tool.
Most enterprise ticketing platforms generate robust reporting such as:
- Ticket volume by category
- First response time
- Aging ticket report
- Resolution time by technician
- SLA compliance rates
- First-call resolution rates
- Recurring issue frequency
- Customer satisfaction
Close Tickets with Care
A ticket closed prematurely that triggers a follow-up submission creates more work for the team. And it signals to the user that the previous resolution was careless.
Before changing the ticket status to Resolved, confirm that the fix has actually held instead of only appearing to work in the moment. And before marking the ticket Closed ensure the user has had adequate time to test the solution in their real work environment. When in doubt, leave the ticket in Resolved status a little longer and let the auto-close timer do its job.
Choosing a Ticketing System
For IT professionals who are in a position to evaluate a ticketing system for an organization, there are important aspects of a system that should be considered.
Scalability
A system that works well for a five-person IT team may become a bottleneck for a fifty-person team. Evaluate whether the platform can scale with the organization in terms of ticket volume and the sophistication of workflows and automation you will eventually require.
Integration Capabilities
Modern IT support does not happen in isolation. Your ticketing system needs to talk to other business systems such as:
- Monitoring tools can create alerts and auto-generate tickets.
- Asset management system can automatically populate device details in a new ticket.
- Directory services (e.g. Active Directory or Azure AD) can populate user information in a new ticket.
- Communication tools (e.g., Slack or Microsoft Teams) enable technicians to receive alerts and update tickets without switching applications
Self-Service Portal Quality
The self-service portal is an interface between your users and your support operation. A confusing portal increases phone and email volume when users give up trying to submit tickets online. A well-designed portal with a searchable knowledge base, intuitive ticket submission forms, and real-time ticket status visibility reduces overall support demand and improves user satisfaction.
Automation and Routing
The amount of manual triage work your team performs is directly proportional to how well the platform automatically routes tickets. An organization can reduce time to first response by creating routing rules that assign tickets to the right team based on category, keywords, and reporter attributes.
Reporting and Analytics
Spend time upfront verifying that a ticketing system fits your business operations. Before selecting a platform, spend time in the reporting module. Ask the following before choosing a ticketing system:
- Can you easily generate the metrics your management team cares about?
- Can you export data for further analysis?
- Can you build custom dashboards that displays the information most relevant to your operation?
Jira Service Management
Jira Service Management (JSM) is a cloud-based, service desk platform from Atlassian that is used by IT, business operations, and development teams. IT support teams use JSM for managing service requests and incidents. Business operation teams use JSM for internal operations such as employee onboarding or payroll inquiries. Development teams use JSM for managing code deployments and collaborating with IT operations.
IT service management is the most popular feature of JSM and the focus of this blog post. The key features of JSM for IT support include:
- The Customer Portal is a self-service hub where users (customers) submit tickets, search documentation, and check the status of service requests.
- IT Service Management provides tools for incident reporting, change requests, asset management and knowledge base management. JSM brings visibility to the work done by support teams and streamlines ticket workflows.
- SLA Tracking monitors response and resolution times for SLAs.
- Ticket creation is possible from multiple channels such as a web portal, email, or chat using Slack or Microsoft Teams.
Create an Account
To create a free JSM account go to the Atlassian website, click on Products and then Jira Service Management. Enter an email, and click Sign up. After verifying your email, create a password.
Create Space for IT Support
After creating your JSM account, you will be directed to a page titled “Create a workspace” where you can create your first workspace (or space). Enter a name (e.g., techwayfarer) that will be used to create a URL for the space.
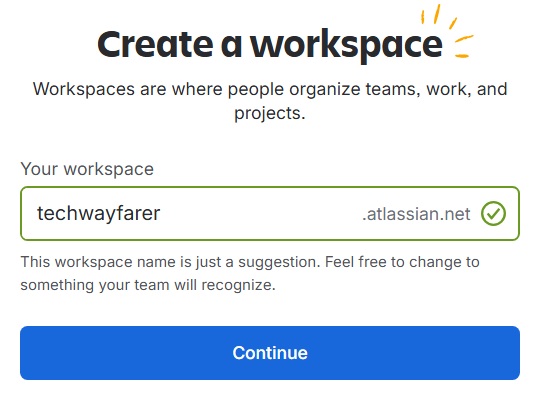
Since we are using the free version of Jira Service Management, the site will be a subdomain of atlassian.net. Click Continue.
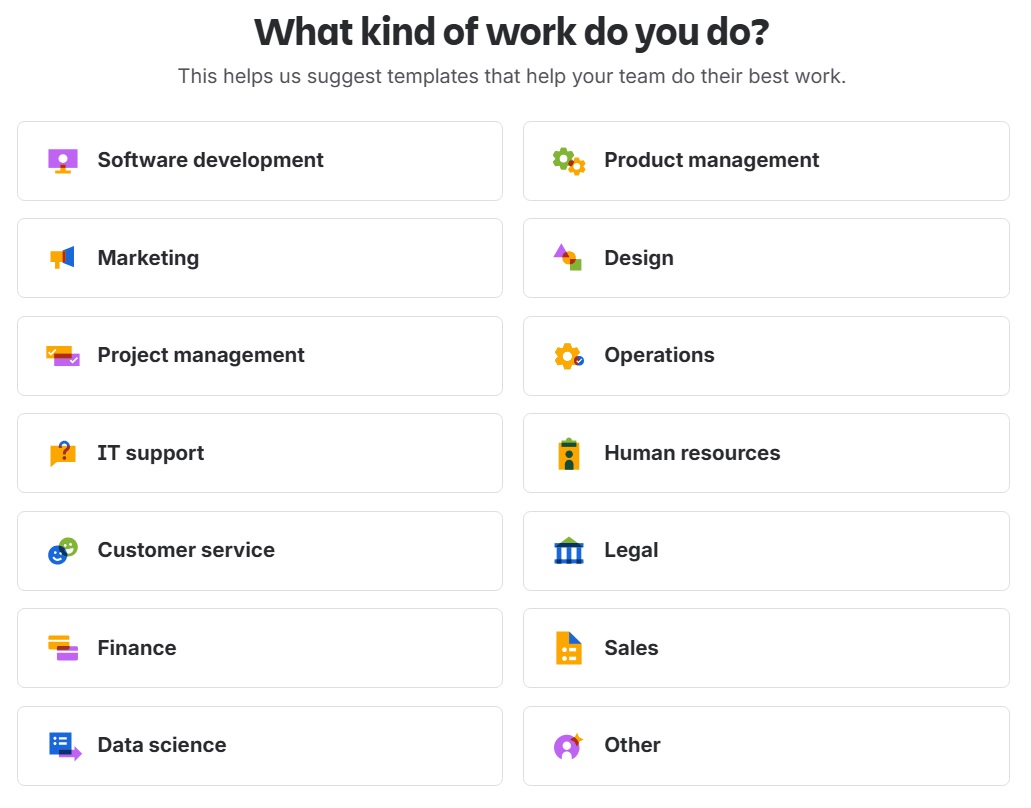
You will be asked a few questions to set up you account. In the screen “What kind of work do you do?” choose “IT support.”
On the page “Welcome to Service Collection” click the “Create space” button.
On the page “Space Templates”, choose a template that will be used to create your new space. Click either “Service Management” or IT in the left column. Then select “Basic IT service management.”
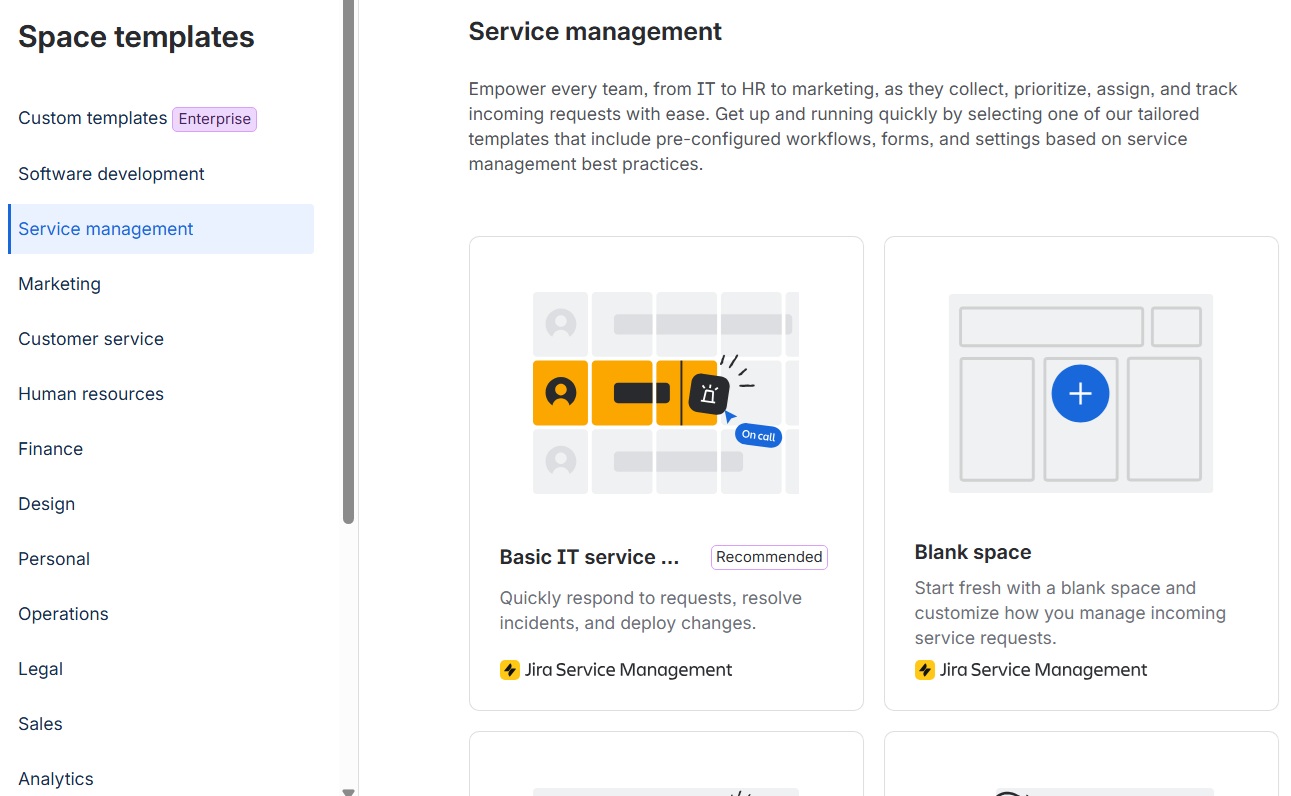
In the window titled “Basic IT service management” click the button “Use template.”
In the page “Create space” enter details about the space you are creating.
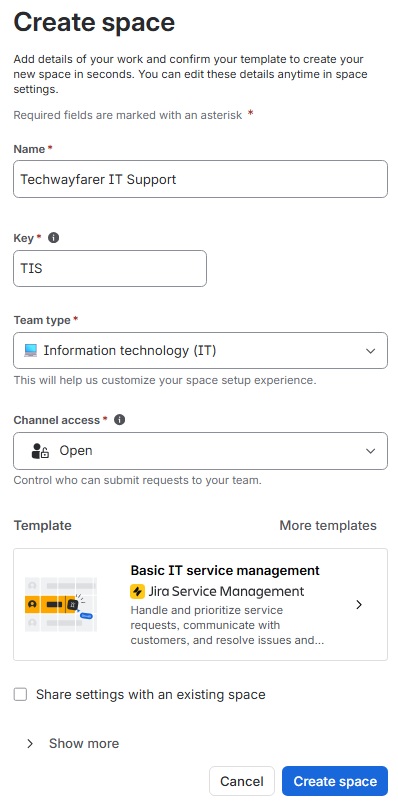
Choose a name for the space (e.g., Techwayfarer IT Support). The Key field will populate with initials that will appear before each ticket (e.g., TIS). In the Team type field choose “Information technology (IT).” In the Chanel access field choose Open so both support technicians (agents) and customers can submit requests/tickets. When done click the button “Create space.”
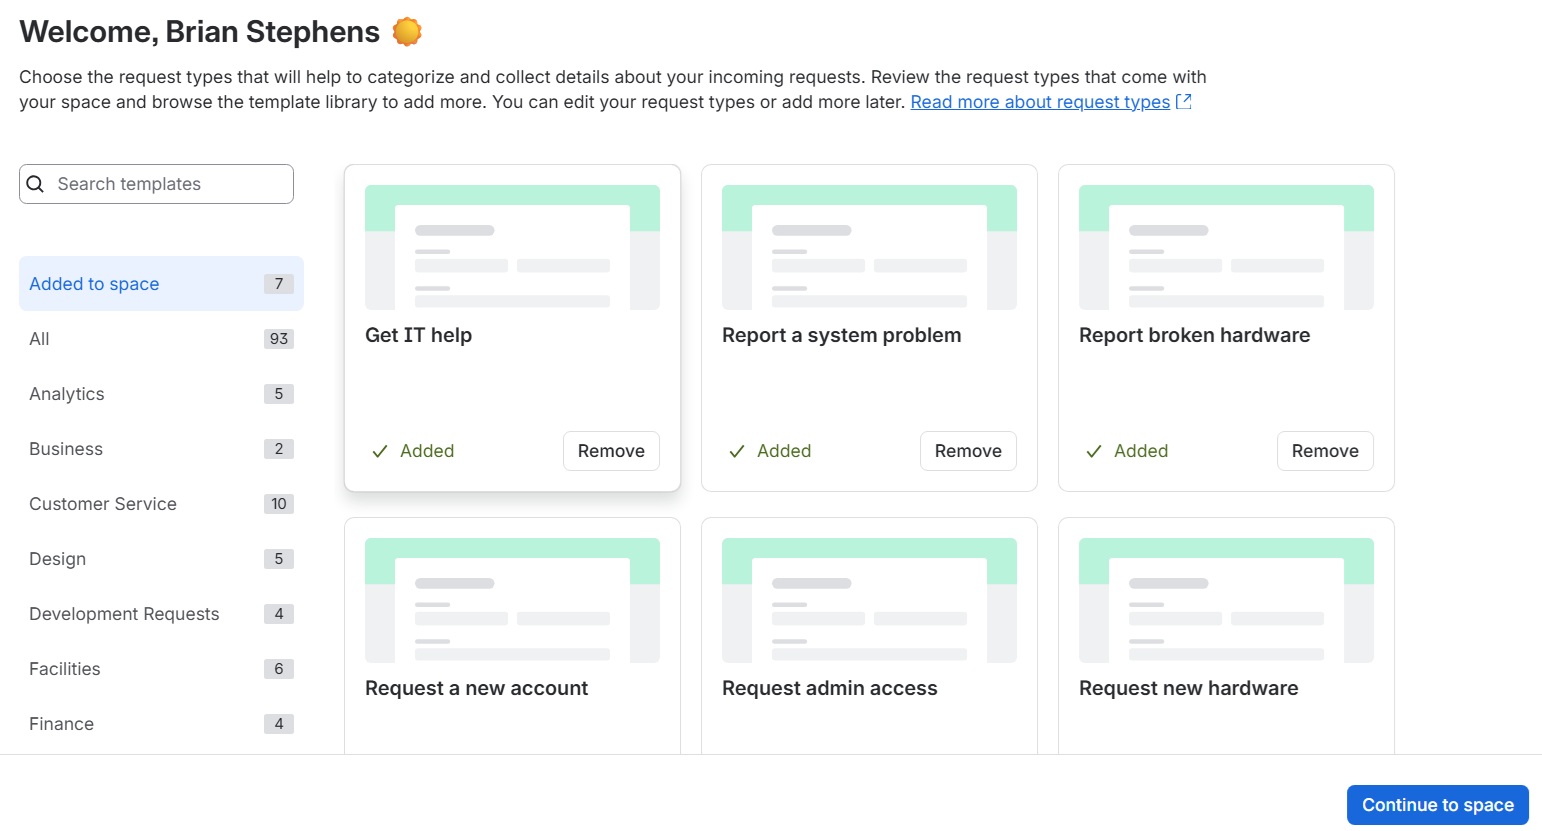
If you see a page displaying all the default request types for your new space click the button “Continue to space.”
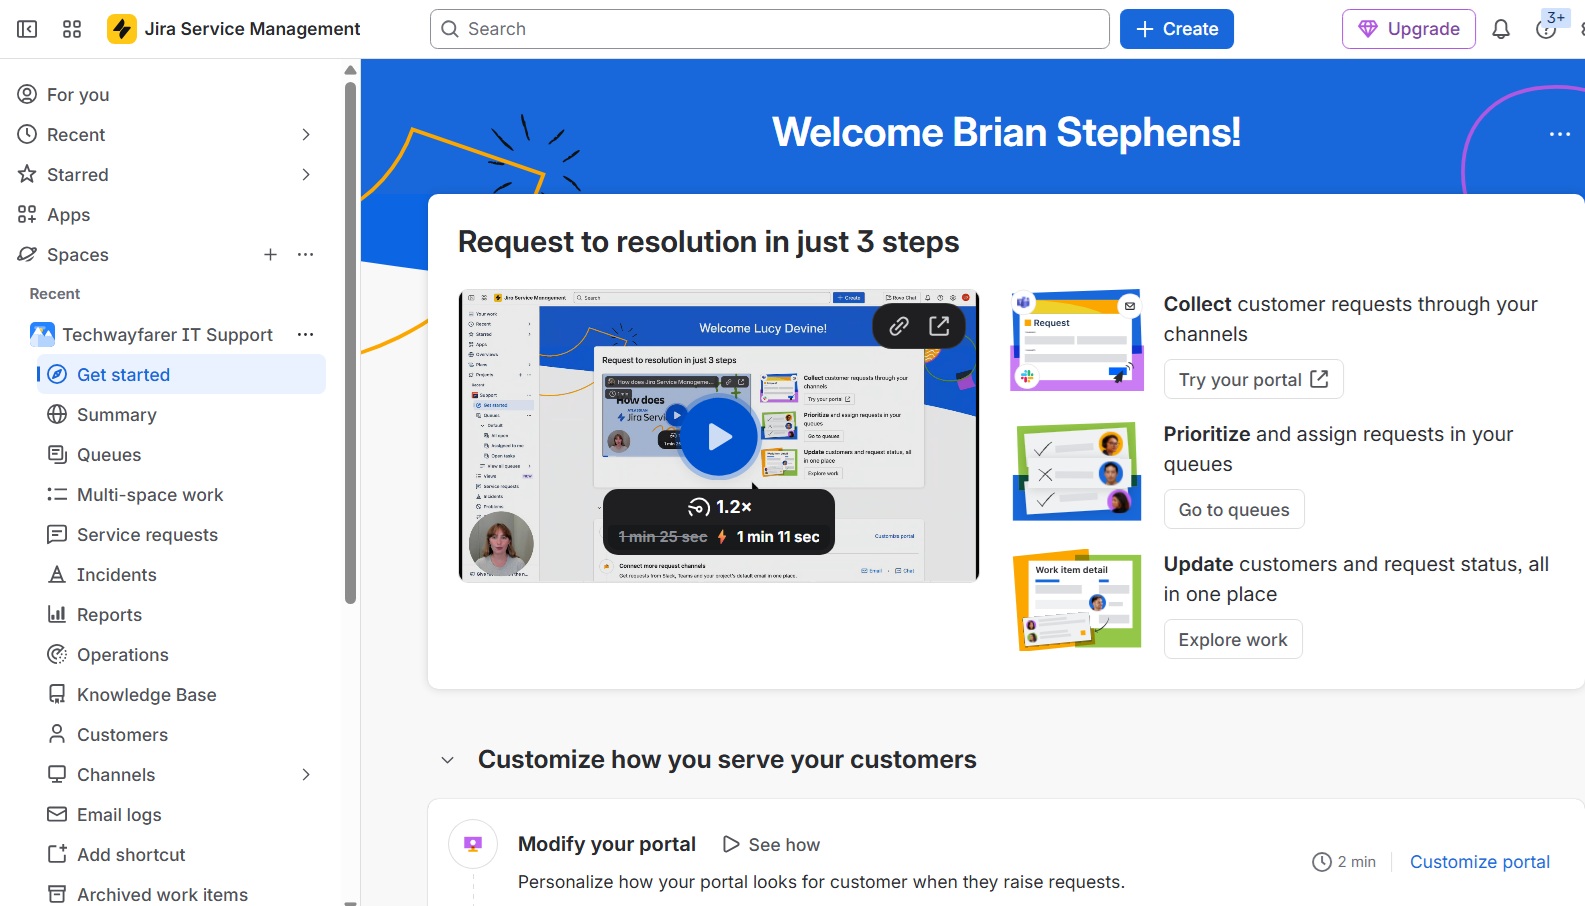
Click on “Jira Service Management” in top left corner of the navigation bar. In the left menu click on Spaces to reveal your spaces. The space you created earlier will appear (e.g., Techwayfarer IT Support). Click on the Get Started tab.
Add Agents to Space
In this section more agents are added to the new space (e.g., Techwayfarer IT Support). Then in a later section we will review the process of managing service request queues and resolving open tickets.
In the free version of JSM you are allowed a maximum of three agents to process service requests. When the JSM account was created earlier, the first user was given the role of Administrator.
To add two more agents to the space click on “Jira Service Management” in the top navigation bar, then click on the three dots next to the name of your space, and choose “Space settings.”
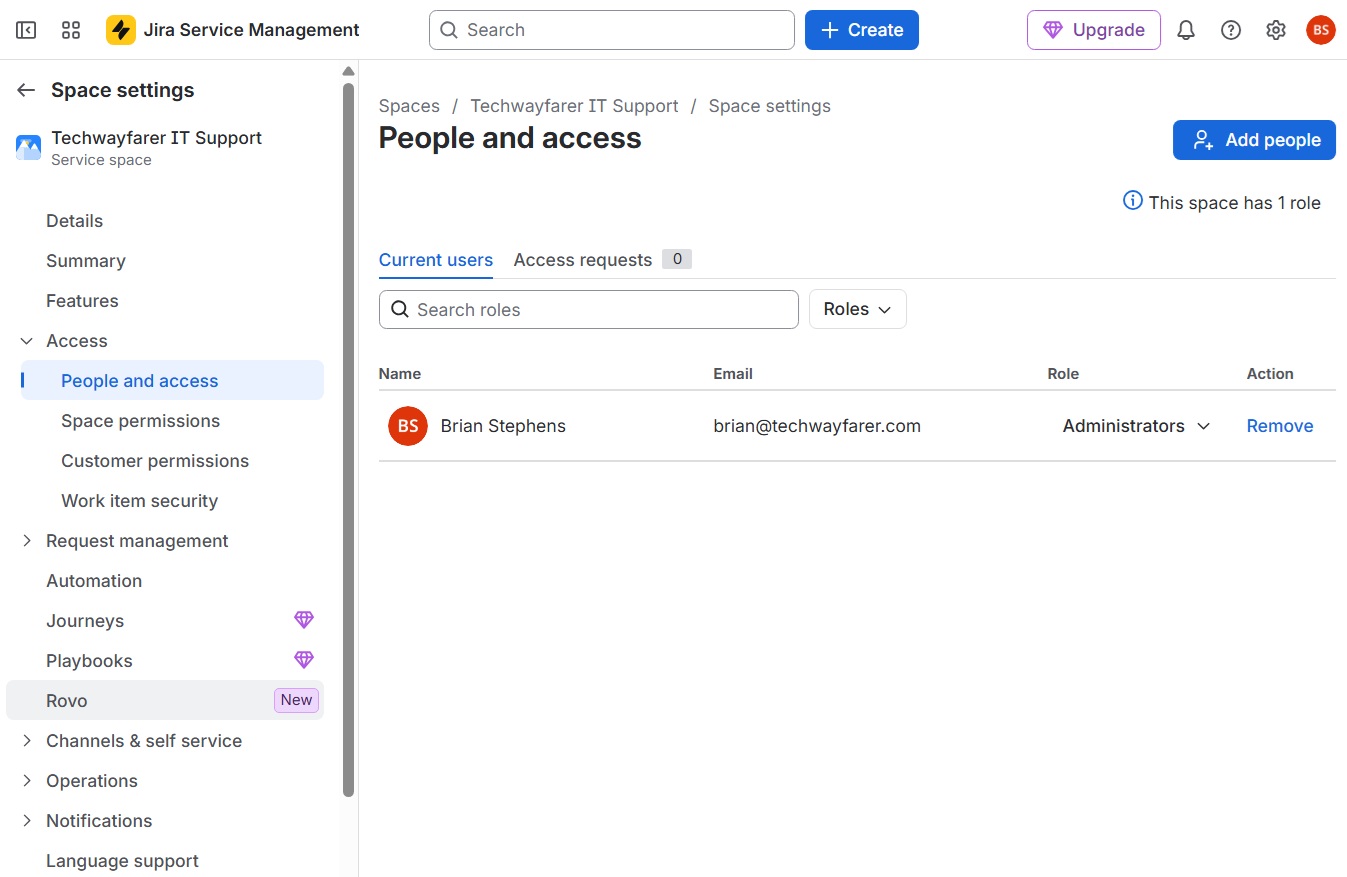
In the Space settings window click on Access and then “People and access” in the left menu. Then click the “Add people” button.
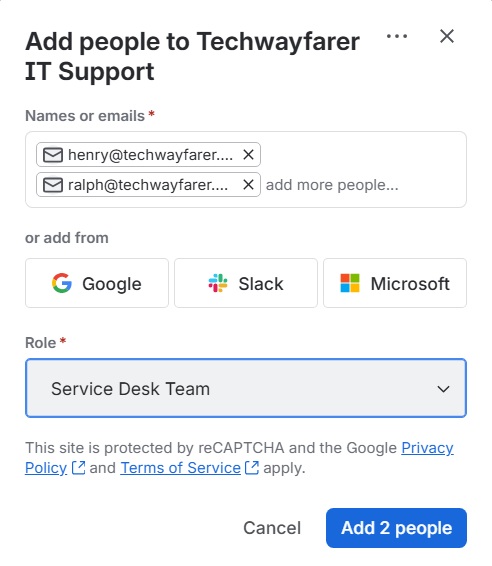
A pop-up window opens titled “Add people to Techwayfarer IT Support.” In the “Names or emails” field enter the email address of the new agents. In the Role field choose “Service Desk Team.” Click the button “Add 2 people.”
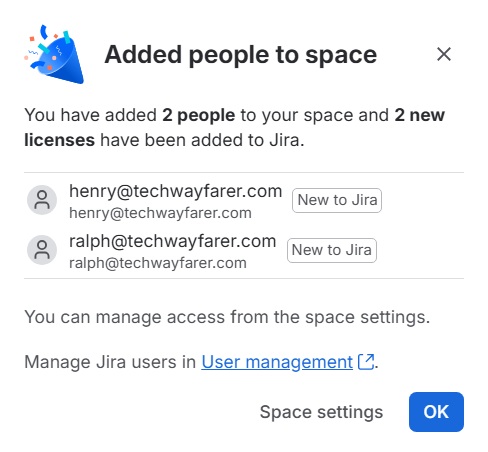
The confirmation window explains that you can manage the new users in either the space settings or the User management window. Click OK.
Each new agent will receive an email explaining that the administrator has invited him to join the team. After clicking on “Accept invite” in the email, the agent will be directed to a page on atlassian.com asking him to confirm his email address. After email confirmation the agent’s account appears in JSM under Space Settings > Access > People and access. In our lab, Henry David Thorough is a tier 1 agent, and Ralph Waldo Emerson is a tier 2 agent.
Add Organization to Space
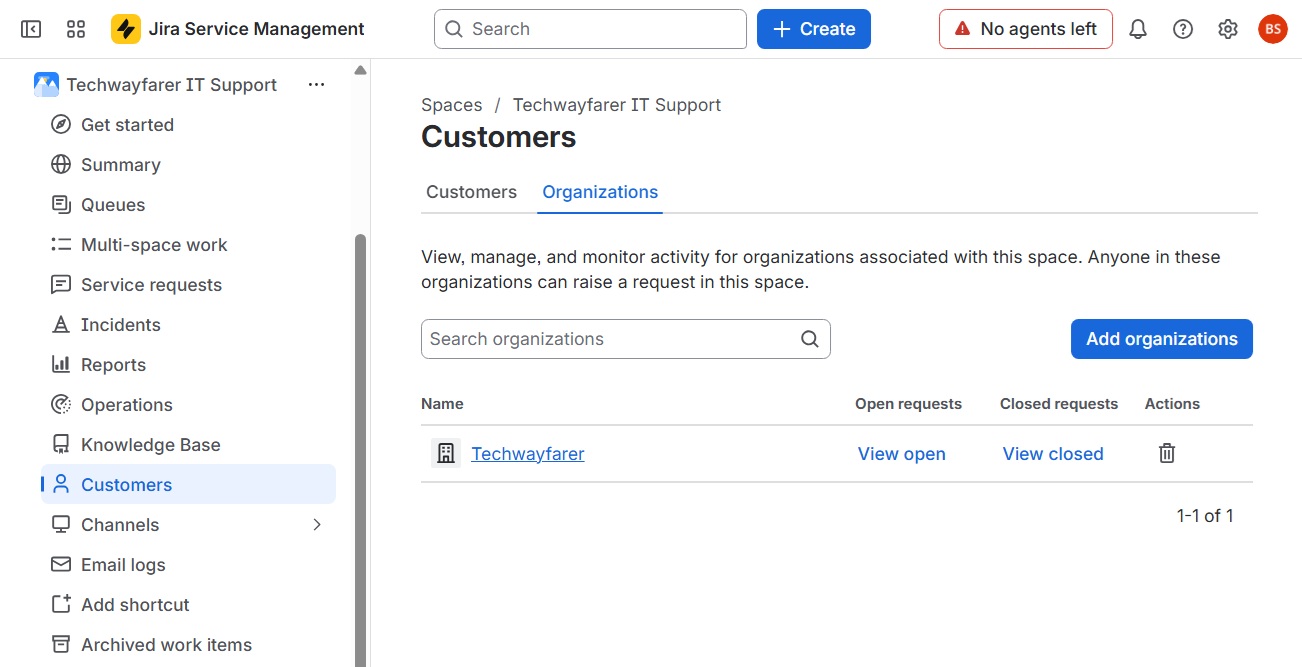
In this section we will add the name of the Organization into JSM. Click on Jira Service Management in the top navigation bar. In the left menu pane choose Spaces, then your new space (e.g., Techwayfarer IT Support), and then Customers.
In the Customers window choose the Organizations tab and then the “Add organizations” button.
In the “Add organizations” pop-up window enter the name for your organization (e.g., Techwayfarer) and the Add button. Your organization now appears in the Customers window.
Add Customers to Space
In this section we will add customers to the space (e.g., Techwayfarer IT Support). Then in a later section we will create service requests under the customer accounts.
In the free version of JSM you are allowed an unlimited number of service desk customers that can create requests in your organization’s JSM account.
There are several ways of adding customers to JSM. You could use the same method described earlier when adding agents. Open the Space settings window, then click on Access, then “People and access”, and then the “Add people” button.
We will use an alternative method and add customers in the Customers window. Click on Jira Service Management in the top navigation bar, then the space for your account (e.g., Techwayfarer IT Support), and then Customers.
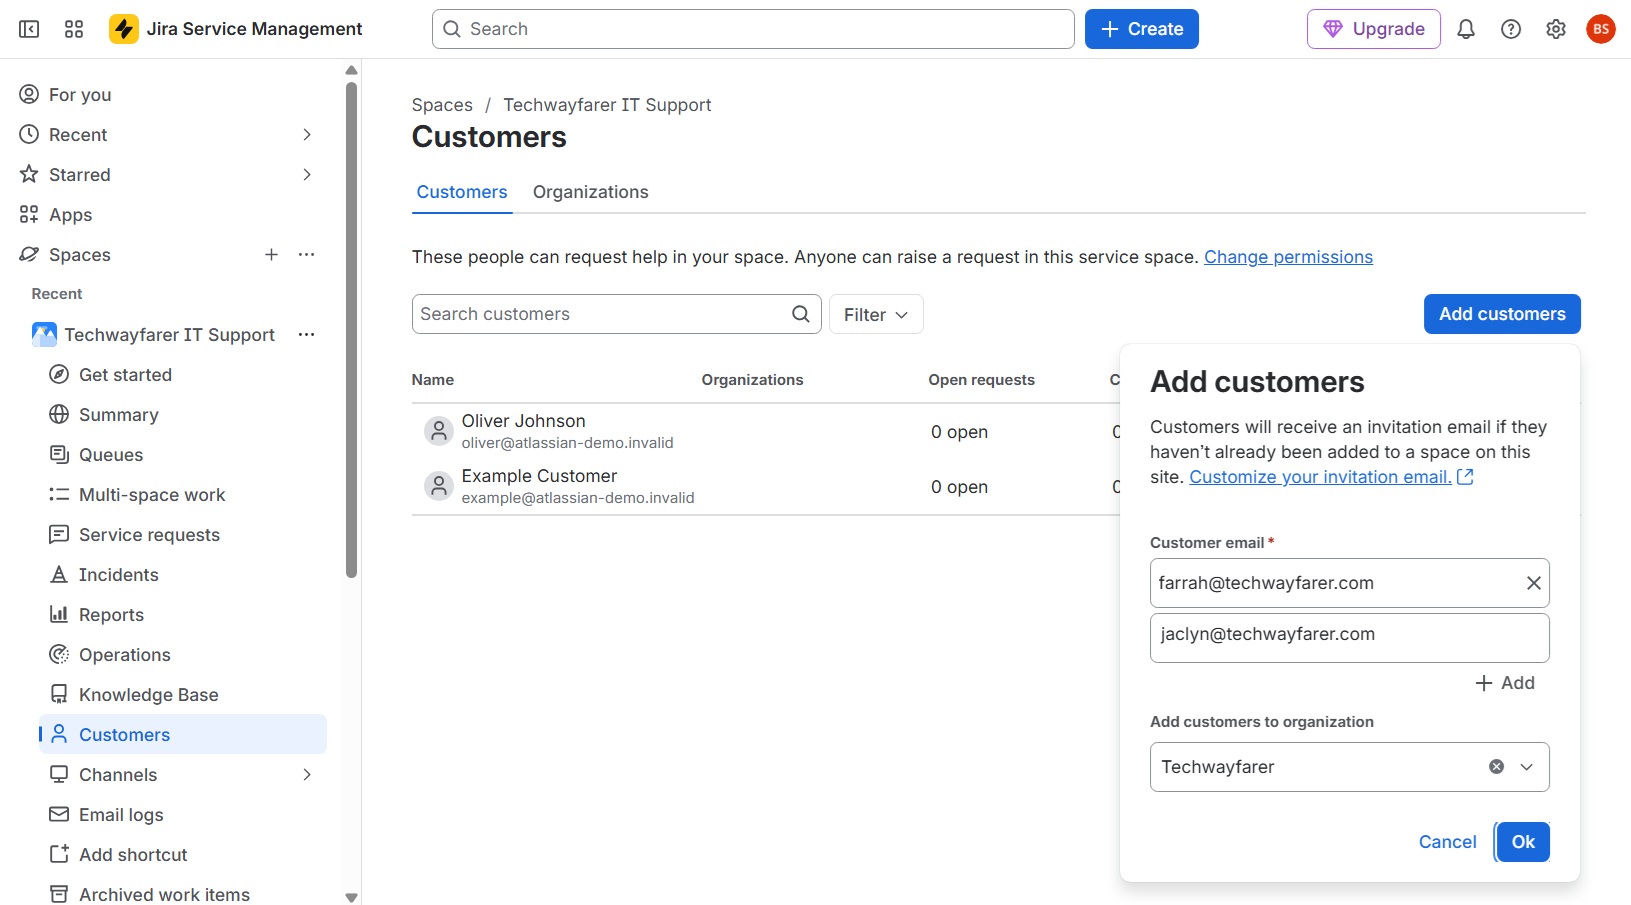
There are currently no real customers in our JSM account, only demo listings created automatically by Jira. Click the “Add customers” button. In the “Add customers” pop-up window enter the email addresses for the new customers. Then choose your organization, and click Ok.
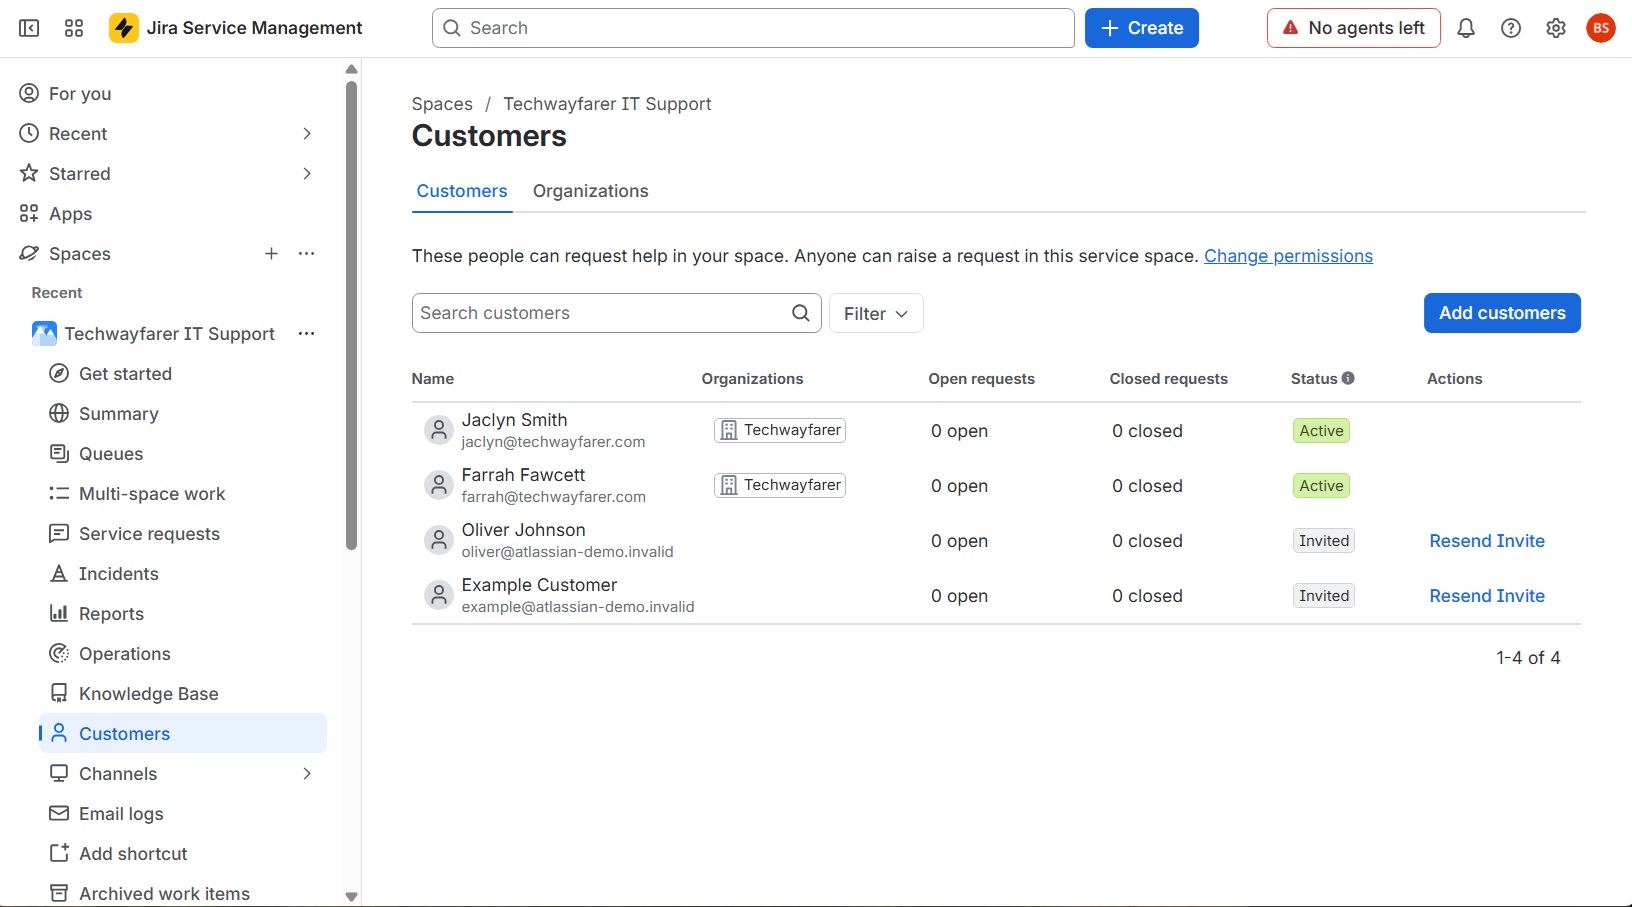
Refresh the browser window and the new customers will appear in the Customers window with a status of Invited. Each new customer will be sent a verification email from Atlassian asking him to enter his full name and password. Then the customer can login to the organization’s JSM account and view the IT Support Portal. And the customer’s status in the Customers window will change from Invited to Active.
Set up SLAs
A Service Level Agreements is the contract a support team has with an external or internal customer for delivering support services. In this section we will explore how to configure SLAs in JSM, so they align with your contracts and can be used to track the support team’s performance.
The support administrator can modify the SLAs in JSM by going to Space Settings > SLAs.
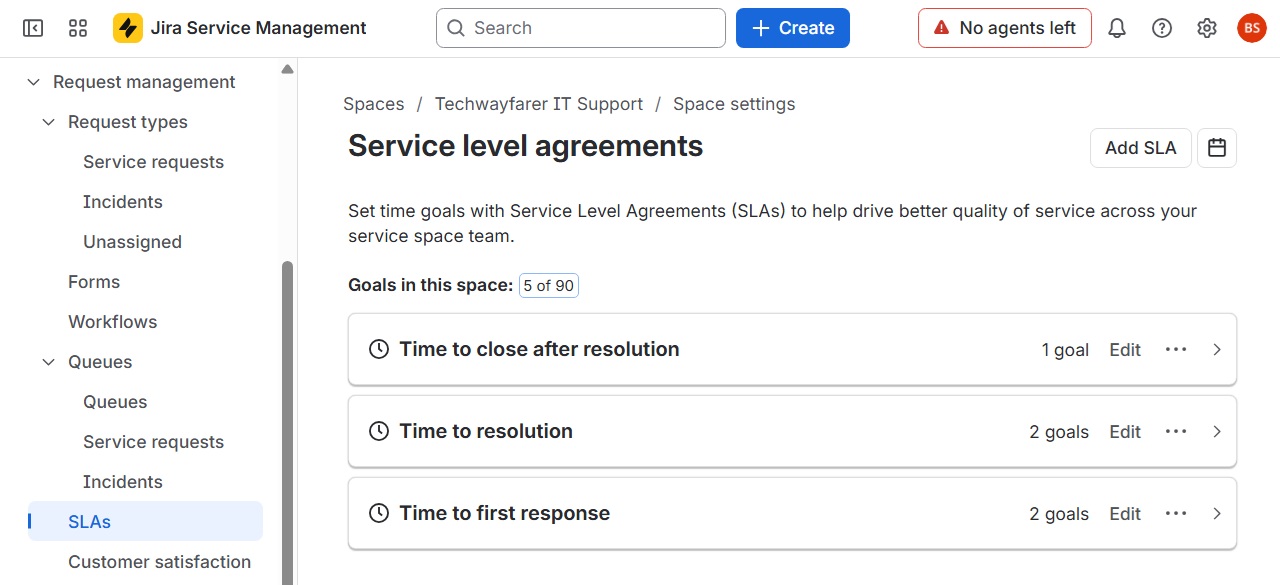
By default JSM provides three SLAs:
- Time to first response
- Time to resolution
- Time to close after resolution
We will walk through how to make changes to the default SLA settings for “time to resolution.” Then you will know how to also change settings for “time to first response” and “time to close after resolution.”
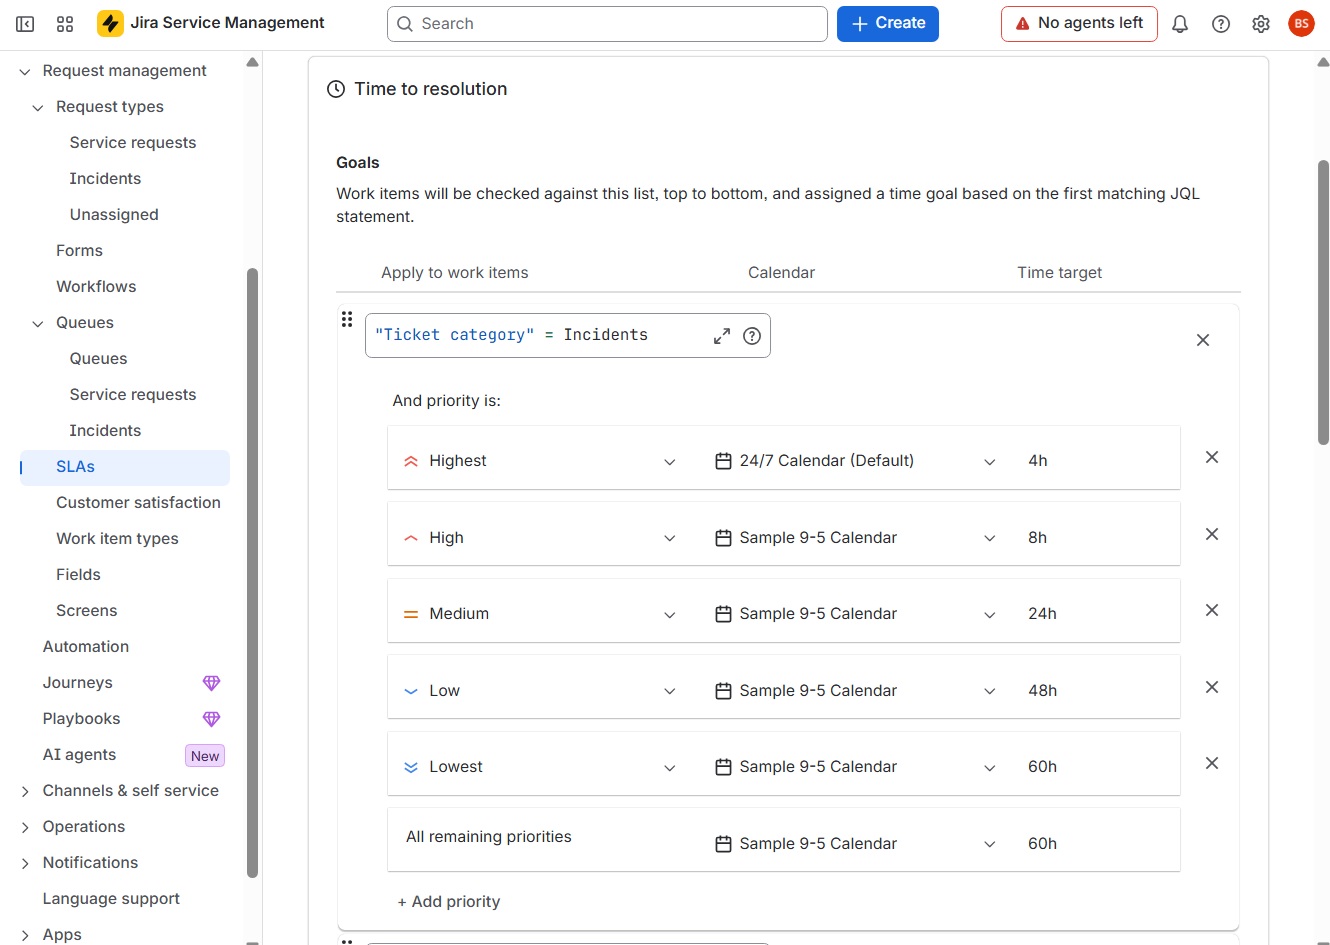
JSM differentiates between incidents and service requests. Incidents are the unplanned events that require immediate attention. Service requests are planned events scheduled by customers. We will modify the resolution times for both incidents and service requests to align with the times provided earlier in the Priority Levels section.
Click on Edit next to “Time to resolution.” Repeat the following steps for both incidents and service requests:
- Change the calendar for the Highest priority from 9-5 to 24/7. So the SLA timer will start immediately regardless of what time of day the ticket is created.
- Click “Add priority” and add the Lowest priority.
- Change the resolution times.
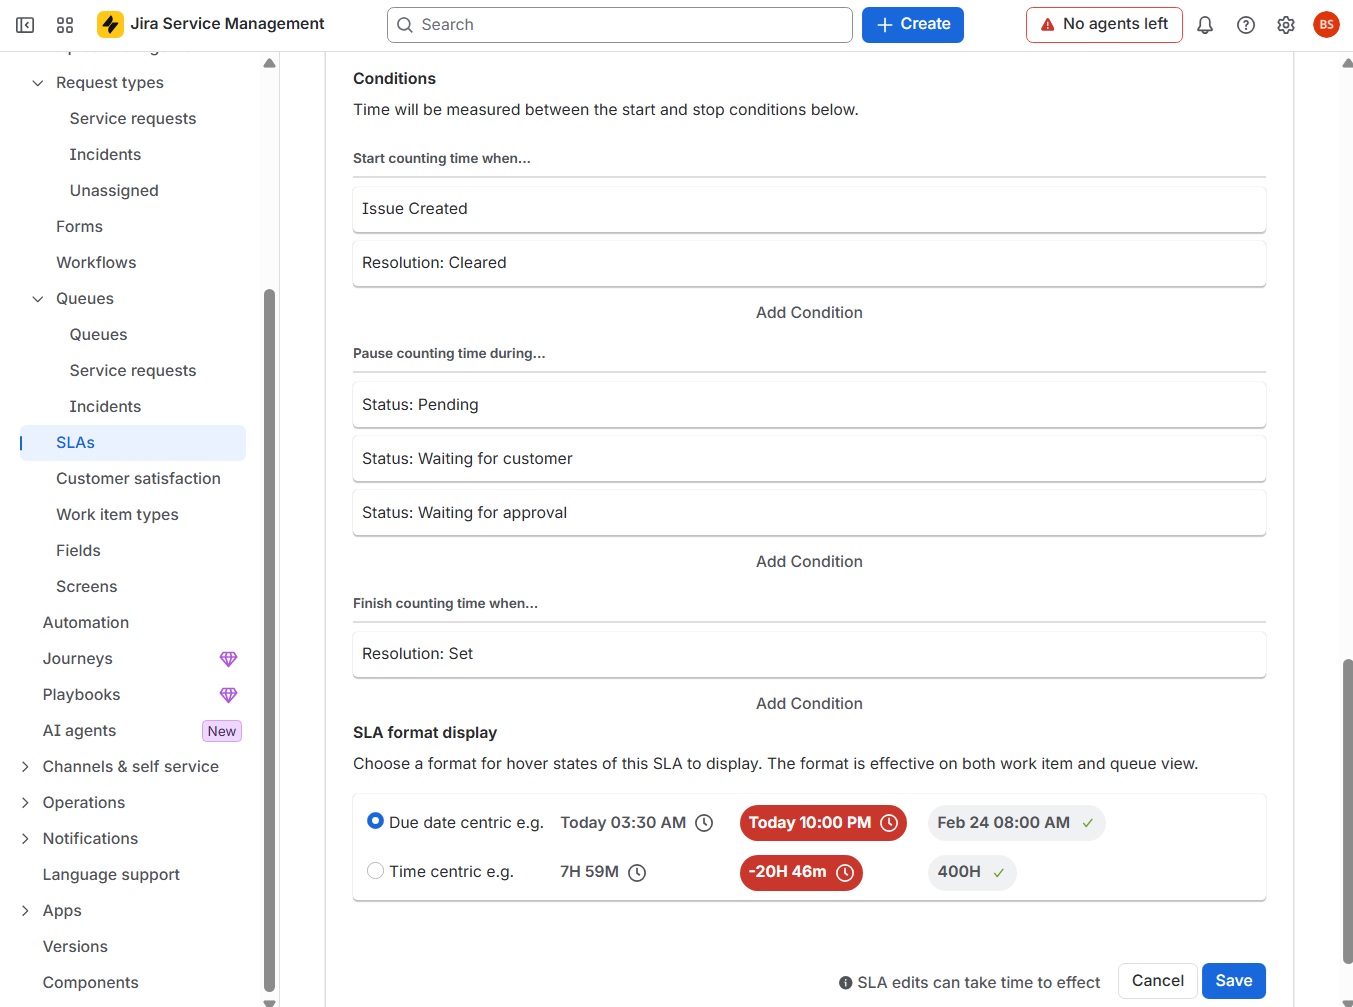
Scroll down to Conditions. Under “Pause counting time during” add the statuses Pending, Waiting for customer, and Waiting for approval. Then the support team will not be penalized when they are waiting for someone else to move the ticket forward.
When all the changes are made click Save.
Request Types
A request type is a form that customers use to submit service requests in the portal. Request types are found in JSM at Space settings > Request management > Request types.
Service Requests vs Incidents
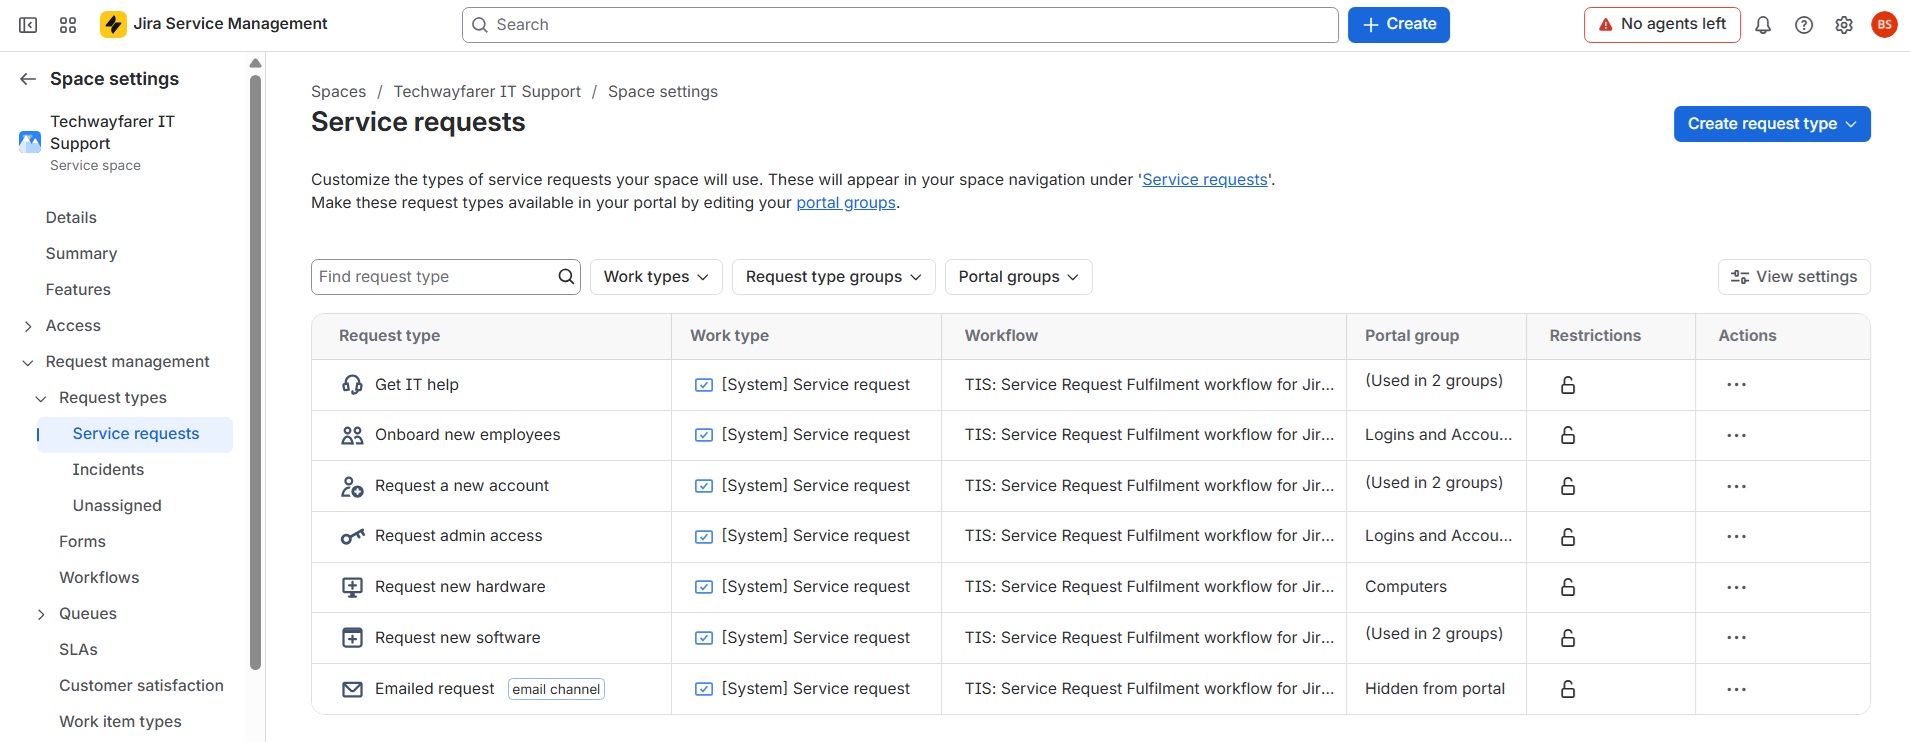
As discussed earlier, JSM distinguishes between service requests and incidents. According to Jira, service requests are planned inquiries from customers who want new resources or access to files and applications. Below are the service requests available in the Basic IT Service Management template we chose earlier when setting up the account.
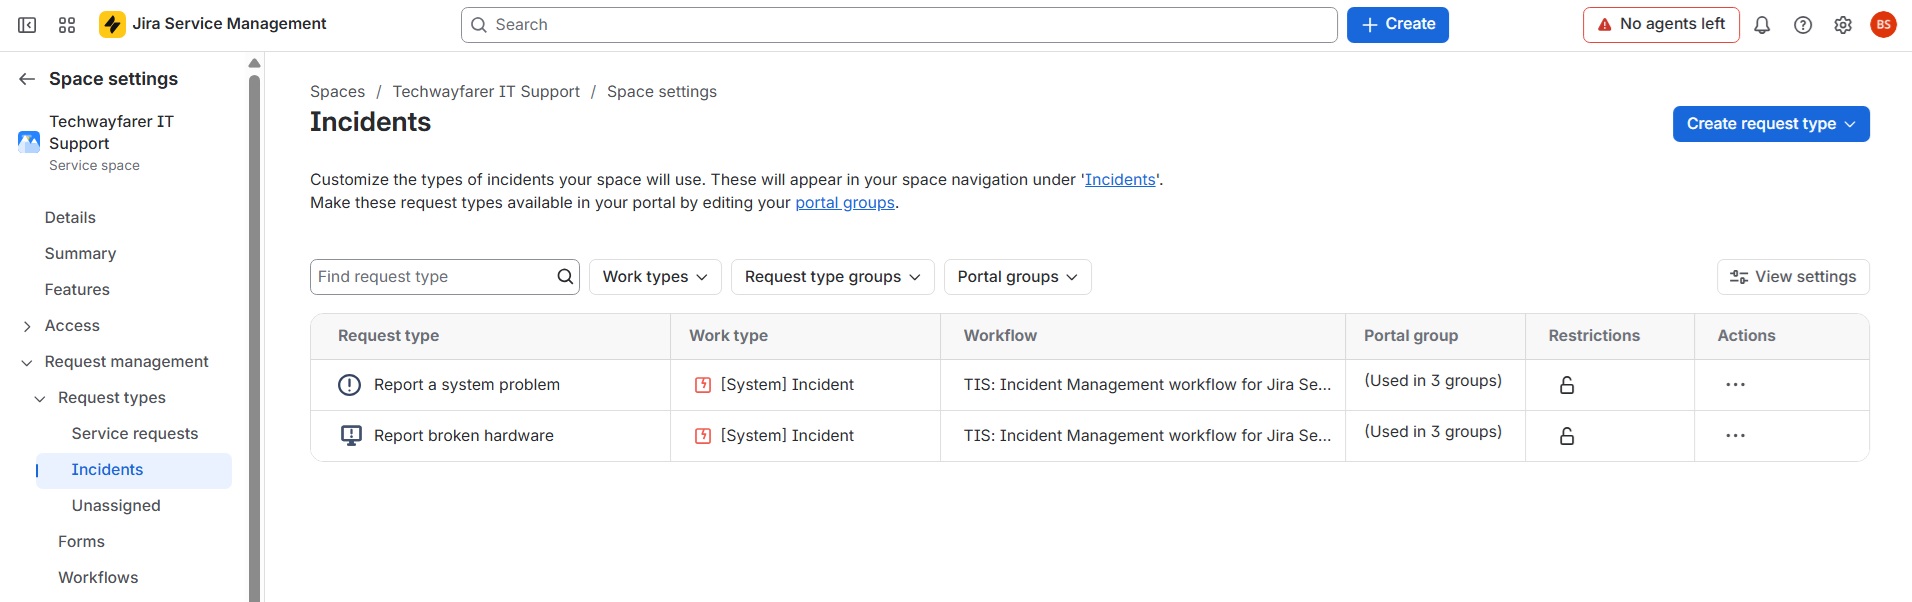
According to Jira, incidents are unplanned service disruptions that require immediate resolution. Below are the two default incident types. You can add more request types to your account by clicking on the button “Create request type.”
Each organization will determine whether an issue classifies as a service request or a system incident. Later in this post we will create example service requests and system incidents.
Modify Request Types
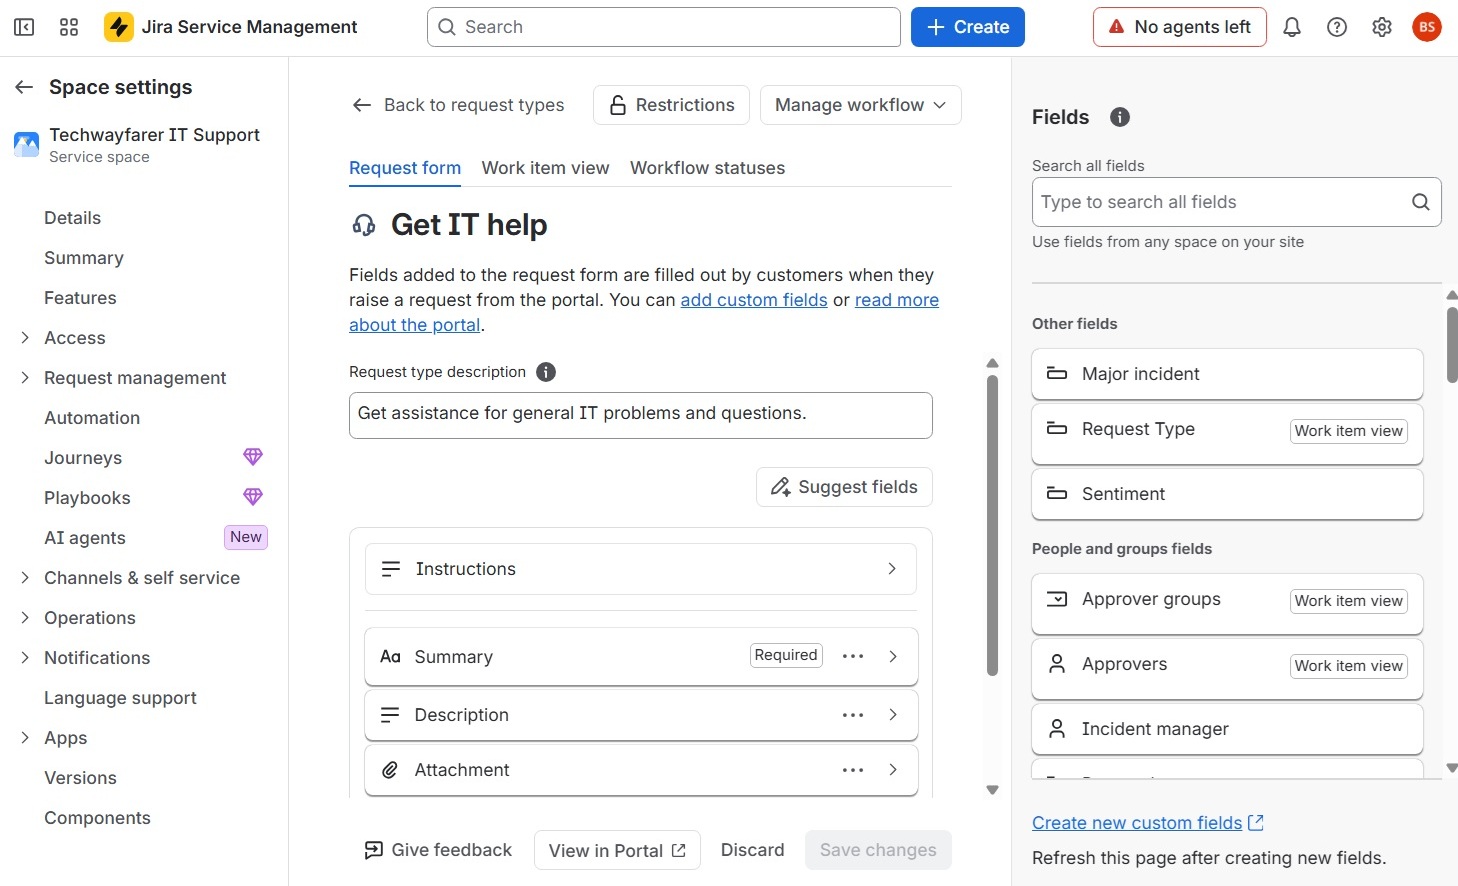
To modify a service request or incident, click on its name under the “Request type” field. Then you can modify the instructions and fields visible in the customer-facing support portal.
Workflow
A service request passes through various stages (or a workflow). A customer or agent opens a request and then the status is updated (either manually by the agent or automatically by the system) until the issue is resolved.
In the earlier section Service Requests vs Incidents we viewed a list of the current service requests types. The third column shows the workflow used by each service request type. They are all using the workflow “TIS: Service Request Fulfillment workflow for Jira Service Management.” We will view the details of the workflow.
The workflows available in JSM are found at Space settings > Request management > Request types > Workflows.
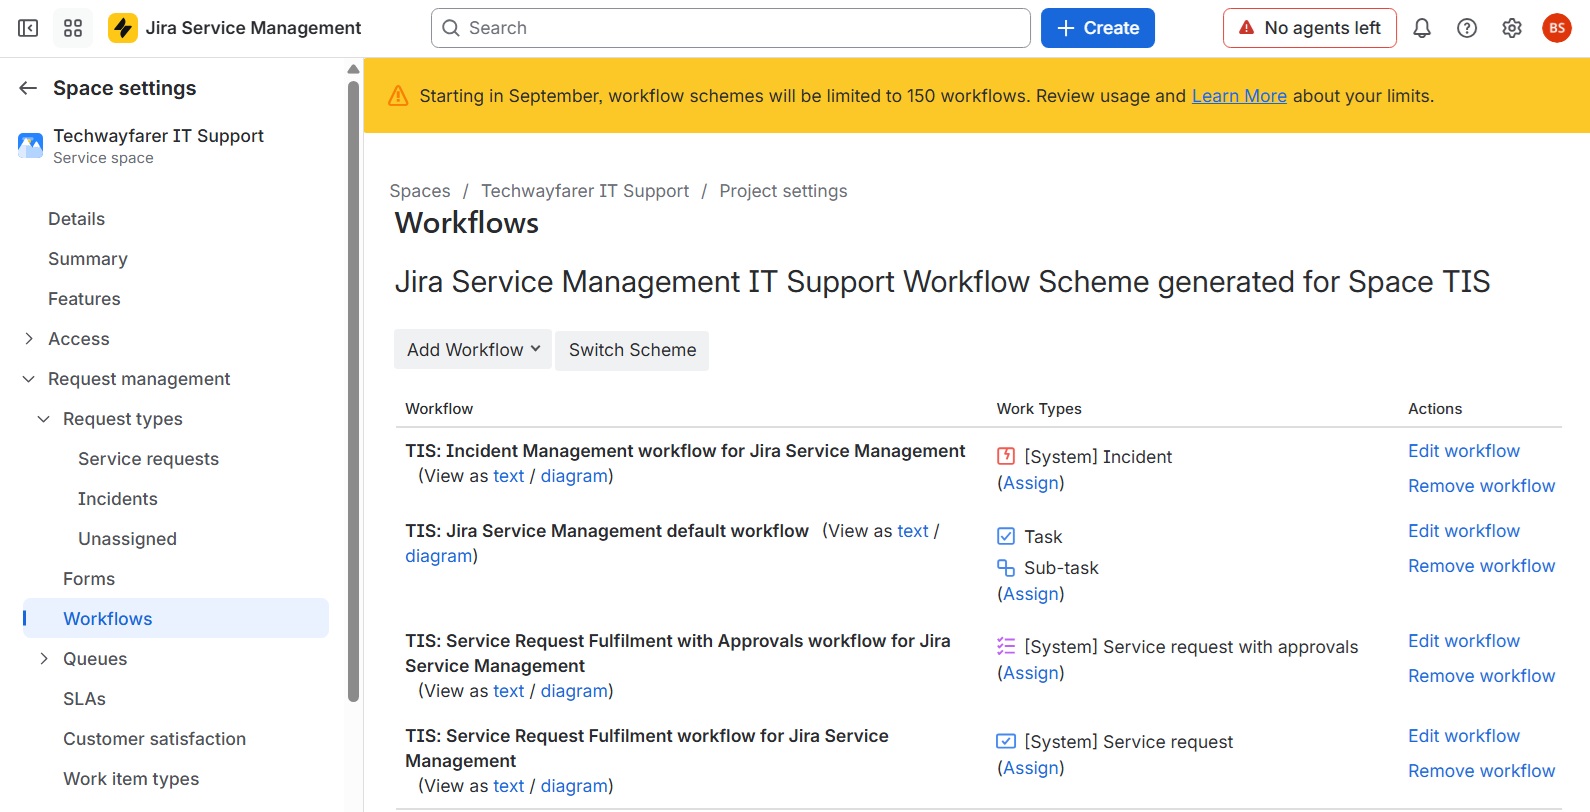
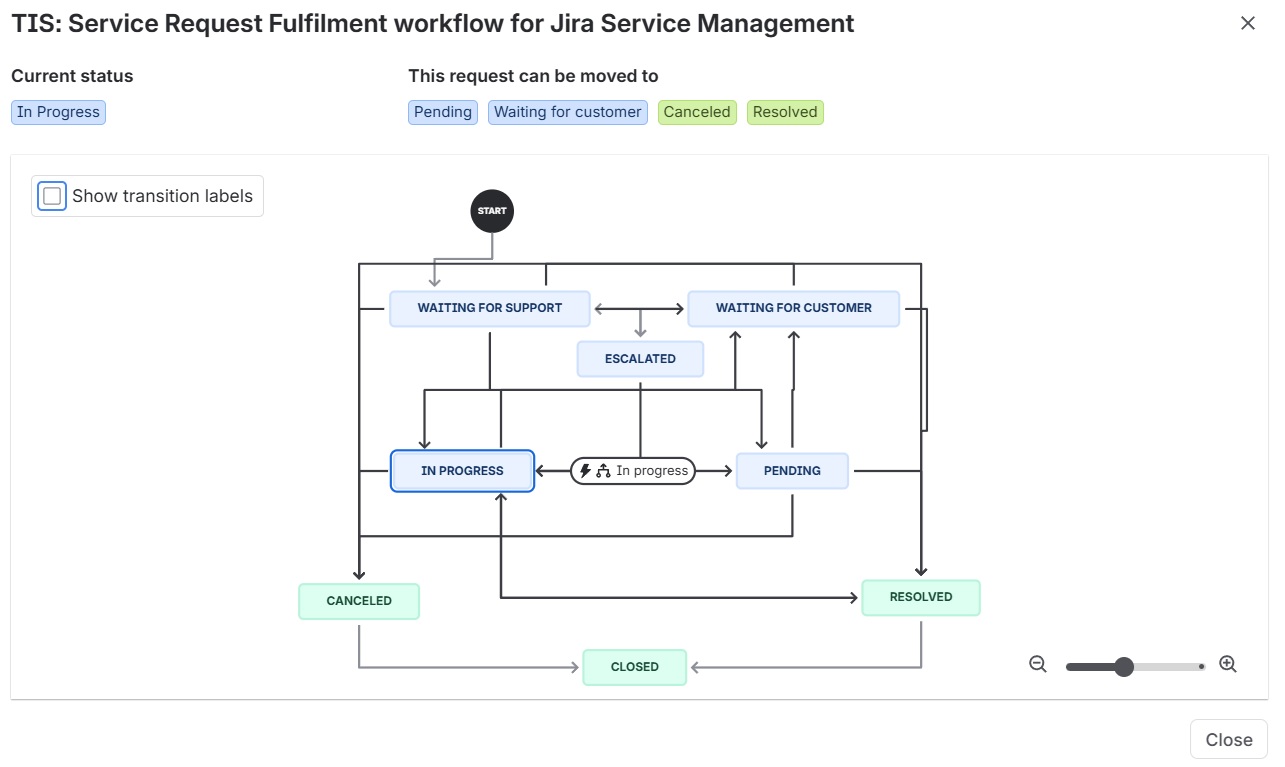
In the Workflows page click the diagram link below the workflow “TIS: Service Request Fulfillment workflow for Jira Service Management.” A pop-up windows displays visual representation of how a ticket can move between the statuses.
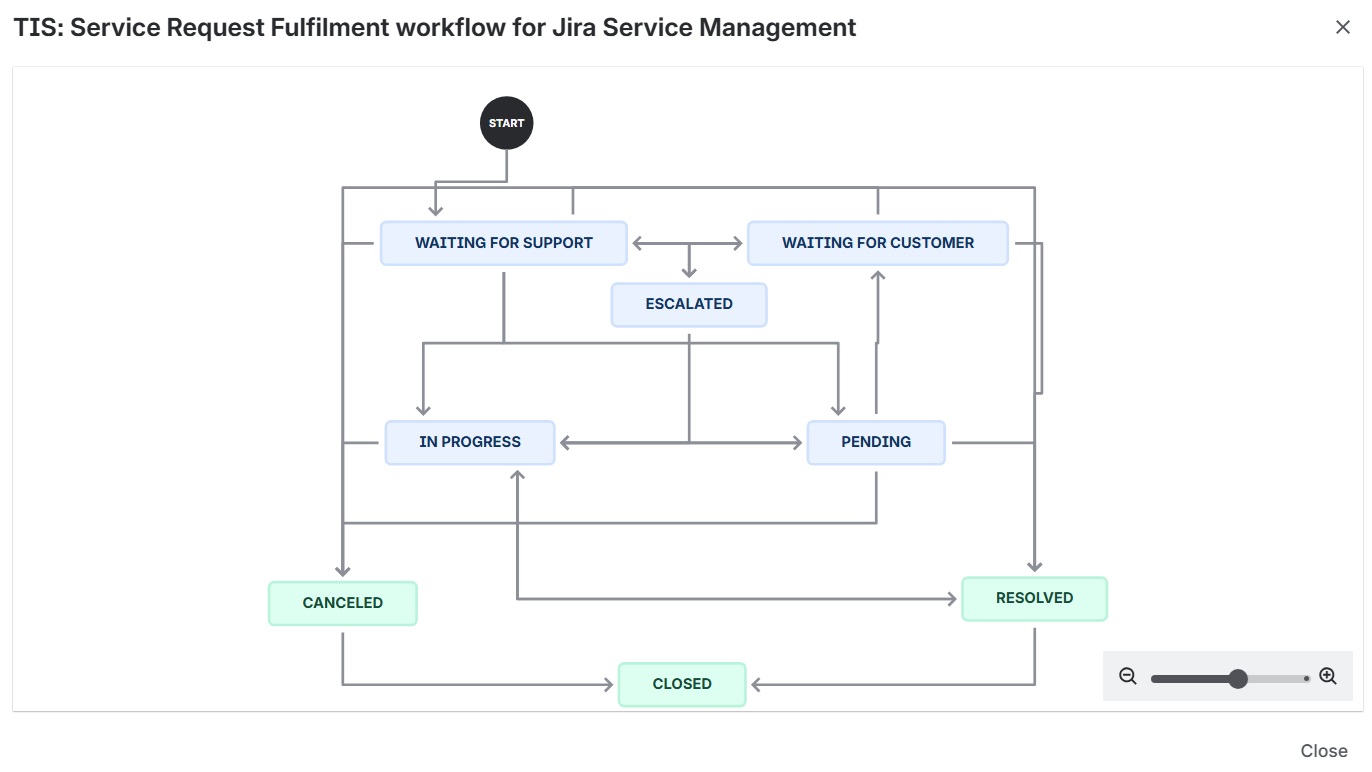
The workflow for a service request can be modified in JSM to align with an organization’s process of resolving tickets. We will modify the “TIS: Service Request Fulfillment workflow.”
In the Workflows page, under the Actions column click on the link “Edit workflow” for “TIS: Service Request Fulfillment workflow.” A page opens where the workflow can be modified. Statuses appear in the first column. Transitions appear in the second column.
For the status “Waiting for customer”, we are going to modify the Transition “Respond to Customer (851).” Click on the transition name and a third column opens titled “Transition.”
Scroll down in the third column to Path > From statuses. Click on the down arrow button and check the box next to “In Progress.” The status “In Progress” is added to the list of statuses that can precede the status “Waiting for customer.” Click the button “Update workflow.”
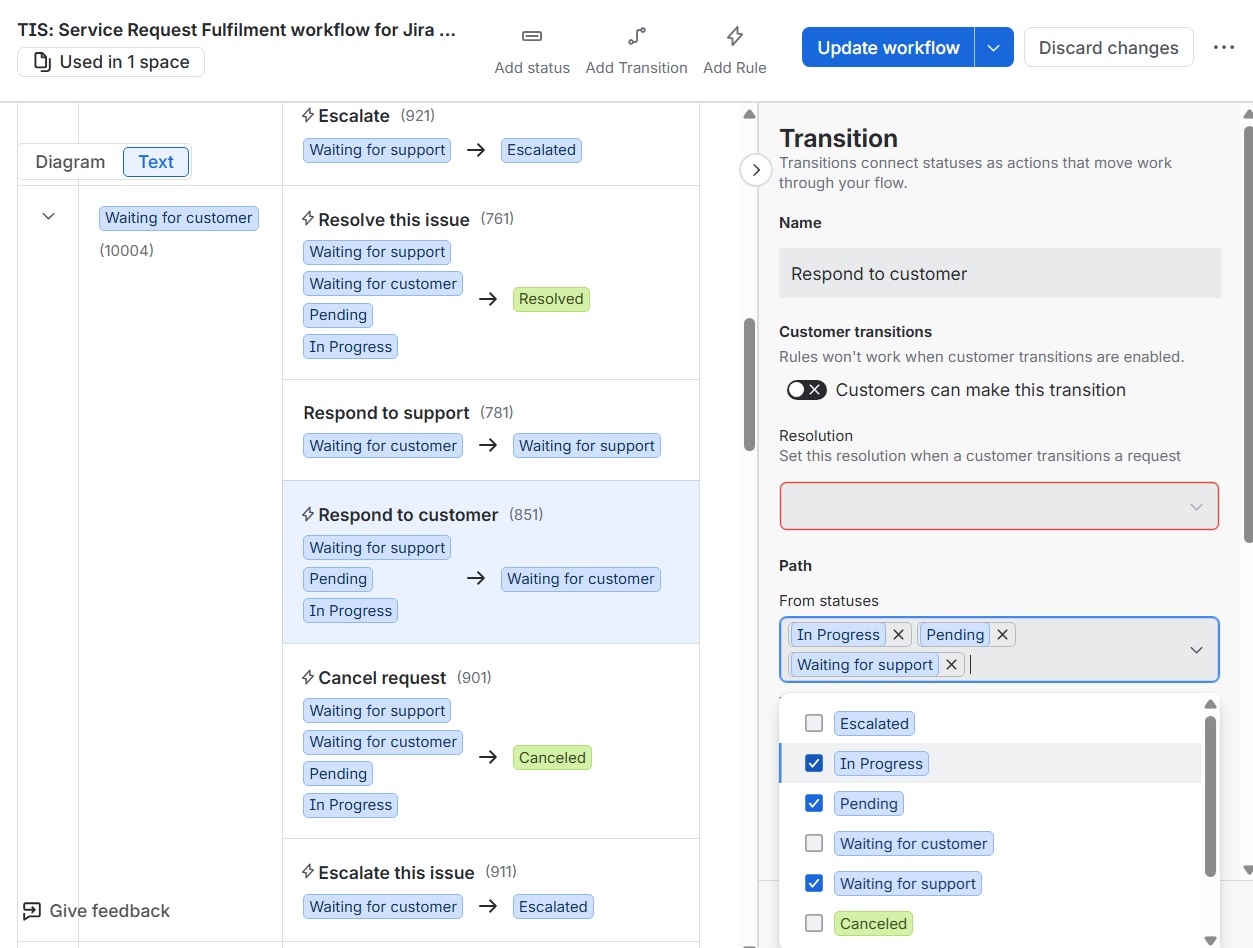
Later in this lab we will walk through a workflow example in which we will need to transition the status from “In Progress” to “Waiting for Customer.”
Queues
Queues are saved searches of service requests that agents use to view, organize, and prioritize tickets. Queues filter requests using criteria such as status or priority. The queues used by the organization are listed in JSM under Space Settings > Request management > Queues.
When our JSM account was created in an earlier step, three queues were provided by default: All open, Assigned to me, and Open tasks.
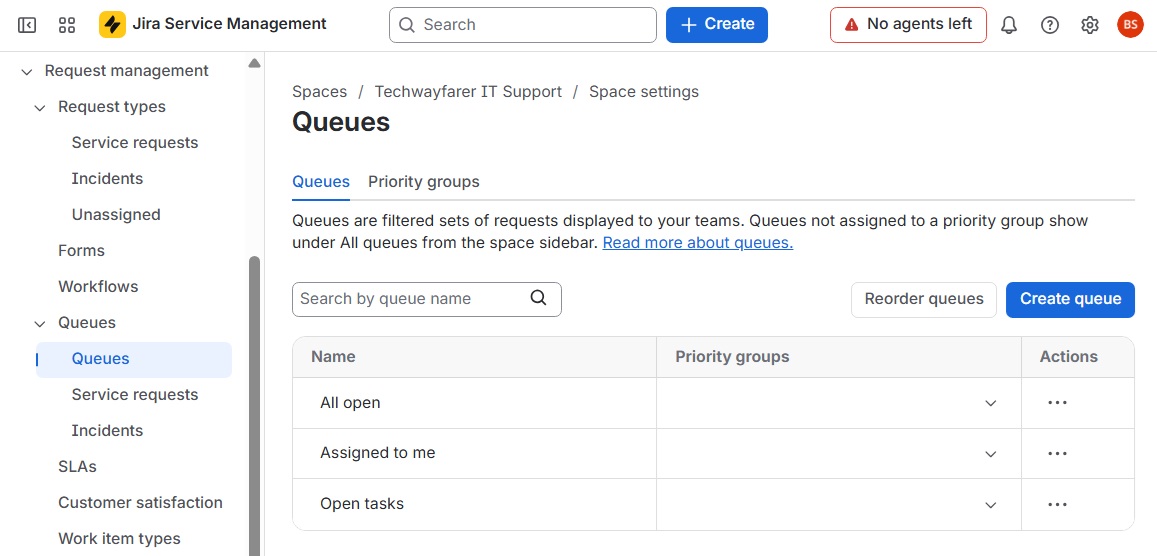
Common queues are: new tickets, high priority, and aging tickets. We will create a High Priority queue. In the Queues windows click the button “Create queue.”
In the “New Queue” window, enter “High Priority” in the “Queue name” field.
Leave the field “Assign to priority group” blank. Our lab has only a few agents and there is no need to use priority groups.
Under “Filter by” click on “More filters” and choose Priority, which will then appear in the Filter by list. Click on Priority in the list and choose the criteria. The options are Highest, High, Medium, Low, and Lowest. Choose Highest and High.
Under Columns add Priority so the field is visible in the list of High Priority requests.
Scroll down and click the Create button.
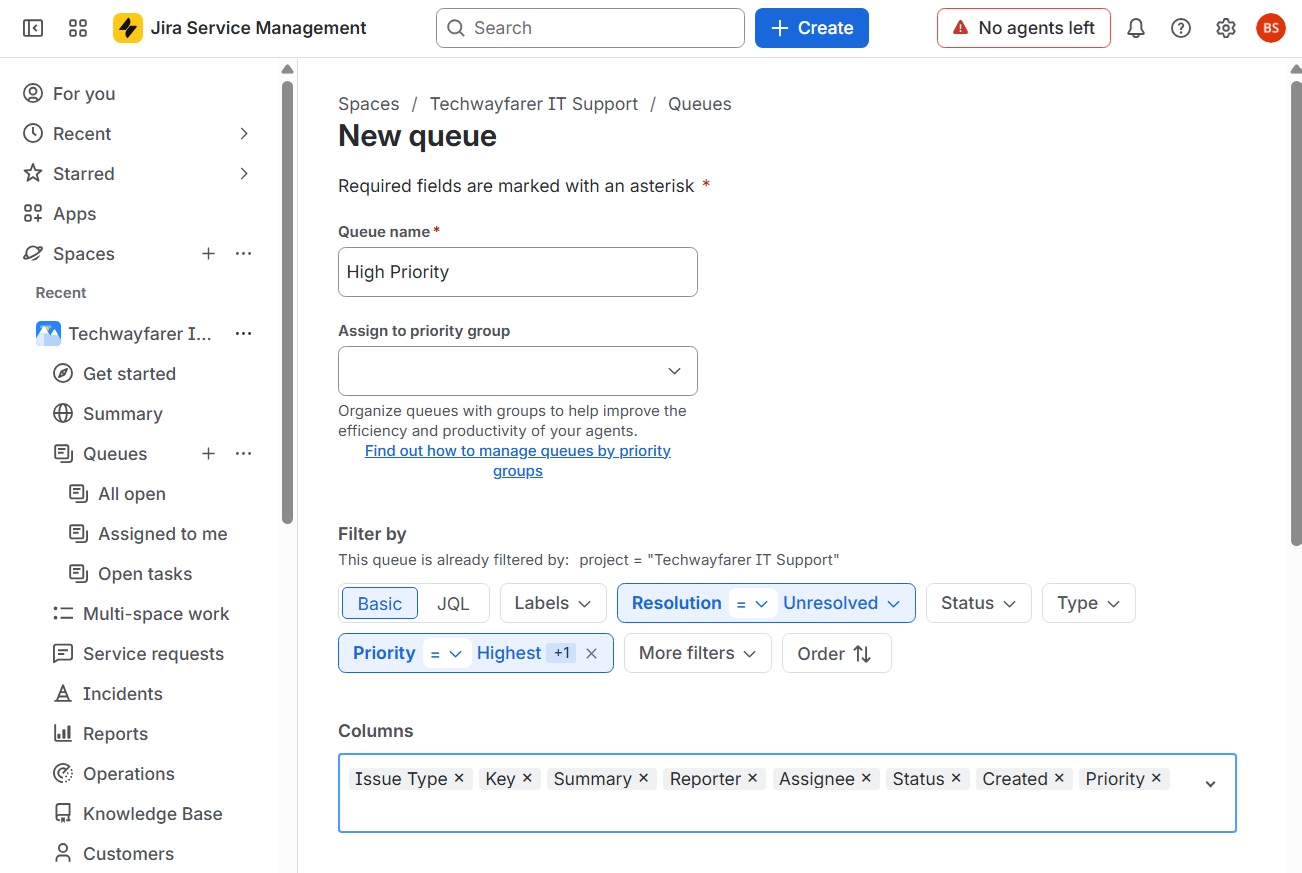
The High Priority queue will now appear in the list of queues in JSM under Space Settings > Request management > Queues.
Reports
JSM has default reports that provide useful information for tracking performance by the support team. You can also create a custom report such as “Time to first response.”
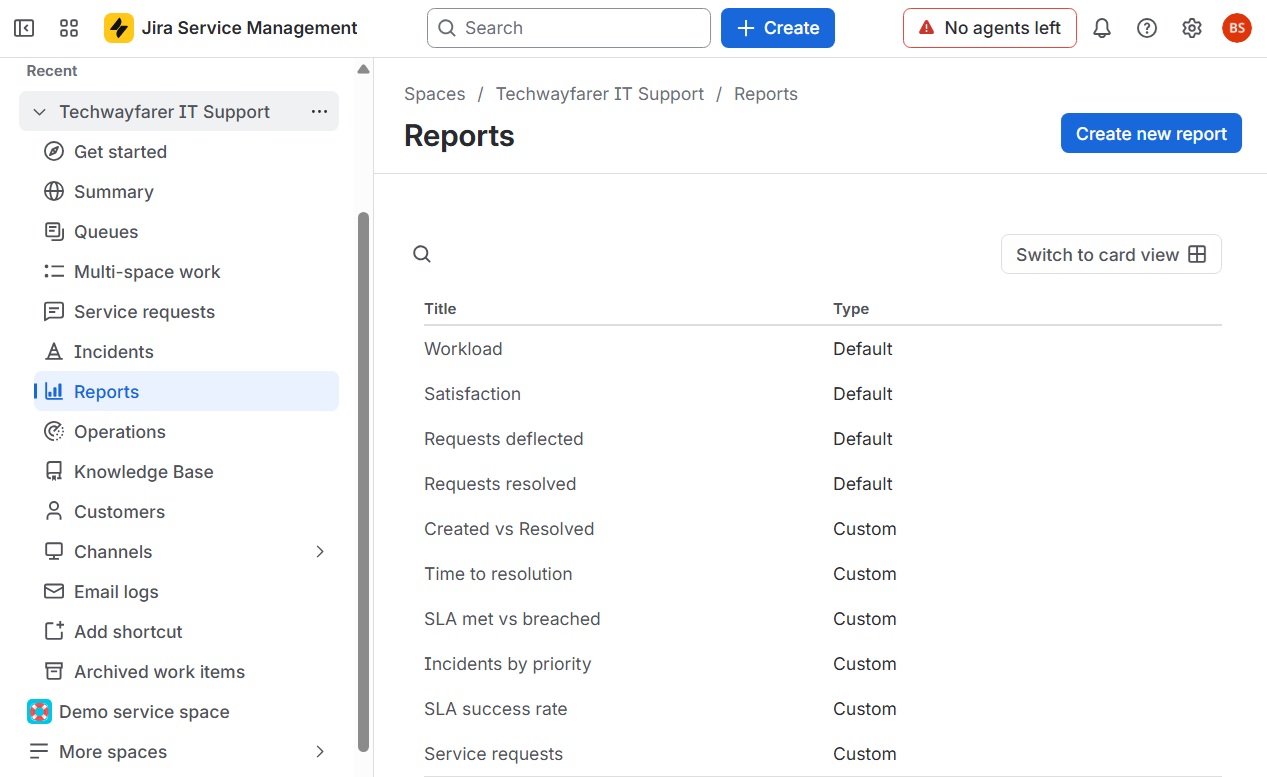
Open Tickets
In this section we will explore the various ways that customers and agents can create tickets for either service requests or incidents. In an organization, agents and customers can create requests using either the portal, email, or chat using Slack or Microsoft Teams. Agents can also manually create a new service request when logged into the back end of JSM.
In the following sections we will create service requests using:
- The Create button that is found on the navigation bar and accessible by agents when logged into JSM
- Emails sent from customers
- The IT support portal that is accessible by customers and agents
Create Button
Agents can open a system incident or service request using the Create button found in the top navigation bar of JSM. Agents may create a service request after talking with a customer. Or an agent may open a system incident after discovering a significant issue that needs to be addressed quickly.
To open a ticket using the Create button, login to JSM using an agent account created earlier (e.g., Henry David Thoreau). Click the Create button in the top navigation bar to open the form titled “Create Report a system problem.”
In our first example, the sales staff is unable to access the CRM. The issue can significantly affect business operations, so it is classified as a system incident instead of a service request. Fill out the fields in the form and click Create at the bottom of the form.
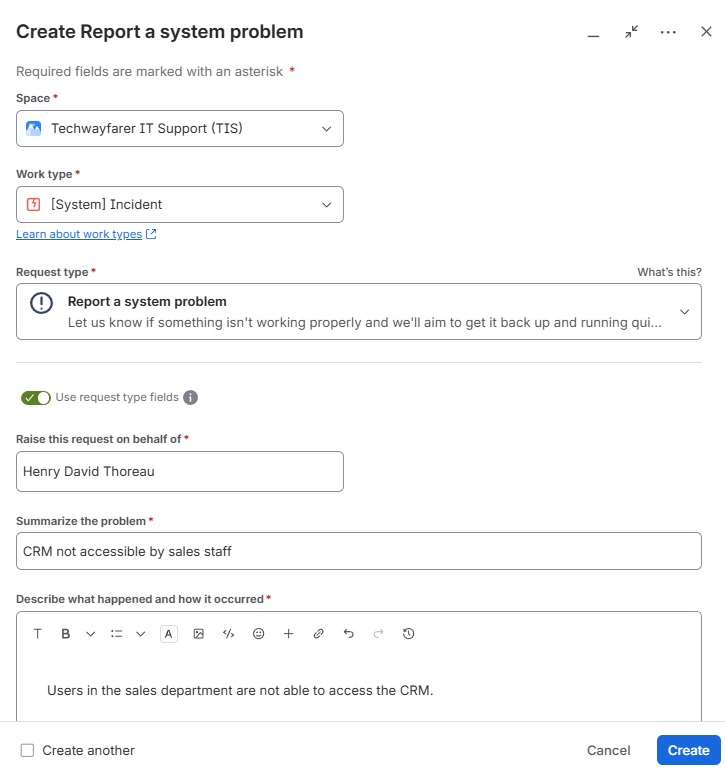
In our second example, the Enterprise Resource Planning (ERP) being down. Since ERP affects many business operations it is classified as a critical system incident. Just like in the first example, click the Create button in the navigation tab, fill out the form titled “Create Report a system problem”, and click Create at the bottom of the form.
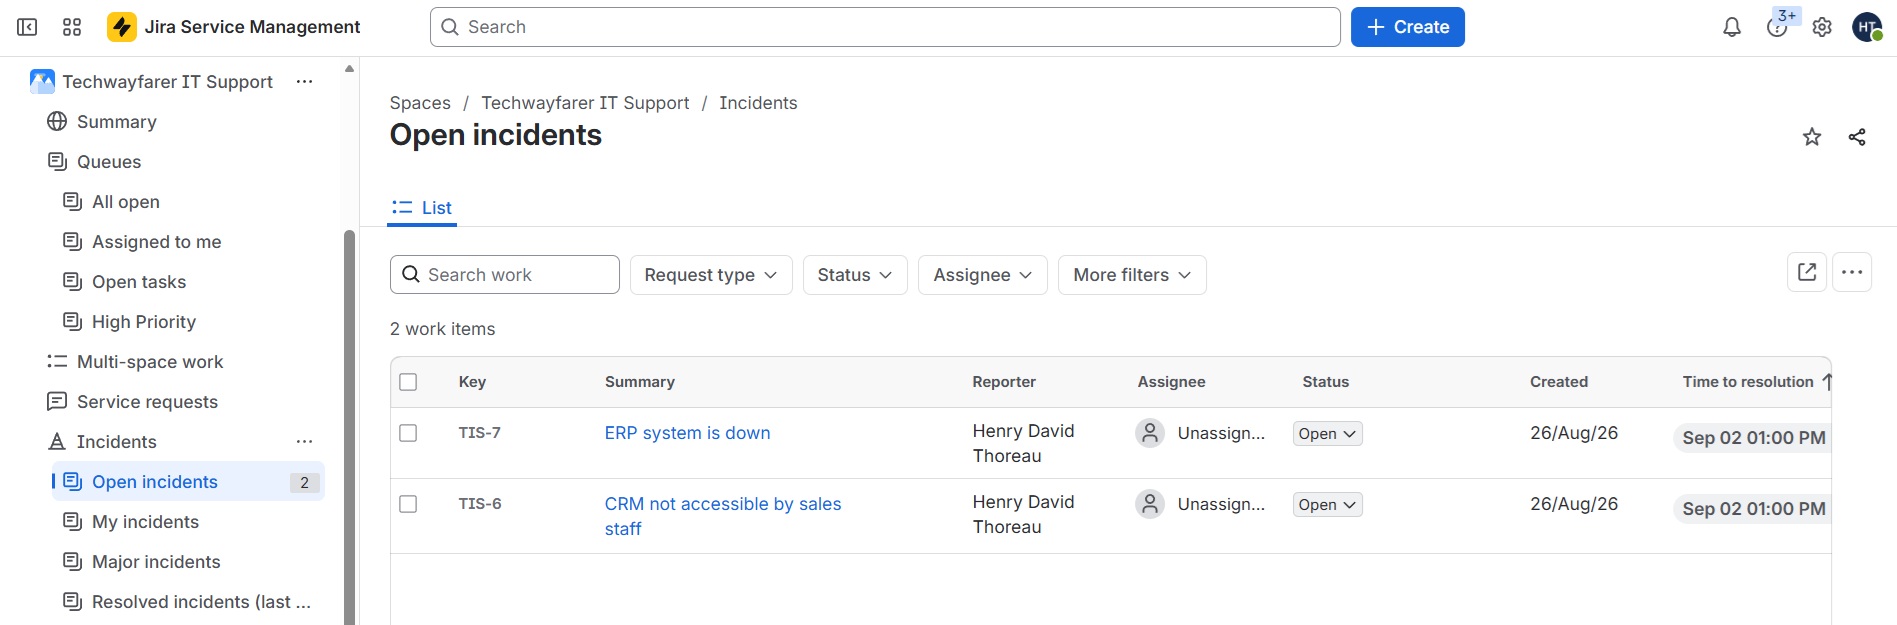
After creating the two system incidents, an agent can view them in JSM by opening the IT Support space and choosing Incidents > Open incidents.
A customer can create a service request by sending an email to a specific email address. The first step is to specify the email address. In JSM go to Space Settings > Channels & self service > Email.
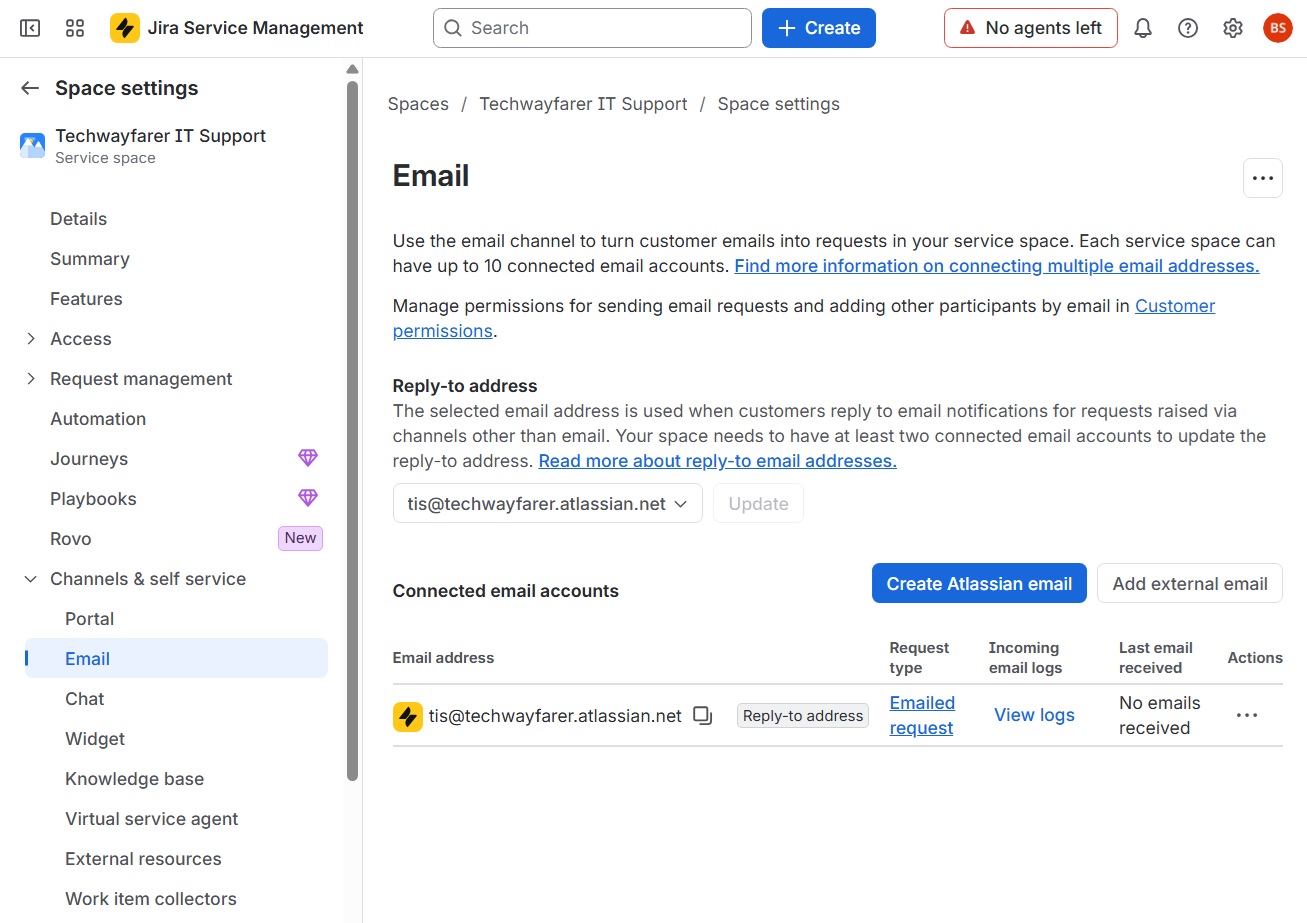
When using a free version of JSM, the domain assigned to your account will be in the format companyname.atlassian.net. When your account is created a default email is created for receive service requests from customers (e.g., tis@techwayfarer.atlassian.net).
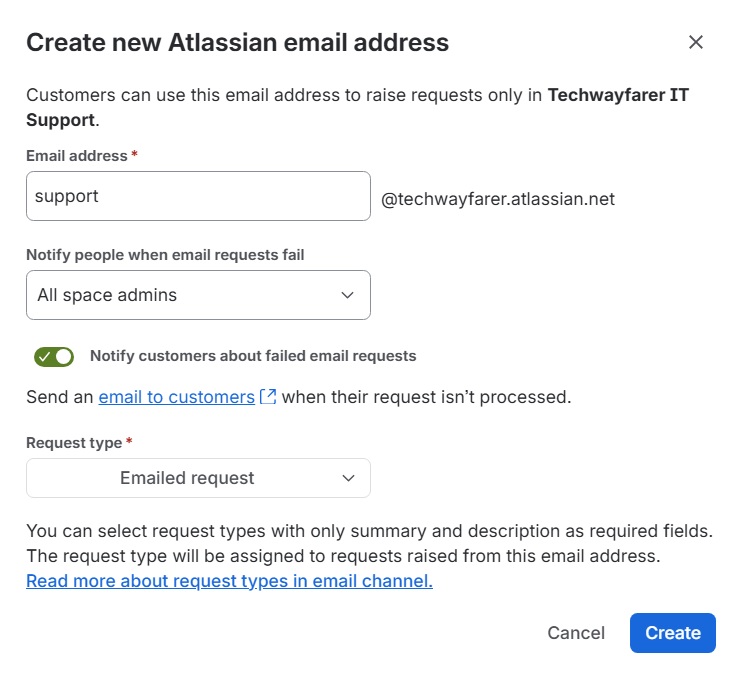
Add another email by clicking the button “Create Atlassian email.” In the pop-up window enter the email address. Choose who will be notified when email sent to the address fails to create a service request. And choose the “Request type” that will be assigned to the service request. Then click Create.
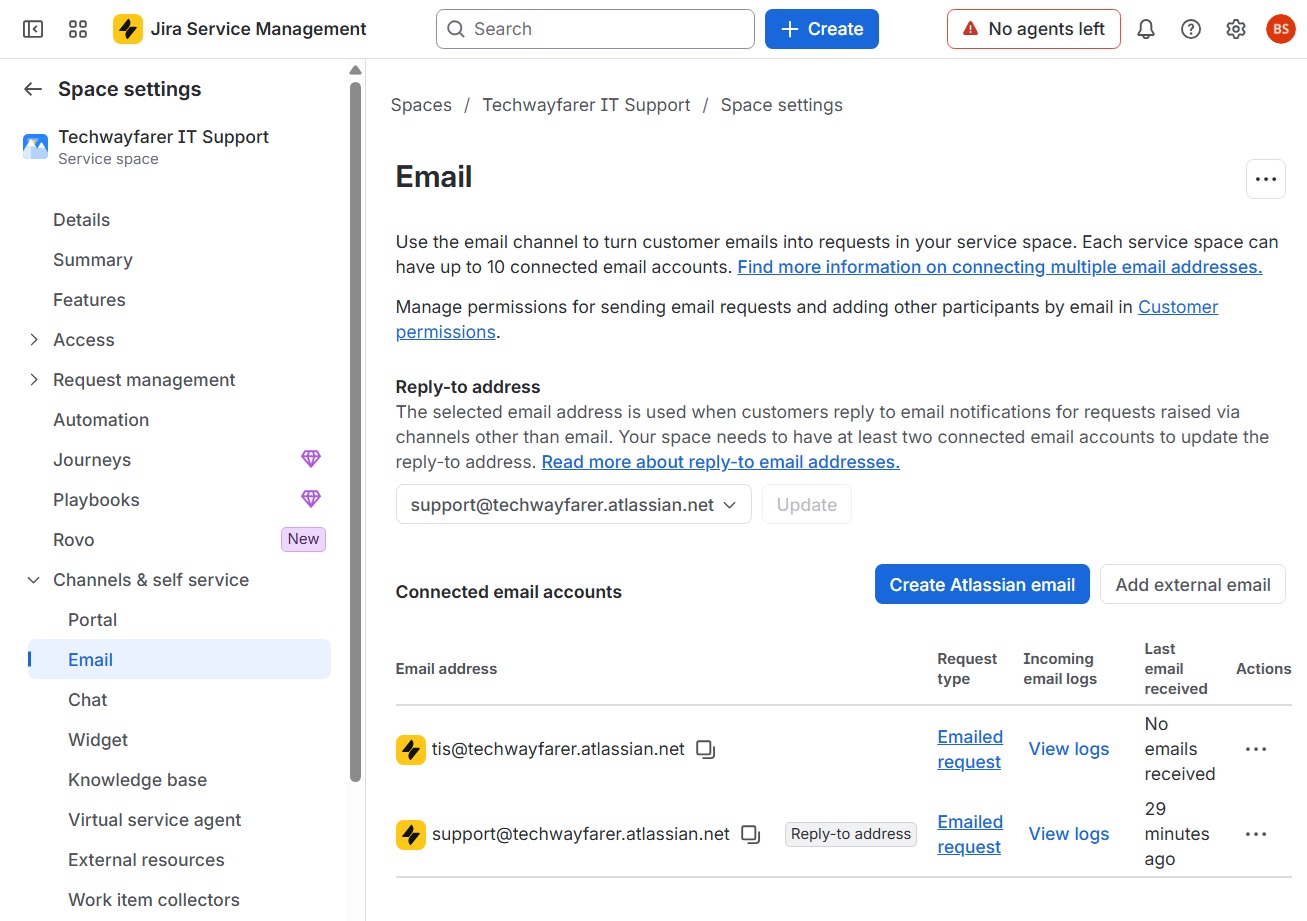
The new email address is added to the list of connected email accounts. Under “Replay-to-address” change the email address to the one just created (e.g., support@techwayfarer.atlassian.net) and click Update.
We will test whether support requests can be created by email by sending a support request from a customer’s email account (e.g., farrah@techwayfarer.com) to our new support request email address (e.g., support@techwayfarer.atlassian.net). After sending the email, the request appears in JSM at Techwayfarer IT Support > Service requests > Open service requests.
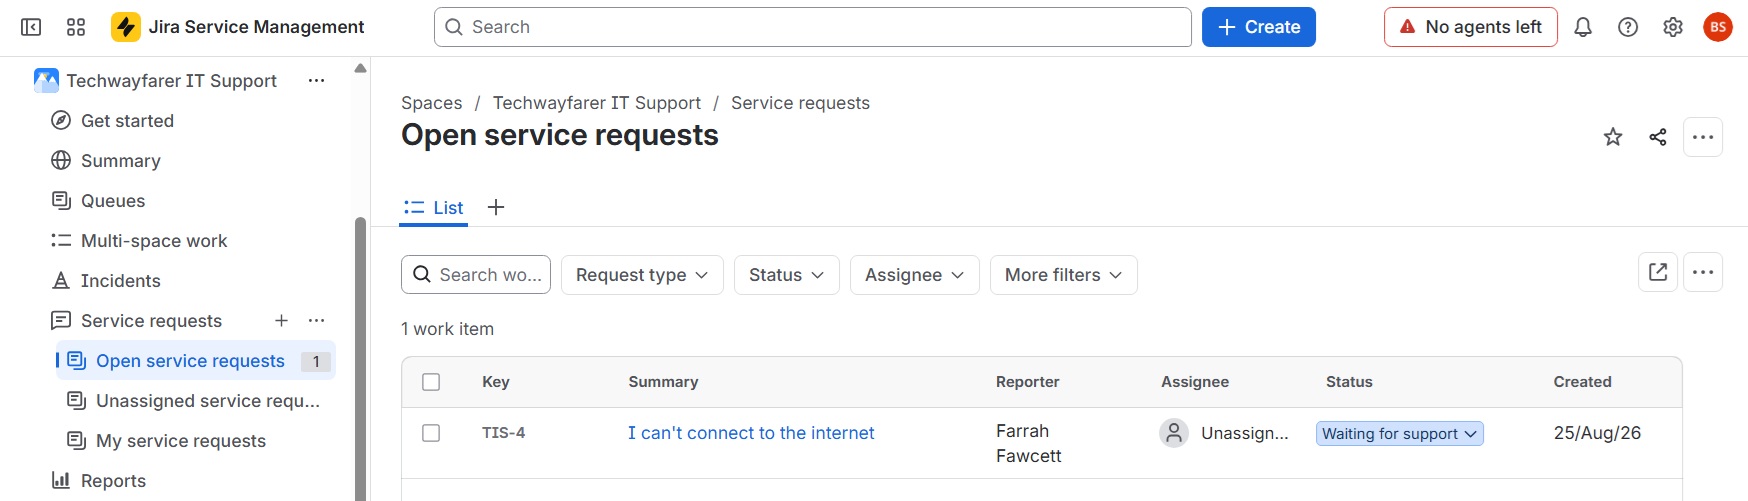
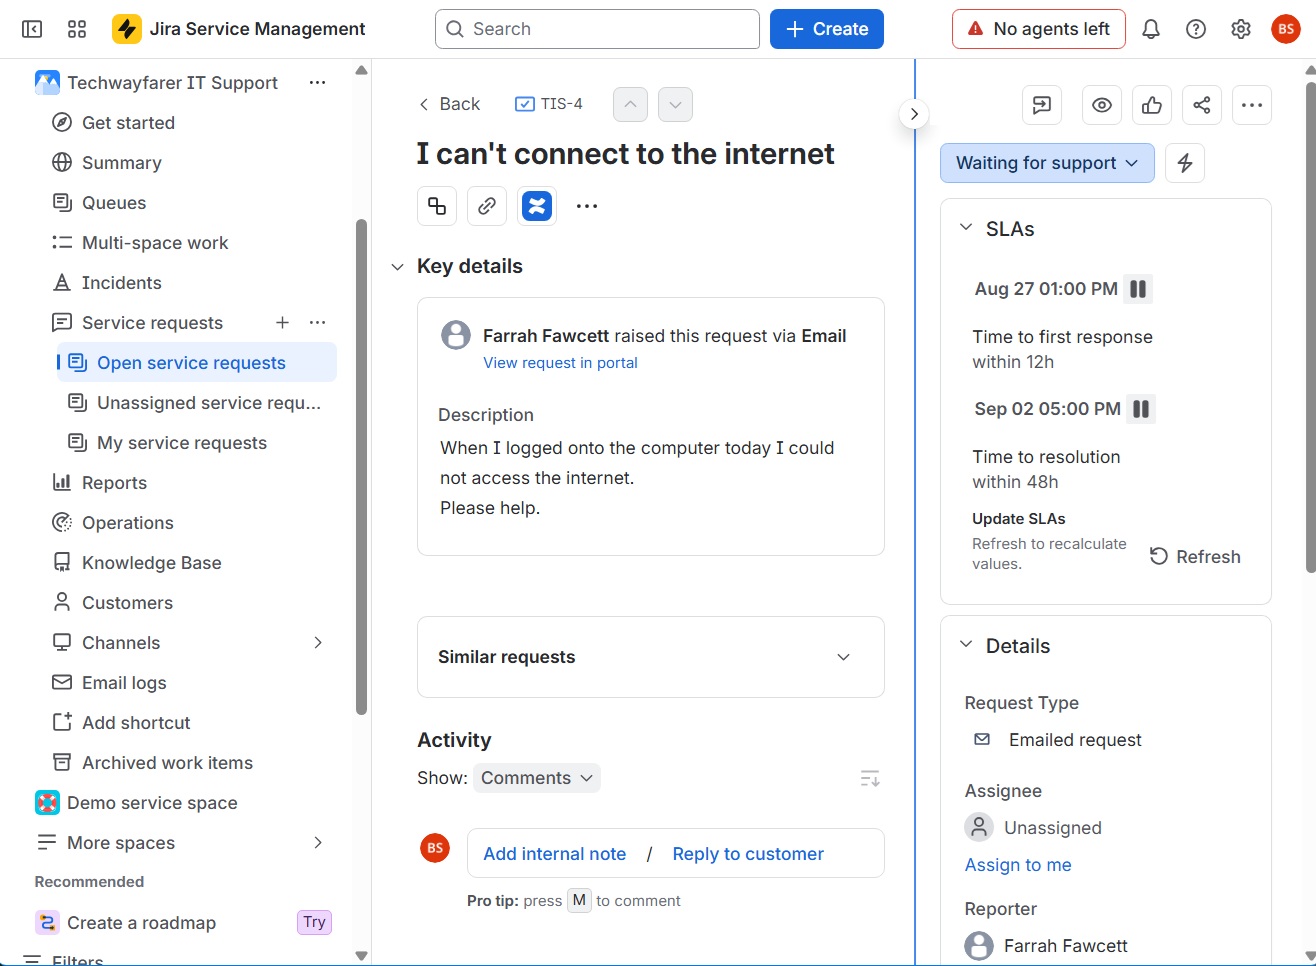
In the “Open service requests” window click on the title of the request to see the details. The subject line of the email becomes the title of the request. The body of the email is displayed under “Key details.” The customer (Farrah Fawcett) is identified as the reporter. And the SLA status is shown in the right column.
Support Portal
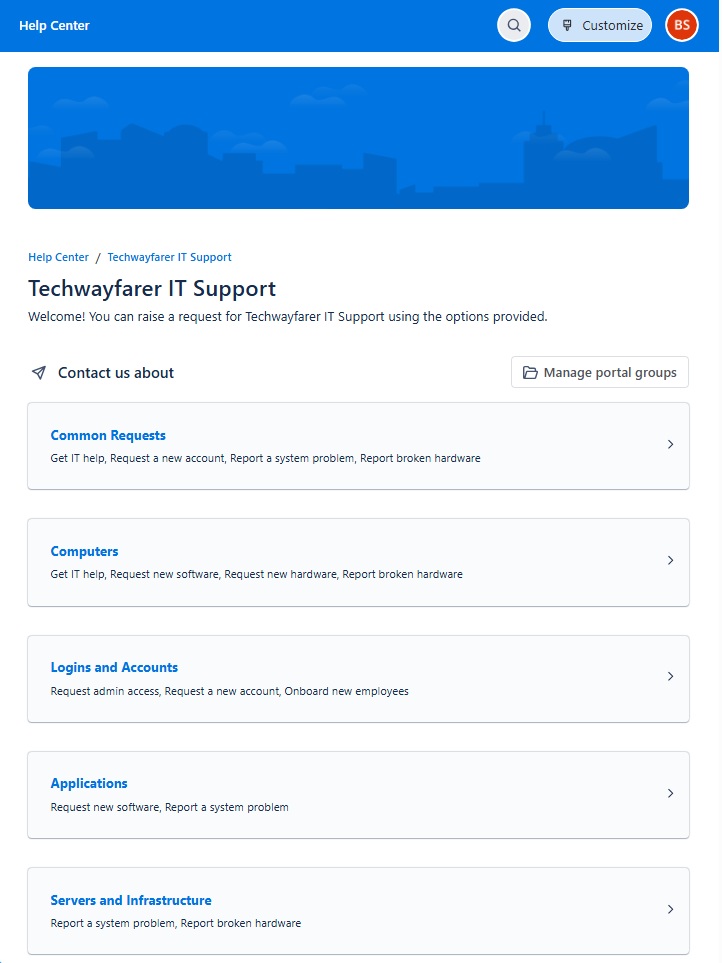
The support portal is often the primary way that customers create service requests in JSM. To create a ticket using the portal, first find the URL for your organization’s portal. In JSM go to Space Settings > Channels & self service > Portal. In the Portal window, the “Portal configuration” tab provides the URL to the customer portal (e.g., https://techwayfarer.atlassian.net/servicedesk/customer/portal/3). Copy the URL and paste it into a web browser.
Portal Settings
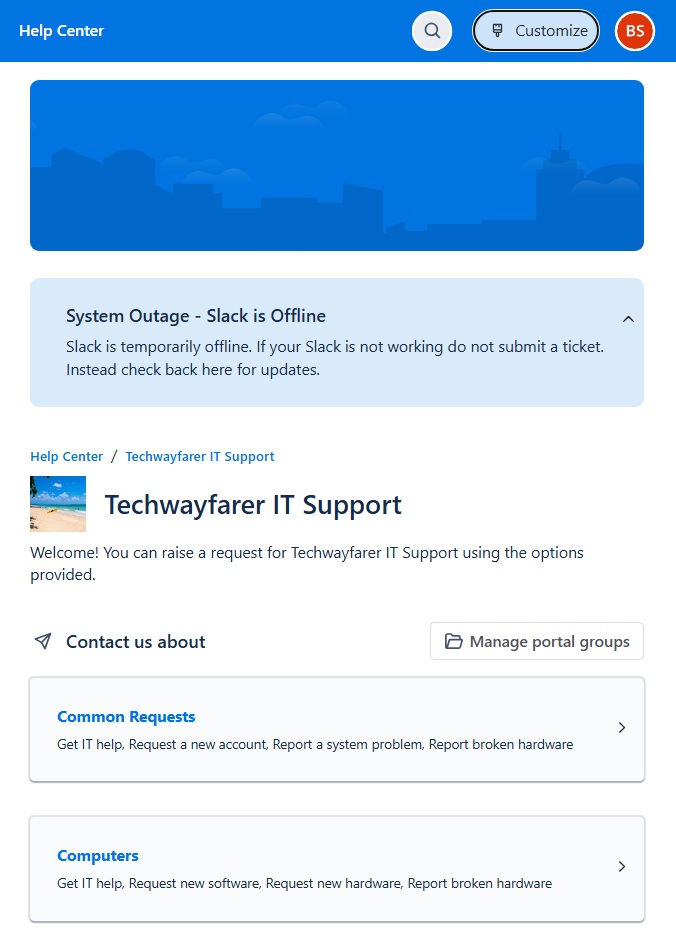
The appearance of the portal can be changed in the Portal window under the “Portal configuration” tab. You can change the name of the portal and the introductory text. And you can add a logo. You can also scroll down in the “Portal configuration” tab and under Announcements allow agents to add messages to the top of the portal.
Announcements
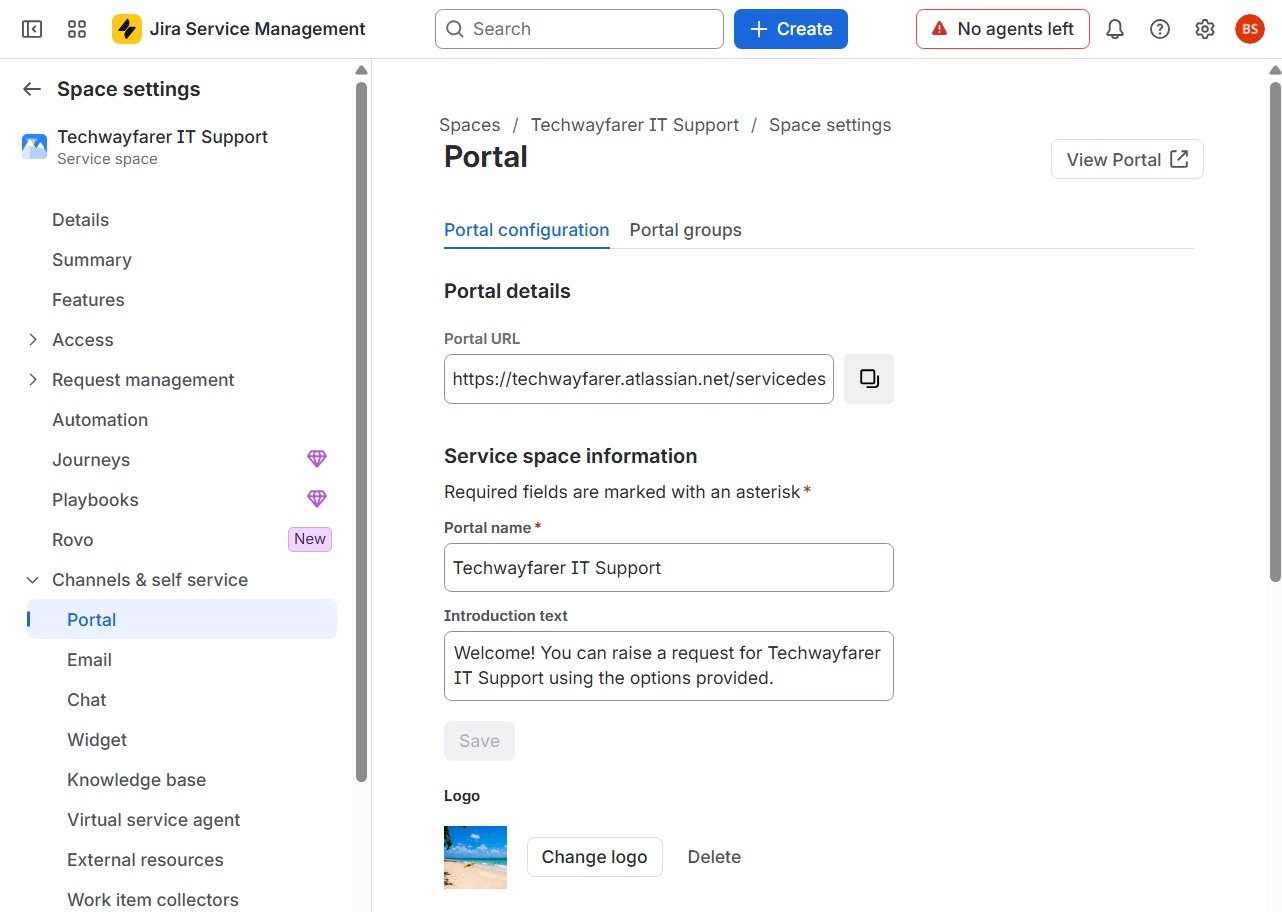
Agents can add announcements to the top of the portal that inform customers of current support issues. After an agent is given permission to create an announcement (see Portal Settings) he can add one by opening the support portal and clicking on Customize > Manage announcements.
Login to JSM using one of your agent accounts created earlier. Then fill out an announcement and click Save.
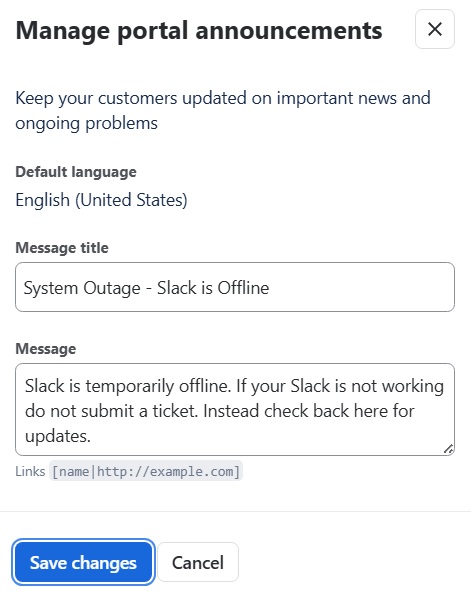
The announcement, portal name, introductory text, and logo are visible in the portal.
Modify Portal Groups and Request Forms
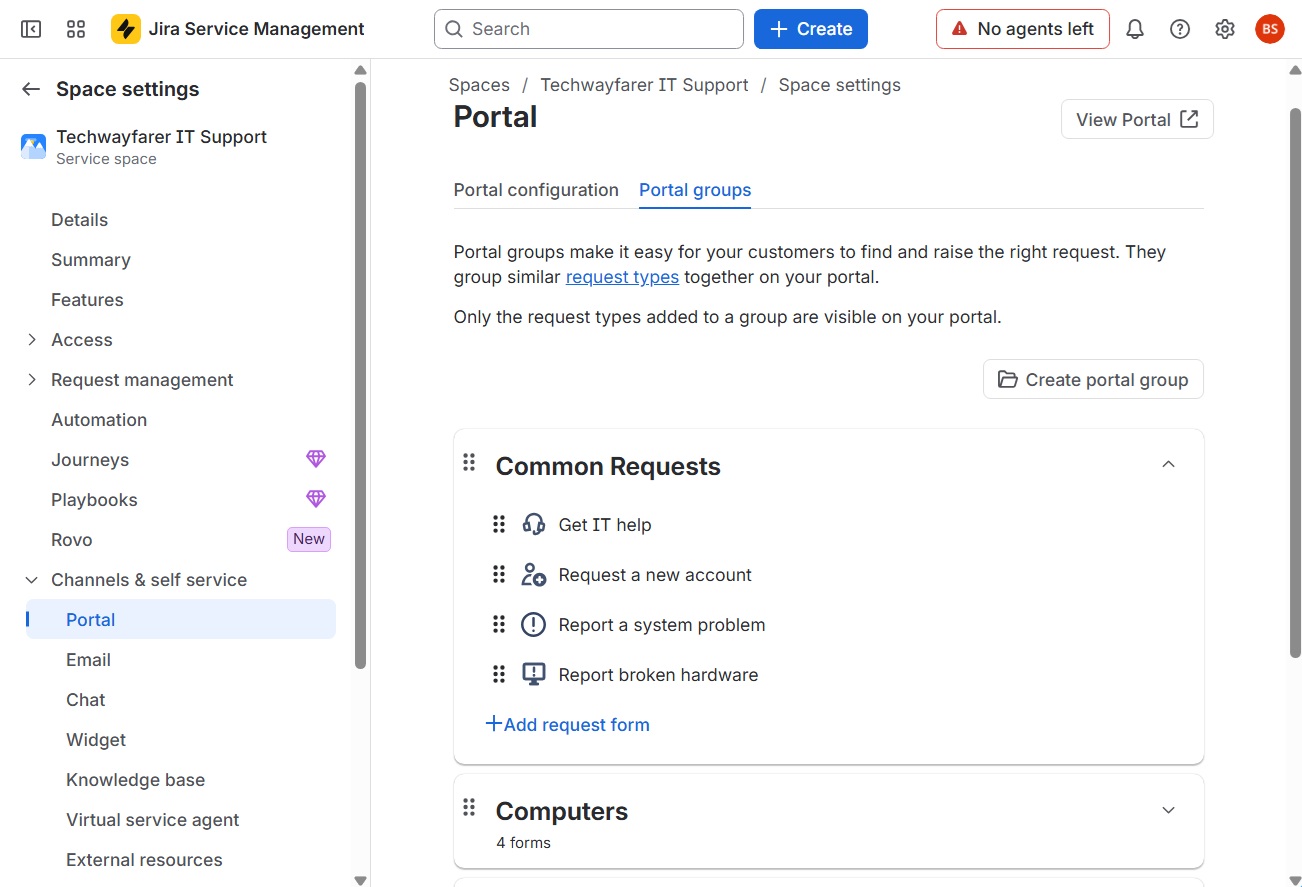
Portal groups are used to organize request forms on the support portal. So customers can more easily find the appropriate request form in the portal and create a new service request.
Under each portal group is a list of typical request forms. IT administrators can modify the portal groups and the request forms listed under each group.
The portal groups can be modified in JSM at Space Settings > Channels & self service > Portal > Portal groups tab. Click on a down arrow button for a portal group to see the related request forms, modify the order of the forms, and add a new request form.
Help Center
In JSM the Help Center acts as a homepage for accessing all the project portals in an organization. There is a separate portal for each service project (e.g., IT Support or Human Resources).
To access the Help Center click on the link in the top left corner of the IT Support Portal. Below is the default look of the Help Center. In our lab there are two portals. “Demo service space” was created by default. “Techwayfarer IT Support” was created for our JSM space.
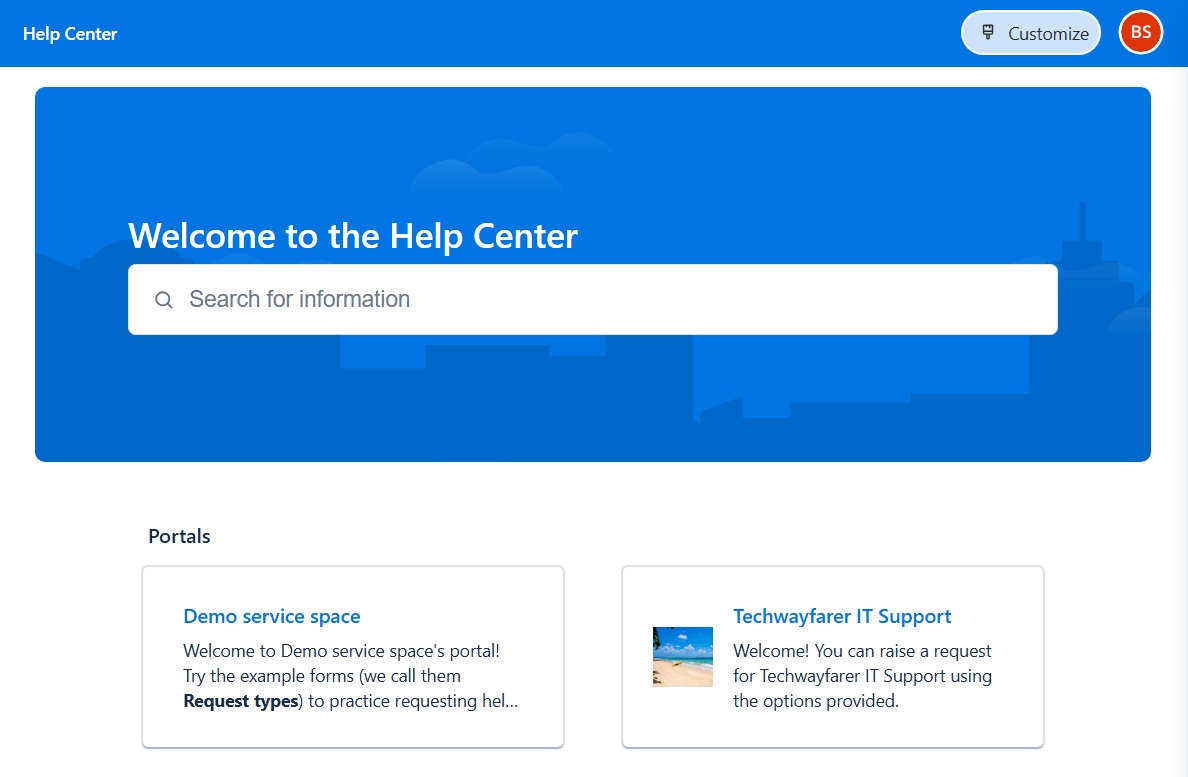
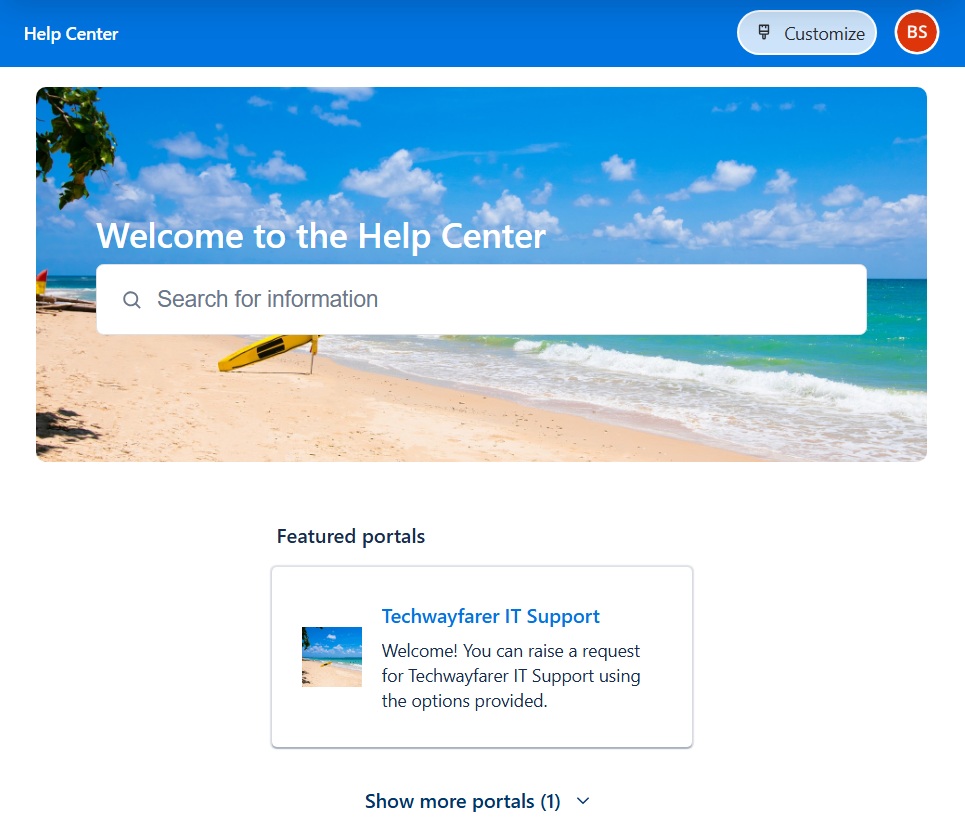
To customize the Help Center click on Customize. In the Customize menu choose “Customize look and feel” to modify the name, title, and logo for the Help Center. Choose “Manage topics and portals” to feature a portal in the Help Center or add Topics that bring together request forms, knowledge articles and links to external resources.
Below the Help Center has been updated with a new image and a featured portal.
Create Tickets in the Support Portal
This section will illustrate how customers can create service requests or incidents in the support portal.
To access the portal a customer needs the URL, which might be found on a company wiki page or in an email sent by an agent. See the Support Portal section for instructions on locating the portal URL.
Open the customer portal and when prompted login as a customer (e.g., Jaclyn Smith). Then click on the portal group “Common Requests.”
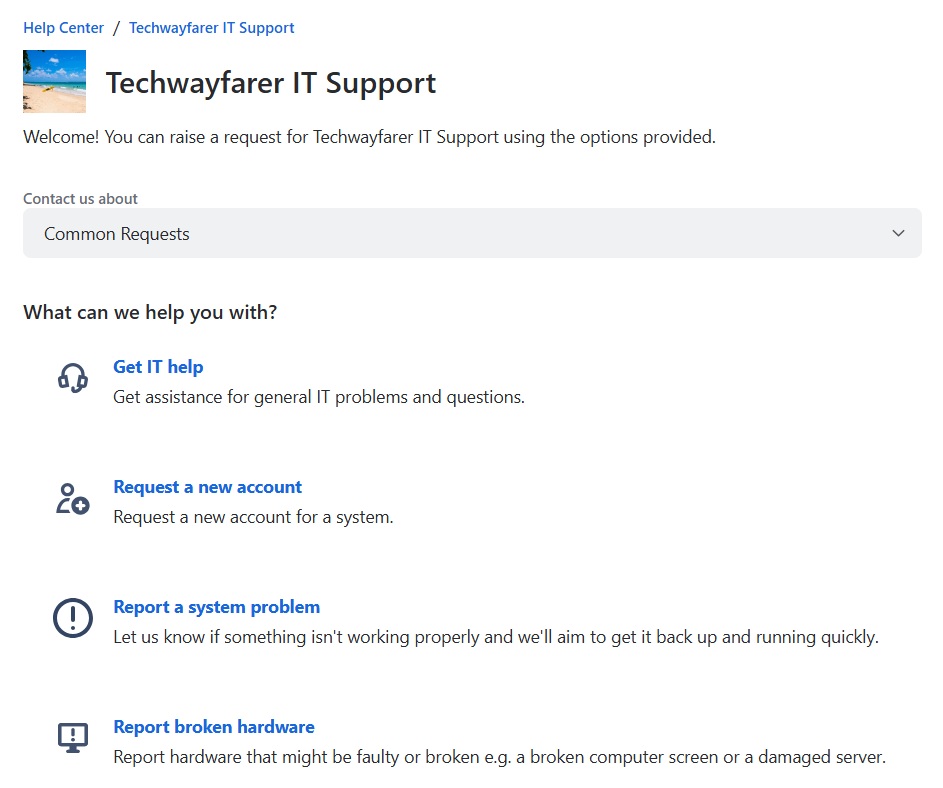
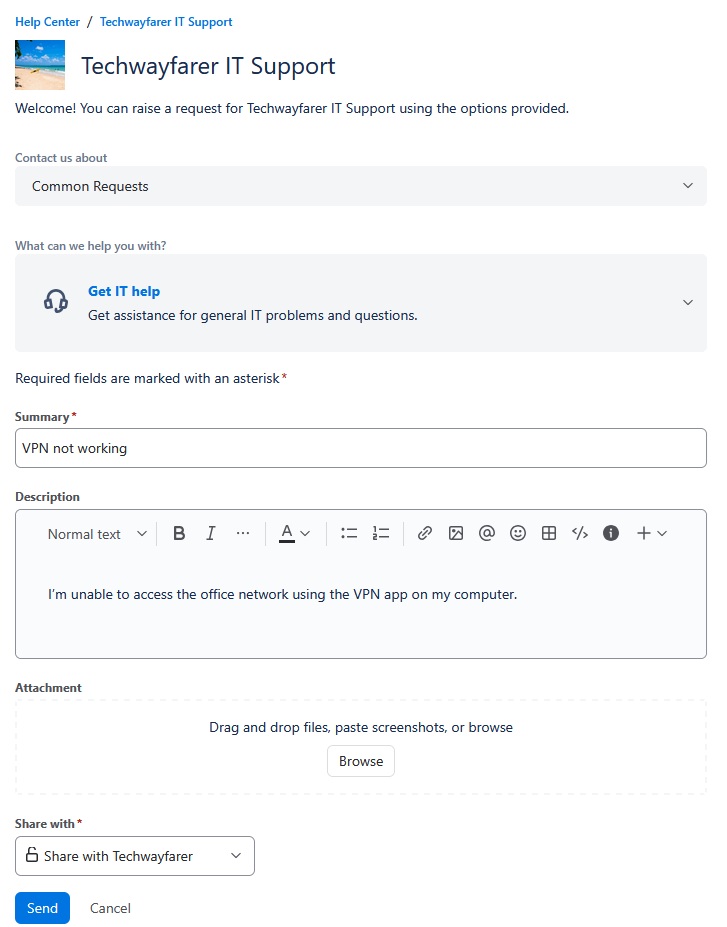
Click on a service request type (e.g., Get IT help) to open the request intake form. Fill out the fields with an example ticket (e.g., VPN not working).
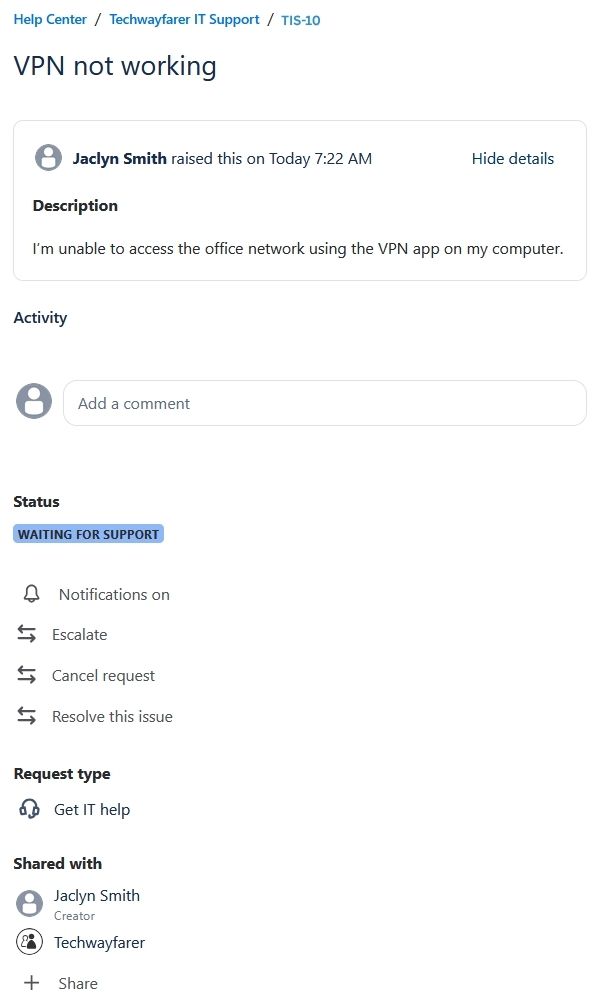
Click send. A verification pop-up will appear stating that the ticket was created successfully. And the reporter will see a summary of the request that was just created.
We will add more example service requests. Then in a later section we can triage the requests.
After creating the service requests, an agent (e.g., Henry David Thoreau) can view them in JSM by opening the IT Support space and choosing Service requests > Open service requests.
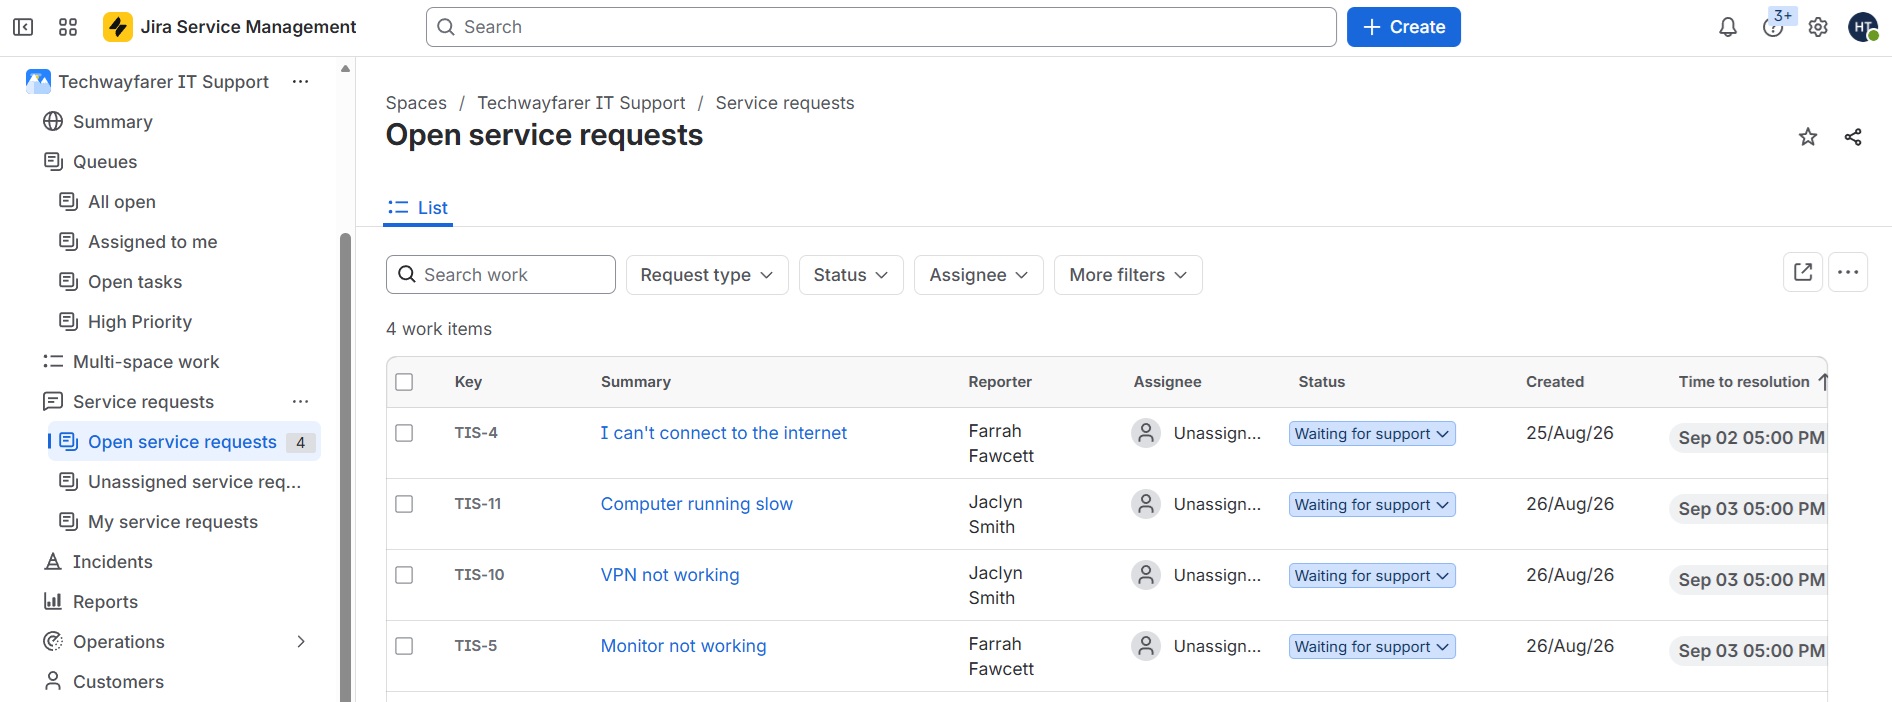
Keep in mind that in Jira open service requests and open incidents are found in two different locations in the menu. Incidents are located just below service requests.
Triage Requests and Incidents
Triage is the process of reviewing, sorting, prioritizing, and assigning incoming service requests or incidents as they are created in JSM. In this section we will triage the tickets created earlier.
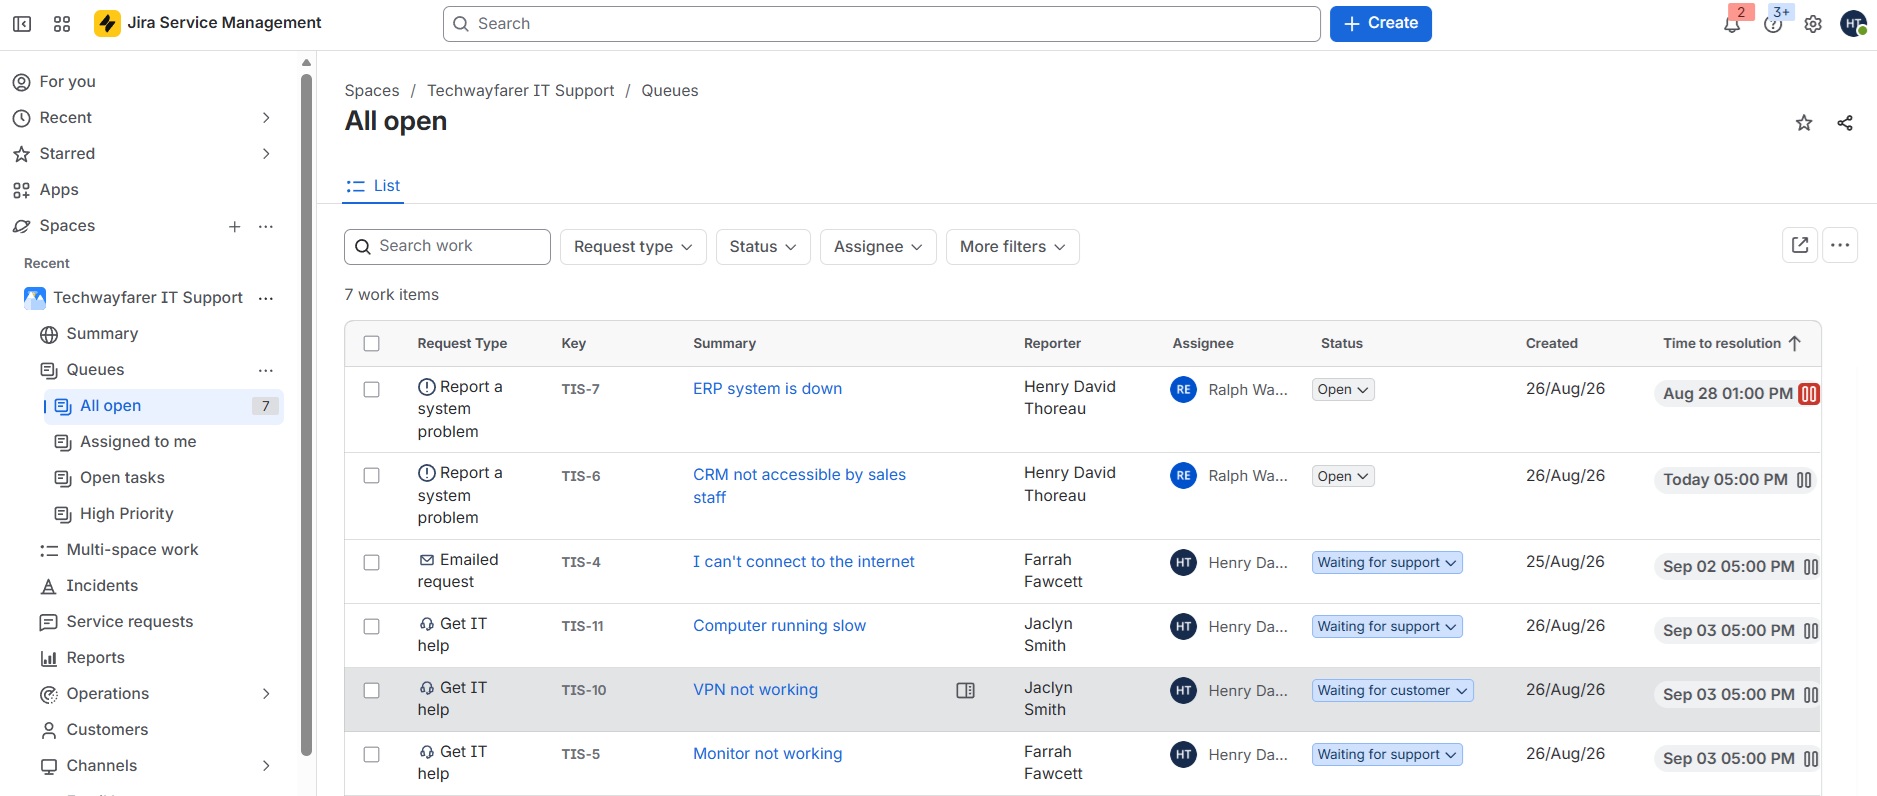
An agent can view all open requests and incidents in JSM by opening the IT Support space and choosing Queues > All open. Agents often take turns triaging open issues in JSM. In our example, it is Henry David Thoreau’s turn.
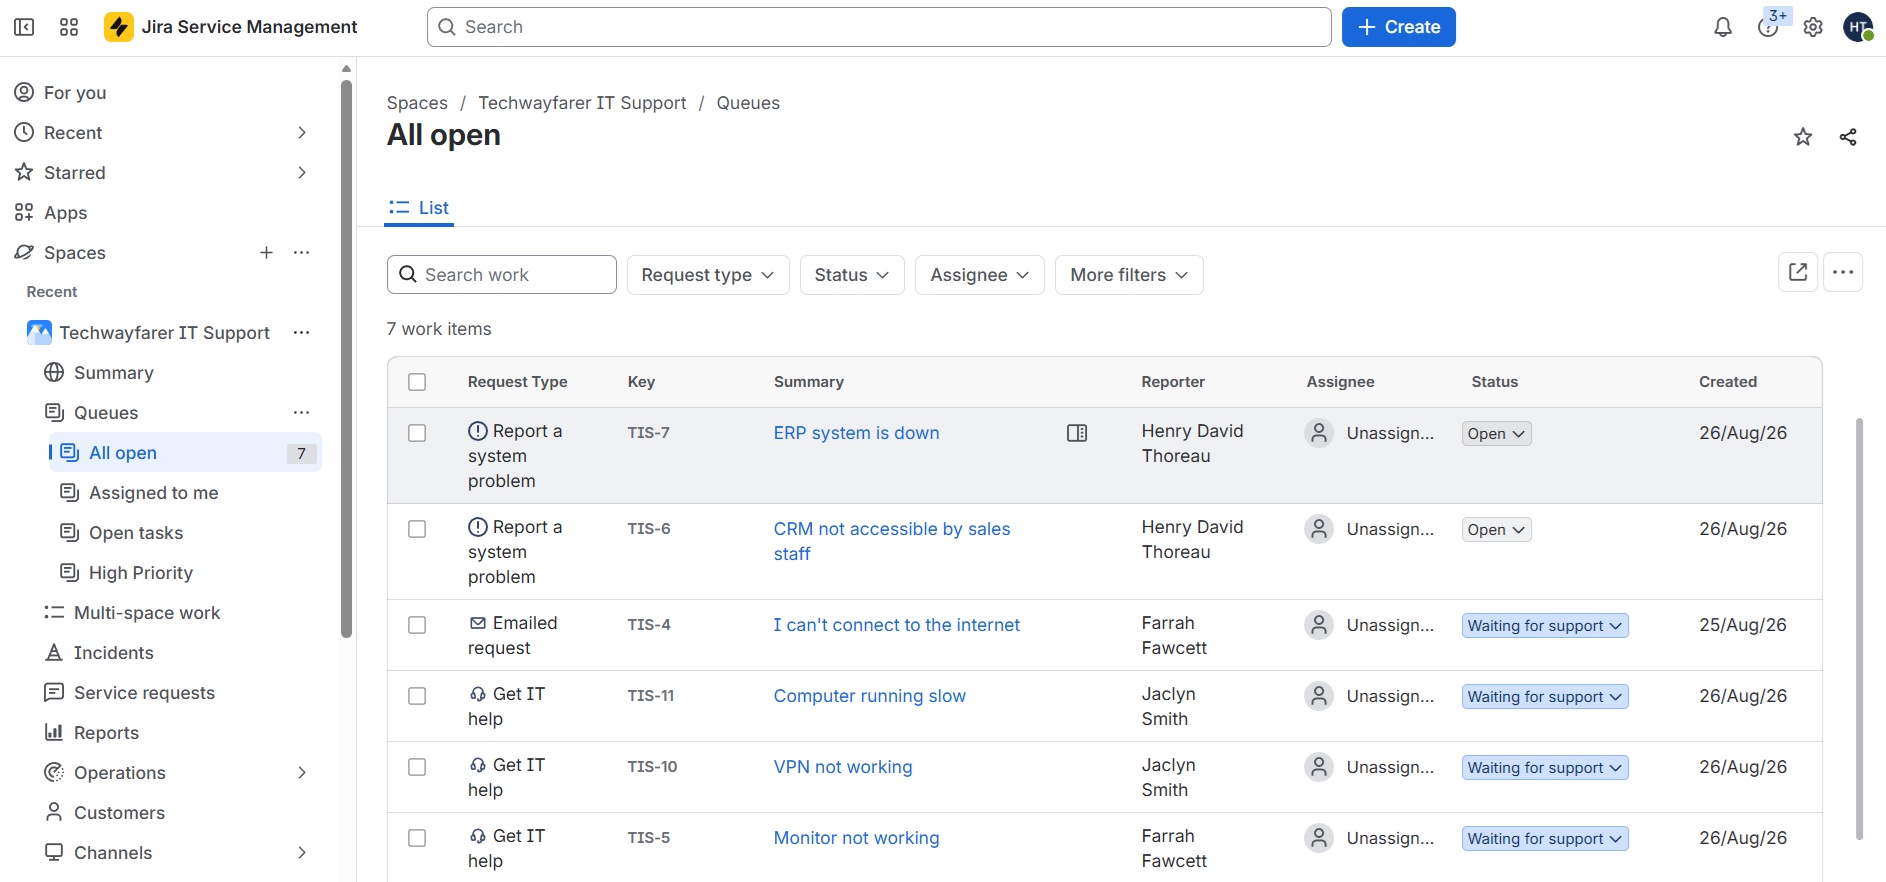
The triage process for each organization may differ. Our example organization (Techwayfarer) triages new tickets by:
- Deciding upon the correct priority level
- Assigning an agent to work the request or incident
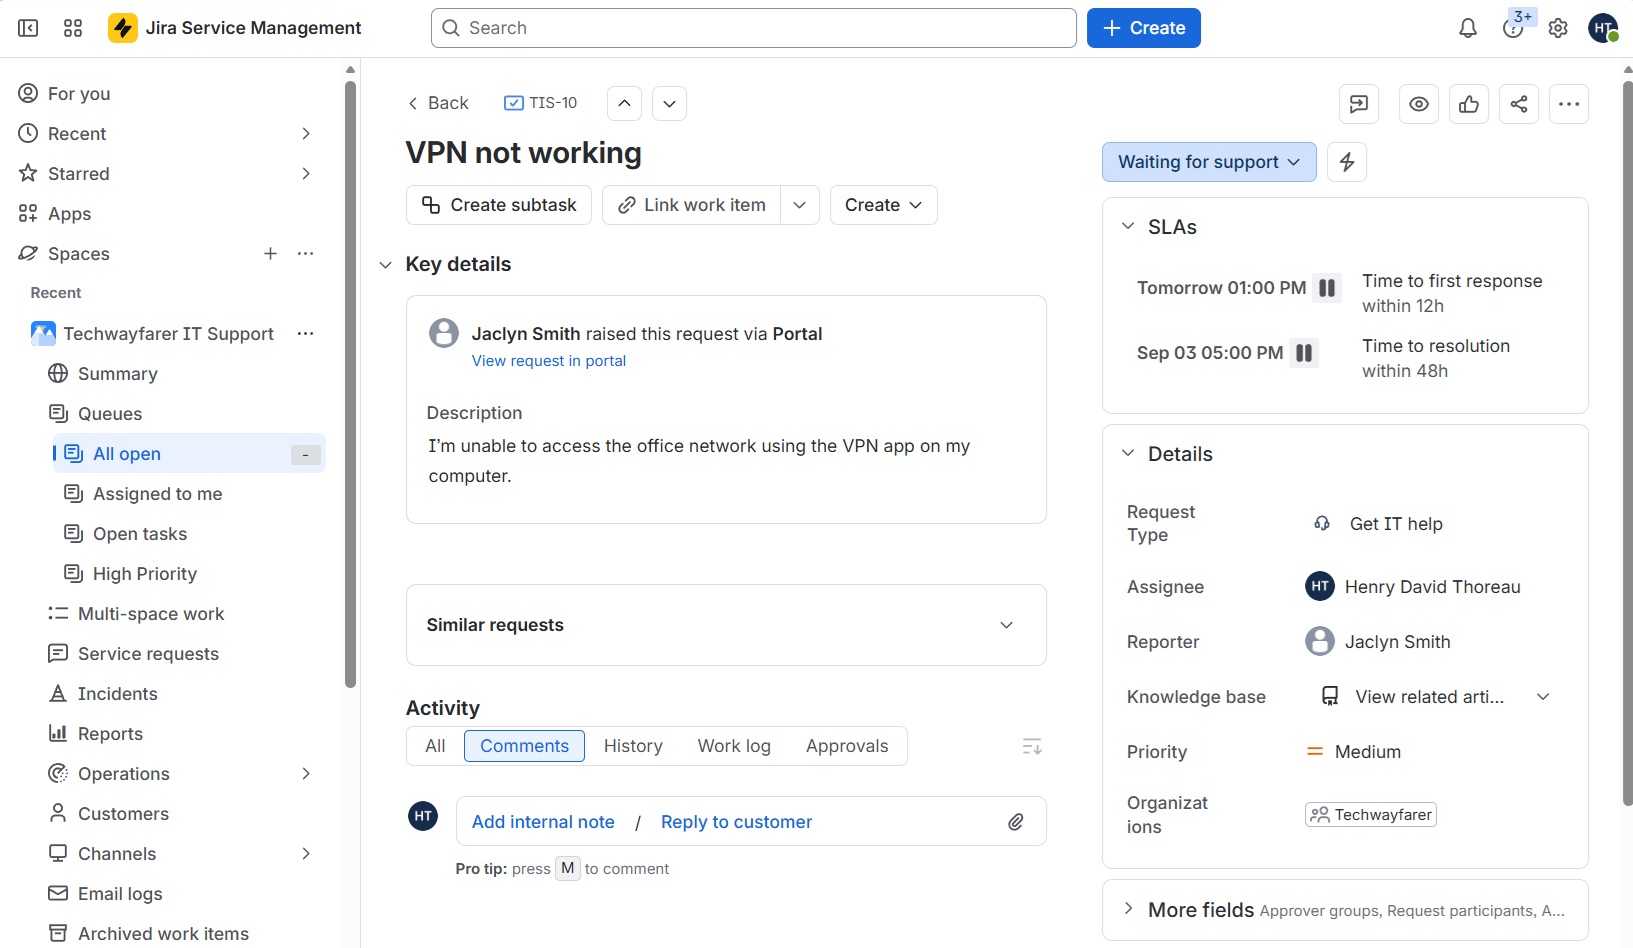
Below are the details for one of the open tickets. In the Assignee field we see that Henry David Thoreau assigned himself to resolve the ticket. The Priority field is marked as Medium.
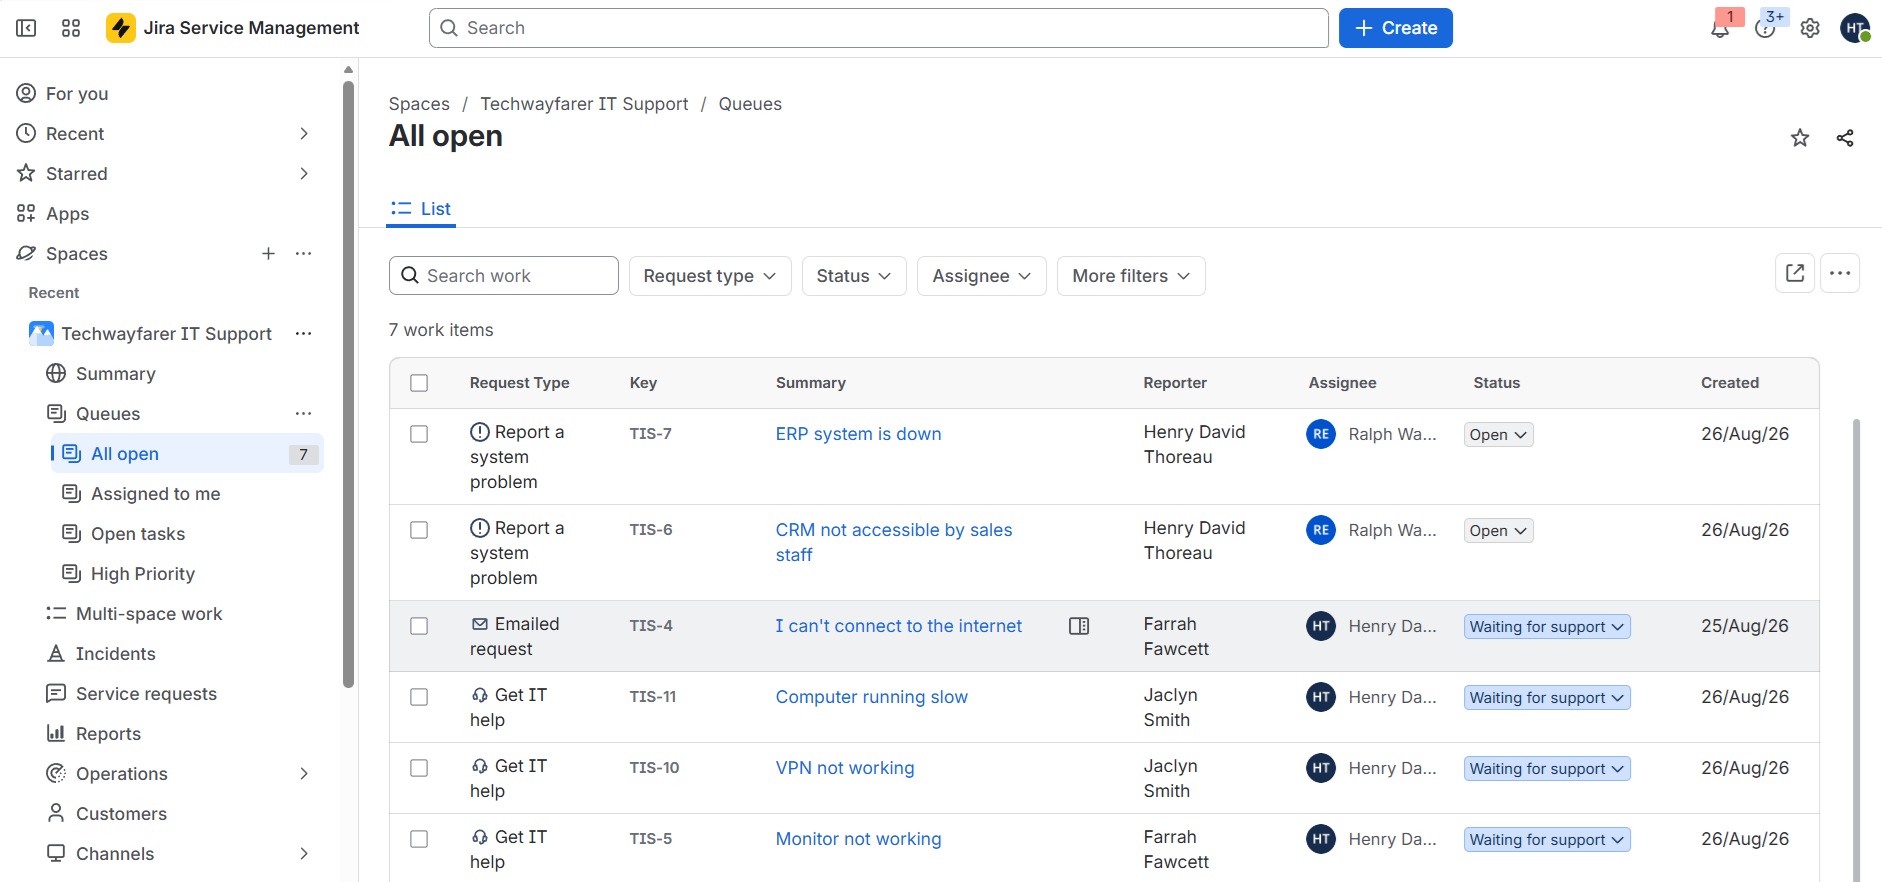
After triaging the remaining open tickets, the “All open” queue shows the Assignee for each ticket. Henry David Thoreau is a tier 1 agent, so he is given the low and medium priority requests. Ralph Waldo Emerson is a tier 2 agent, so he is given the high and critical priority requests.
Workflow Example
In this section we will walk through the lifecycle of a single support ticket. We will return to the example used in the earlier section Create Tickets in the Support Portal in which a customer created a ticket titled “VPN not working.”
The path a ticket follows from inception to resolution may vary depending on the:
- Type of ticket
- Ticket priority level
- Structure of the support team
- Responsiveness of the reporter
- Resources available to agents for resolving issues
In the earlier section Ticket Lifecycle we described eight stages of a normal support ticket. In our example ticket the stages are combined into the following steps:
- Create ticket
- Triage
- Gather more information
- Escalate to a higher level support agent
- Resolve and follow-up – the agent resolves issue, confirms resolution with reporter, and closes the ticket
- Analyze ticket – identify areas for improvement
Step 1: Create Ticket
In an earlier section we created the example ticket “VPN not working.” In this section we will build upon the example. Below is a summary of the steps involved in creating a ticket using the support portal.
A user is provided a URL to the customer-facing support portal.
The customer clicks on a portal group (e.g., Common Requests) and a request type (e.g., Get IT help) and fills out the required fields.
After creating a ticket the customer can view it by logging into the support portal, clicking on her avatar in the top right corner, choosing Requests, and then opening the new ticket.
In the “Add request participant” field the customer can share the ticket with others, who can then view the ticket and receive status updates. In our example, Jaclyn shared the ticket with Farrah Fawcett.
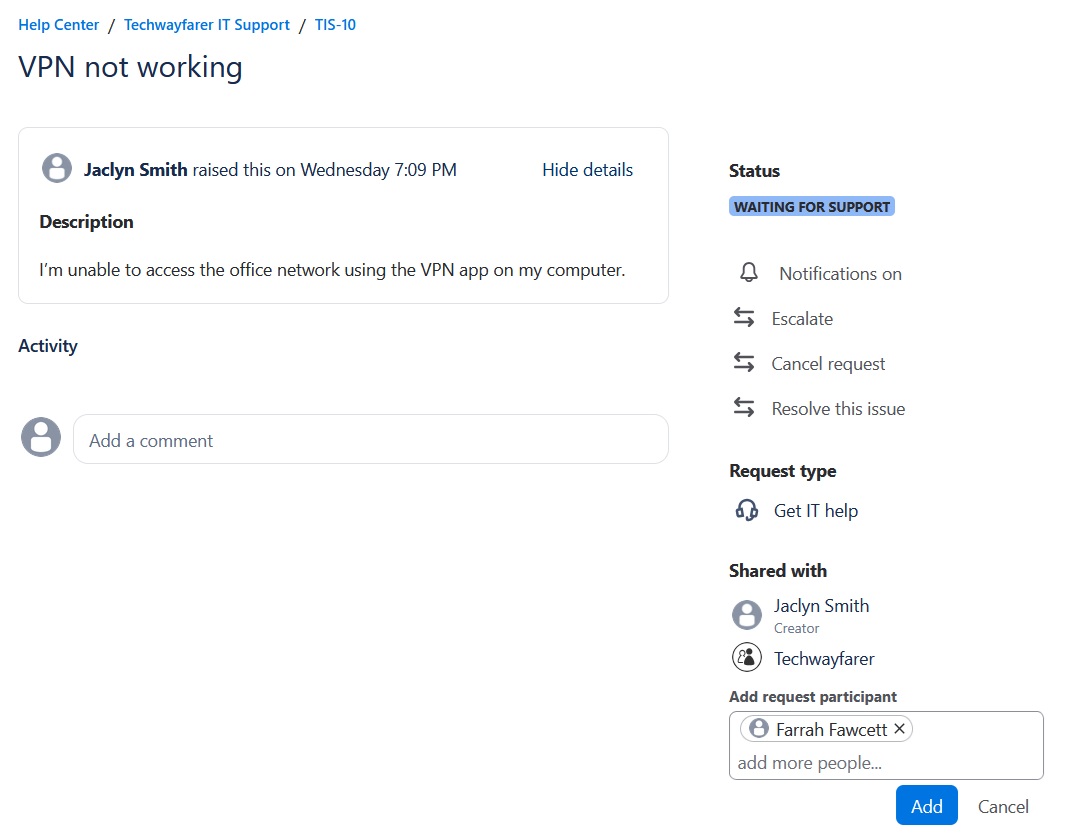
When viewing a ticket soon after it is created, a customer might also be able to add additional language or attachments.
Step 2: Triage
Agents can view a new ticket in the JSM service queue by opening the IT Support space and choosing Queues > All open.
In an earlier section we triaged the ticket “VPN not working.” To review, the agent triaging an open ticket decides upon the priority level (e.g., low, medium, high, highest). And he assigns an agent to resolve the issue based on the team structure (e.g., tier 1 agents work low and medium issues, and tier 2 agents work high and critical issues).
Step 3: Gather More Information
In this step the assigned agent reviews the ticket in greater detail and gathers more information needed to resolve the issue. He might review past tickets for ideas on how to resolve the issue. He will look at the information provided by the customer and determine if more information is required.
The “Similar requests” field in an open ticket might be set up to search past tickets that involve the same subject. In our lab, we have yet to create past tickets related to VPN issues, so no results appear.
Customers often do not provide enough information in the initial ticket for the agent to begin working on the issue. In our example ticket (VPN not working) an agent might need to know the type of error message the customer receives when attempting to logon to the network with her VPN app. And he might need to know which version of the VPN app the client is using.
We will go to the Activity section of the open ticket and open Comments > Reply to customer. And we will send the customer a message requesting more information.
In the message it is helpful to acknowledge the customer’s issue and explain why you are requesting more information. Comments posted in “Reply to customer” are publicly visible by anyone with access to the support portal.
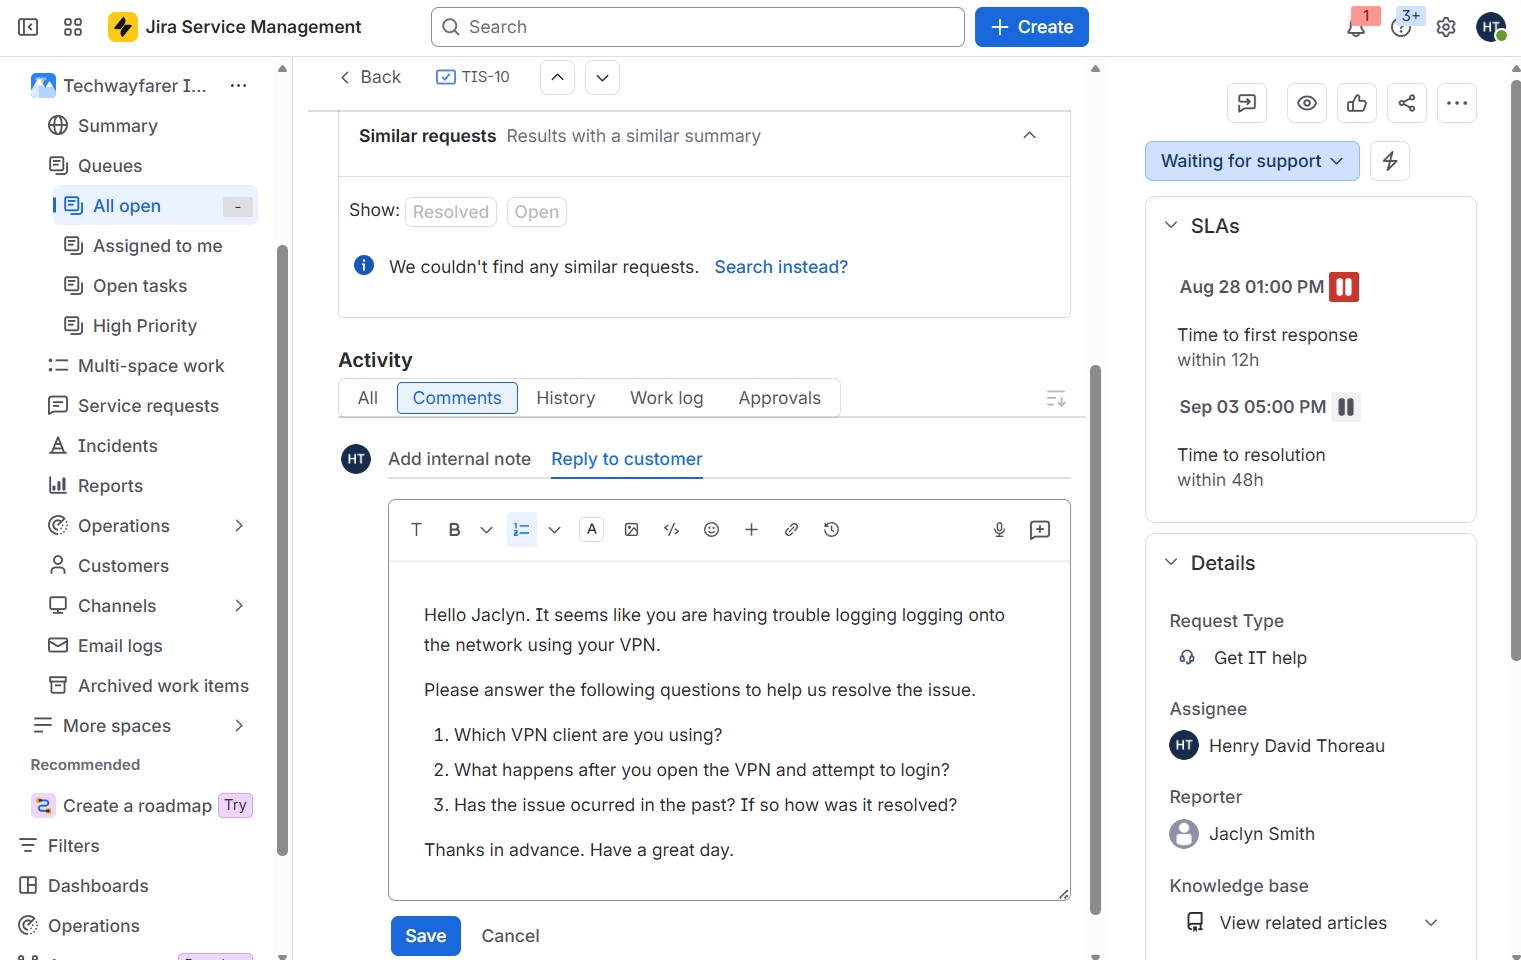
After clicking Save the customer will receive an email with the response from the agent. The customer can then login to the support portal and respond with the needed information.
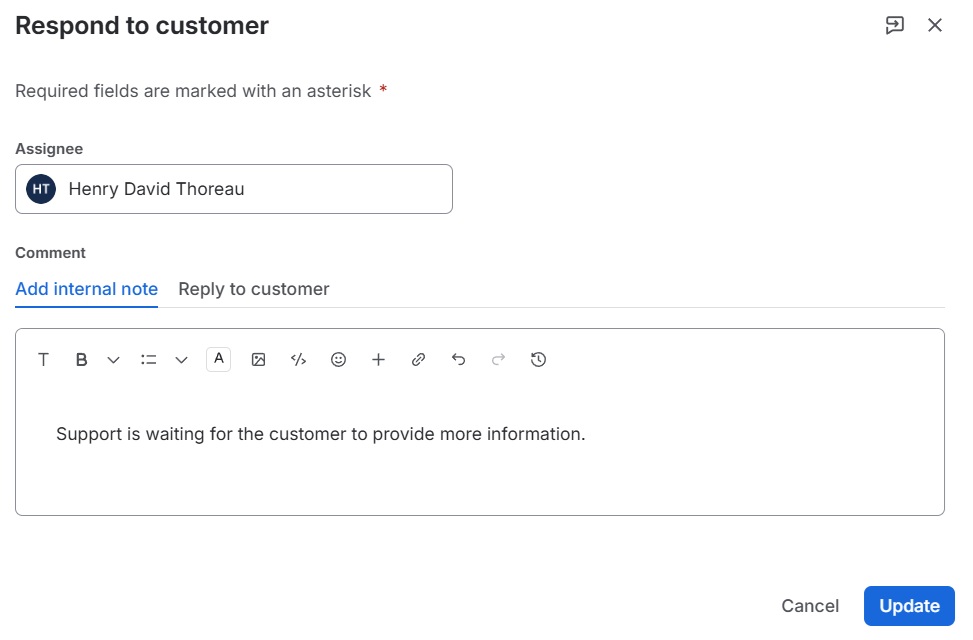
We will also change the status of the ticket to reflect that we are waiting for the customer to provide more information. In the top right corner of the open ticket click on the status button and change the status from “Waiting for support” to “Waiting for customer.”
A pop-up window will appear that has to be filled out before the status can be changed. You can choose whether the comment is an internal note or a reply to the customer. Since we already sent a reply to the customer we will choose “Add internal note”, enter the internal comment, and click Update.
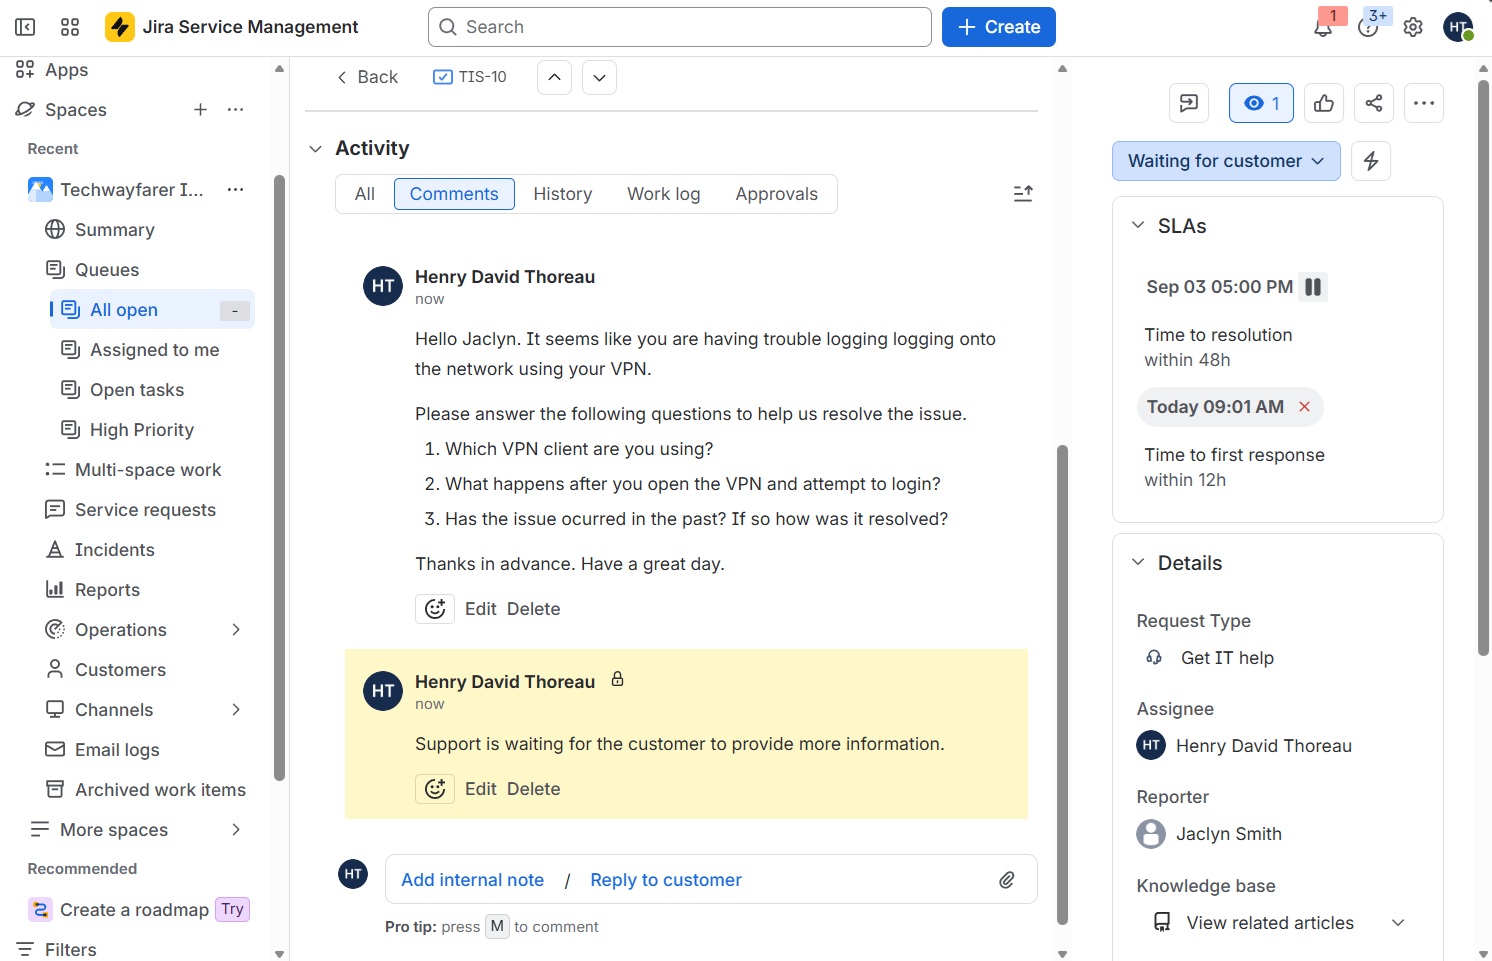
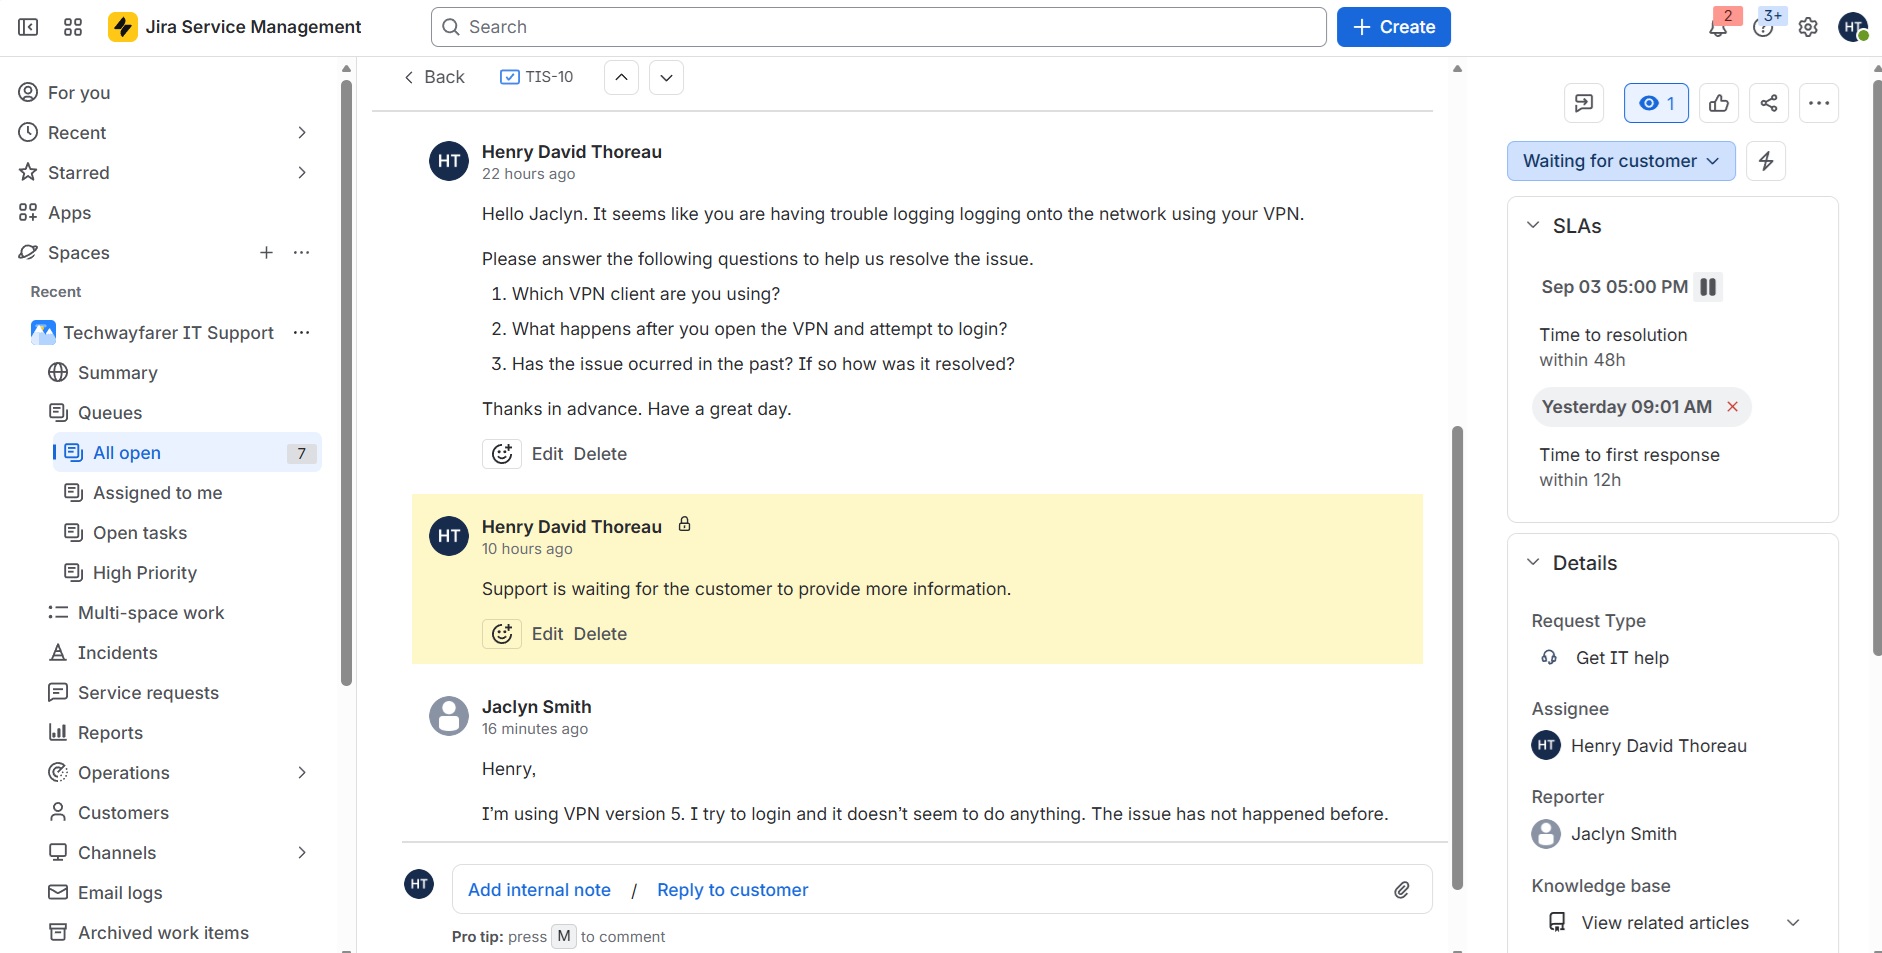
The internal note appears with a yellow highlight at the bottom of the Activity list. It is only visible by agents with access to the organization’s JSM account.
Two SLAs for the ticket (“Time to first response” and “Time to resolution”) are displayed in the right column under the status button.
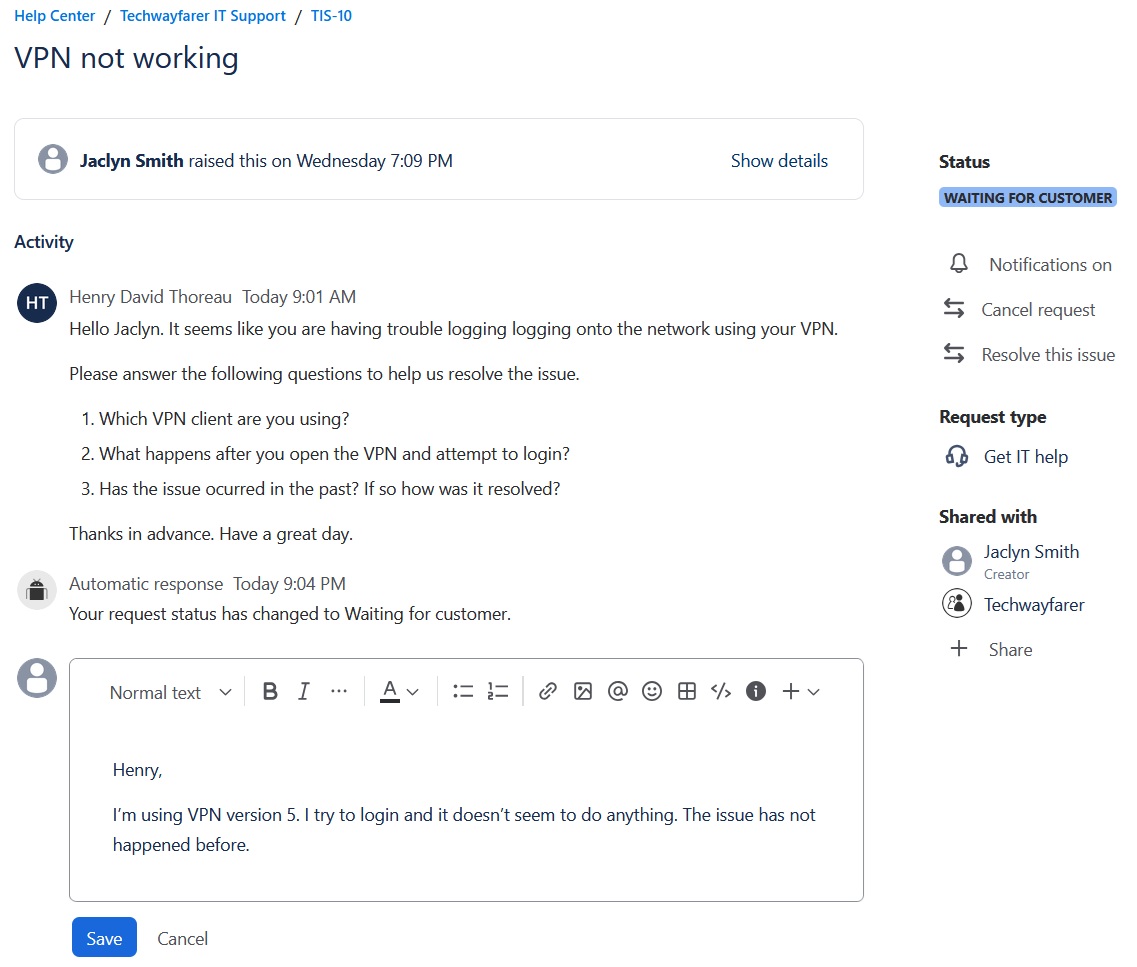
We now switch back to the customer’s view of the portal. Under Activity the customer can see the message from the agent and the status update. She cannot see the internal note created by the agent.
The customer replies to the agent and clicks Save.
We switch back to the agent’s view of the ticket. The agent can view the ticket in the Queues > All Open.
Automations
JSM can be setup with automations that take actions based on triggers. For instance, a customer responds to a agent inquiry and the ticket status changes from “Waiting for customer” to “Waiting for support.” And the agent might get an alert letting him know the customer has responded to his inquiry.
In our lab the automations have not been setup in JSM. Even though the customer has responded to the agent’s inquiry, the status still shows “Waiting for customer.”
Without automations that change the status, the agent has to periodically look at his open tickets and update the status as needed.
Step 4: Escalate
Escalation is the process of assigning a ticket to an agent who has a higher level of support, greater system access, or more knowledge to resolve the issue. In our lab there are two agents. Henry David Thoreau is a tier 1 agent, and Ralph Waldo Emerson is a tier 2 agent.
Henry is currently assigned to the ticket. He periodically reviews his open tickets. He views the details of the ticket “VPN not working” and sees the customer’s reply. The customer said she is using VPN version 5.
At this point in the resolution process Henry might reach out to others in his support team for assistance in resolving the ticket. Or he might look at the organization’s support documentation (knowledge base or wiki) to find troubleshooting steps or a solution. Agents should be encouraged to create or update documentation in the course of resolving tickets. Thorough documentation reduces guesswork and helps agents close tickets more quickly.
After reading the documentation, regarding VPN version 5, Henry realizes the ticket should be escalated to someone with more knowledge and access. The documentation might include a chart with issue types and the agents who should be assigned the tickets. Henry sees that Ralph is the agent designated to resolve tickets involving VPN version 5.
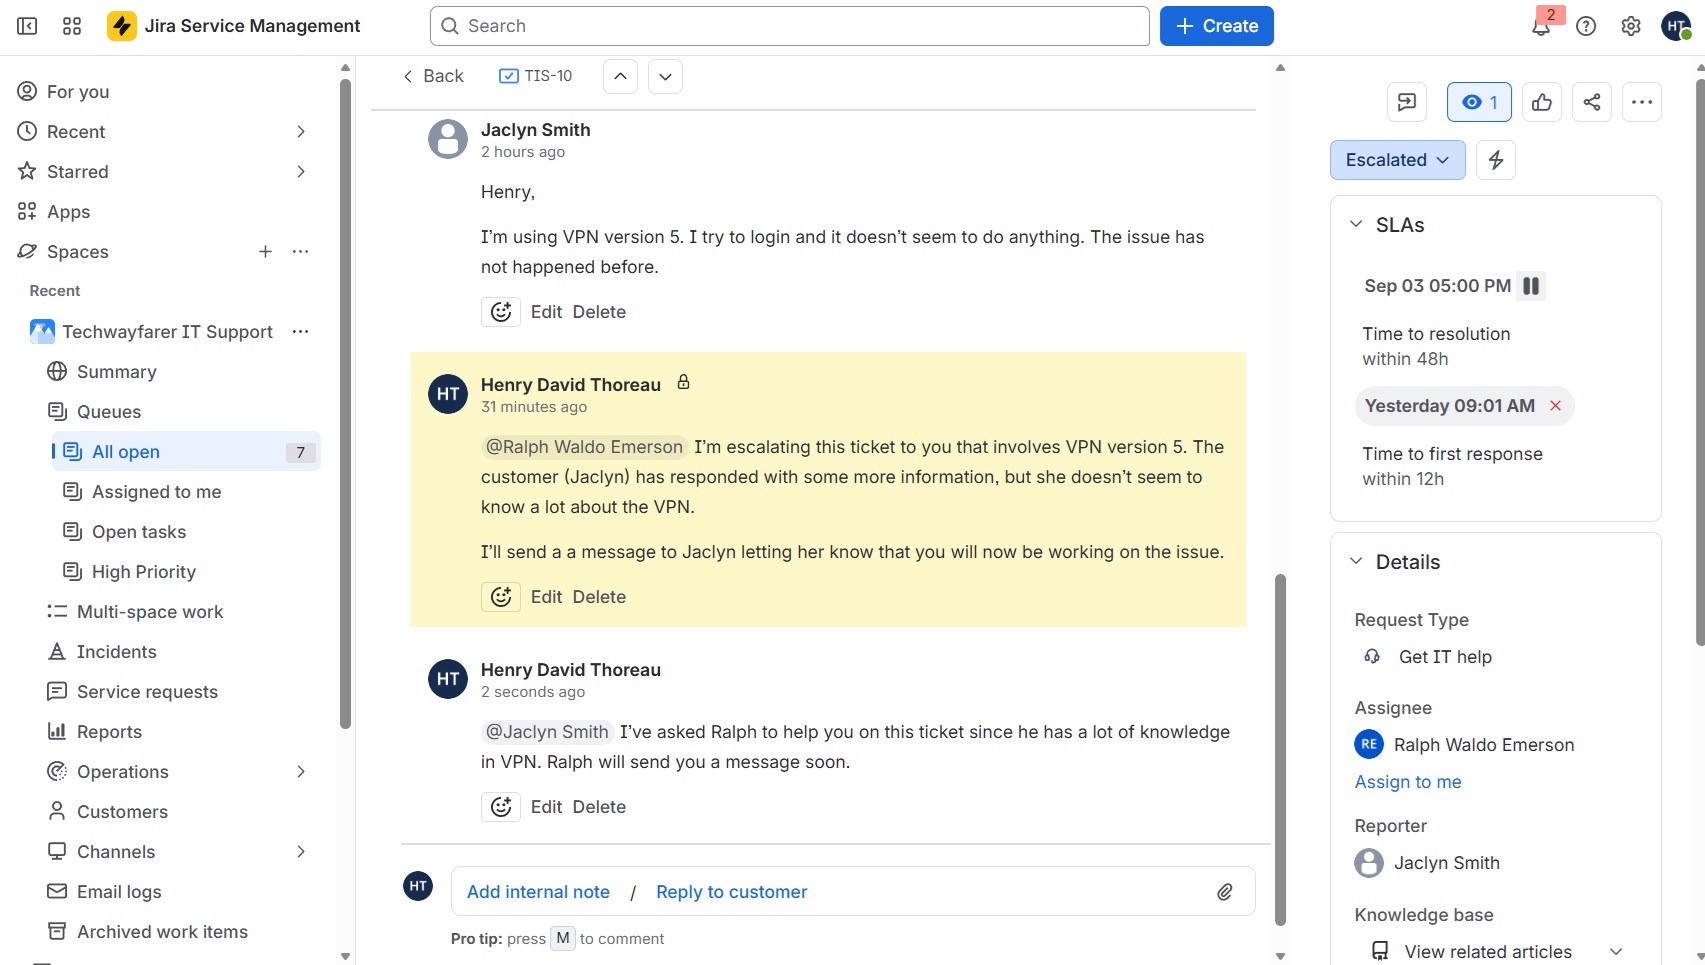
Henry now performs a warm handoff of the ticket to Ralph. Henry adds an internal note on the ticket explaining why the ticket is being assigned to Ralph and any information that might help Ralph resolve the issue. Ralph is at mentioned in the note so he receives a notification about the new ticket assigned to him.
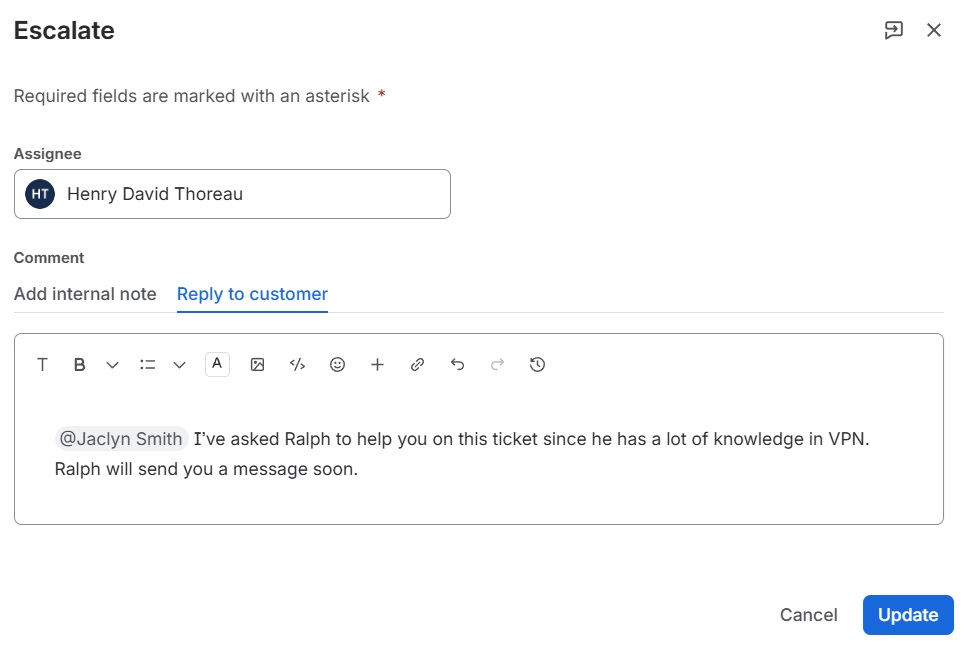
Henry also changes the ticket status to Escalated. A pop-up window appears that has to be filled out. Henry chooses “reply to customer” and sends Jaclyn a message letting her know that another agent (Ralph) will now to be working on the issue. Keeping the reporter informed about the ticket helps to manage her expectations and reduce her frustration in waiting for the ticket to be resolved.
Henry changes the Assignee on the ticket to Ralph and is done working on the ticket.
Step 5: Resolve and Follow-up
In this step the ticket is resolved by the tier 2 agent, Ralph Waldo Emerson. We will begin by logging into JSM as Ralph. In the IT support space under Queues > Assigned to me, we see the ticket “VPN not working” with a status of Escalated.
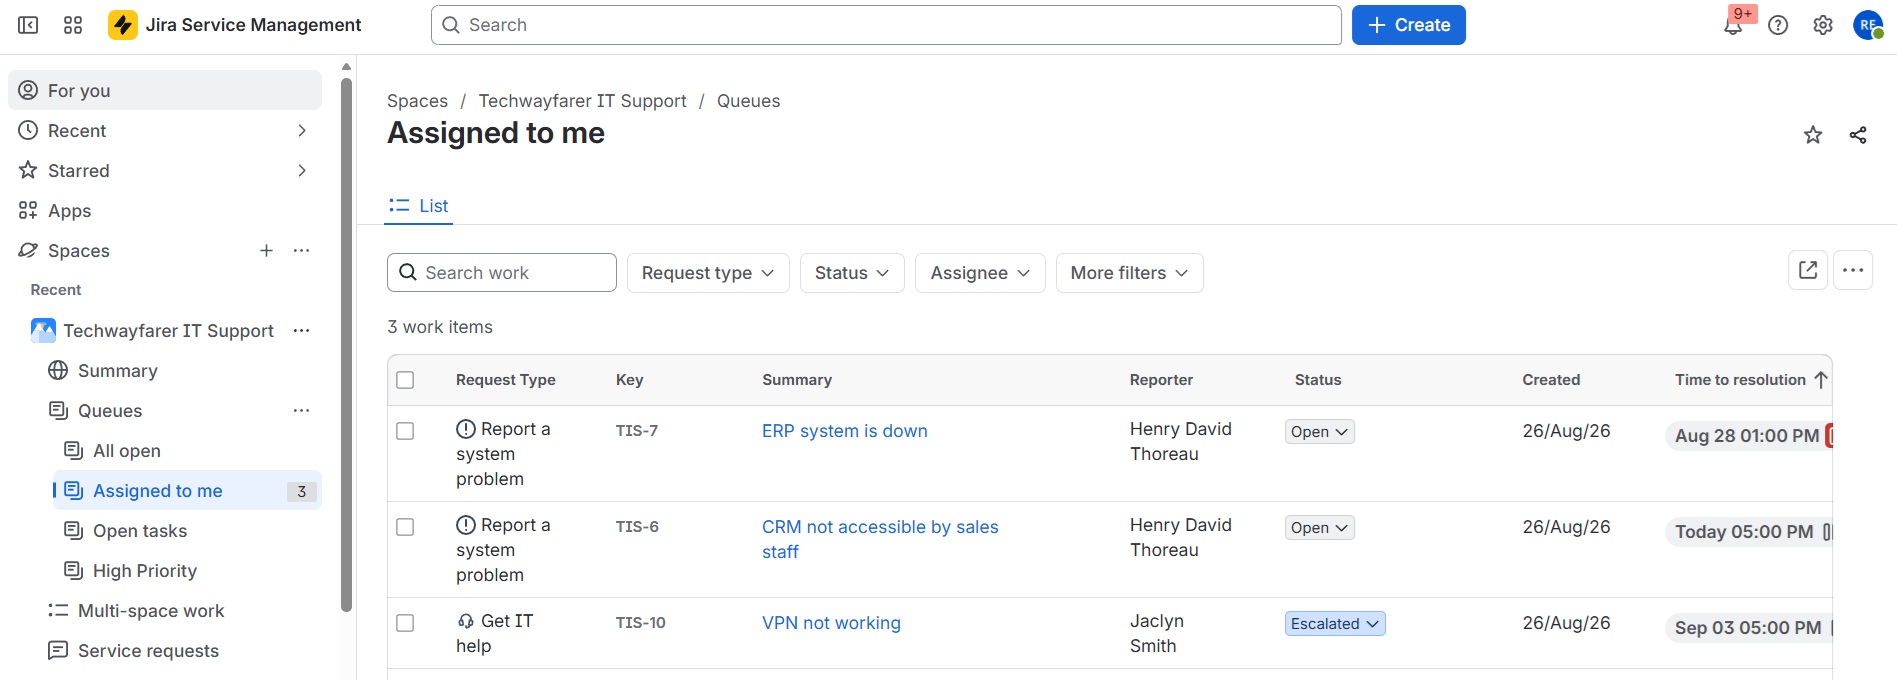
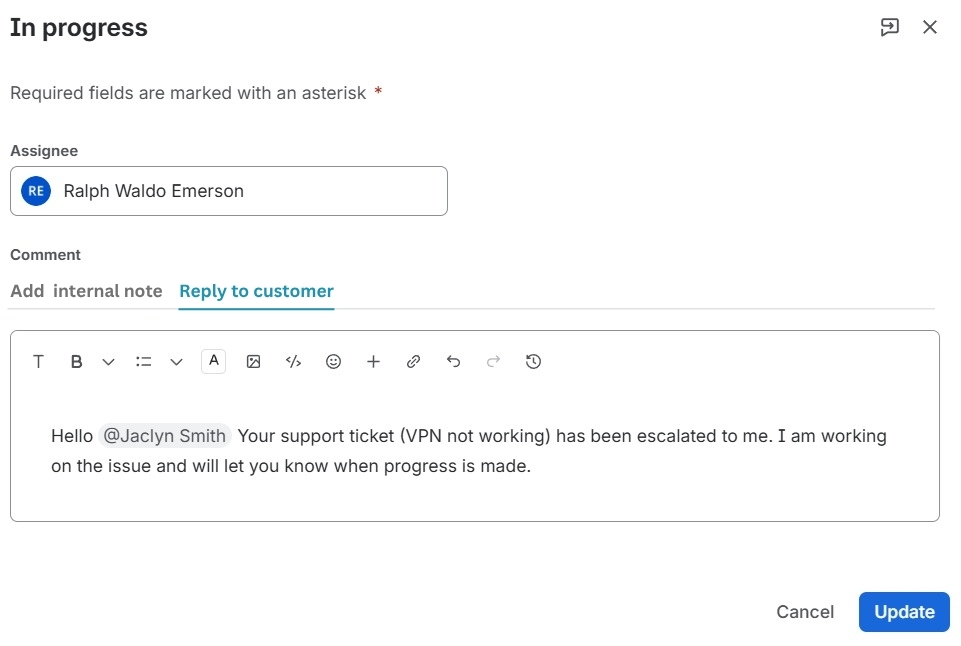
Ralph clicks on the newly assigned ticket to review the details, including prior notes. Then he changes the ticket status to “In progress” and is required to create a comment. He sends a message to the customer (Jaclyn) letting her know he is working on the issue.
Ralph then works on resolving the issue. When he believes the issue is resolved, he clicks on the status button to change the status from “In Progress” to “Waiting for Customer.” In the earlier section Workflow we modified the transition “Respond to Customer” and added “In Progress” to the list of statuses that can precede the status “Waiting for customer.” Because of our modification to the default workflow, we can choose “Waiting for customer” as the next status.
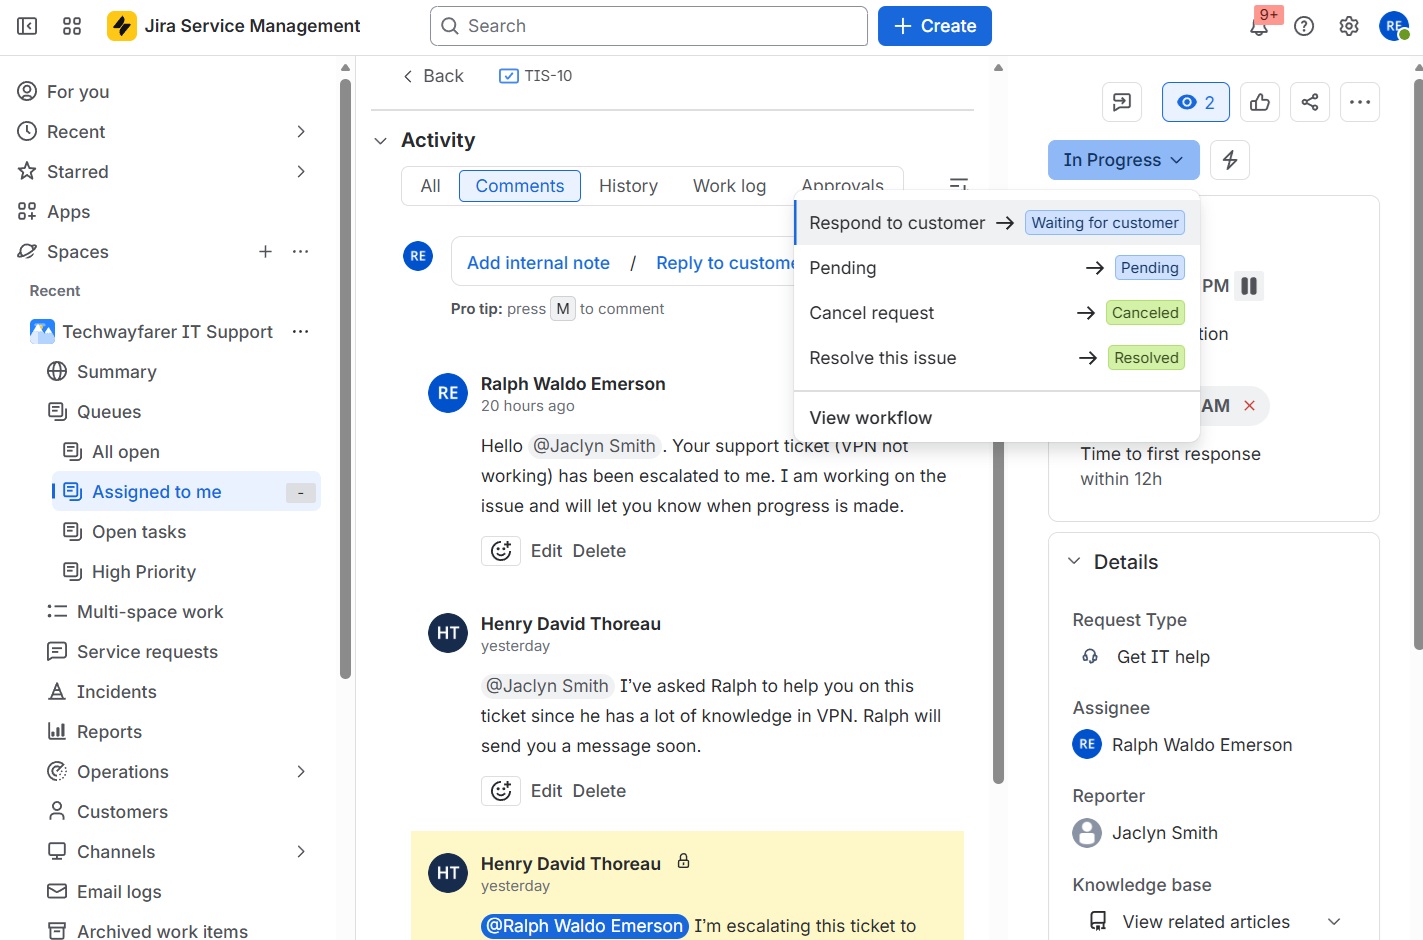
Under the list of possible next statuses, you can click on “View workflow.” It shows the current status, the options for the next status, and the path a ticket can take in JSM.
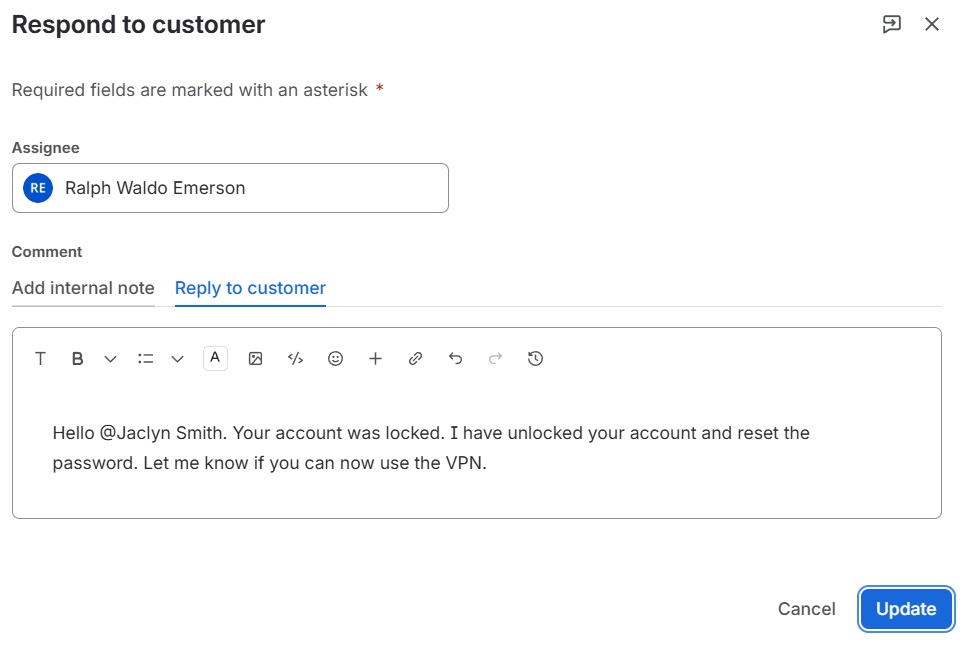
The agent chooses “Waiting for Customer” as the status. Then in the pop-up window he sends another message to the customer explaining what he has done and asking her to confirm that the issue is resolved.
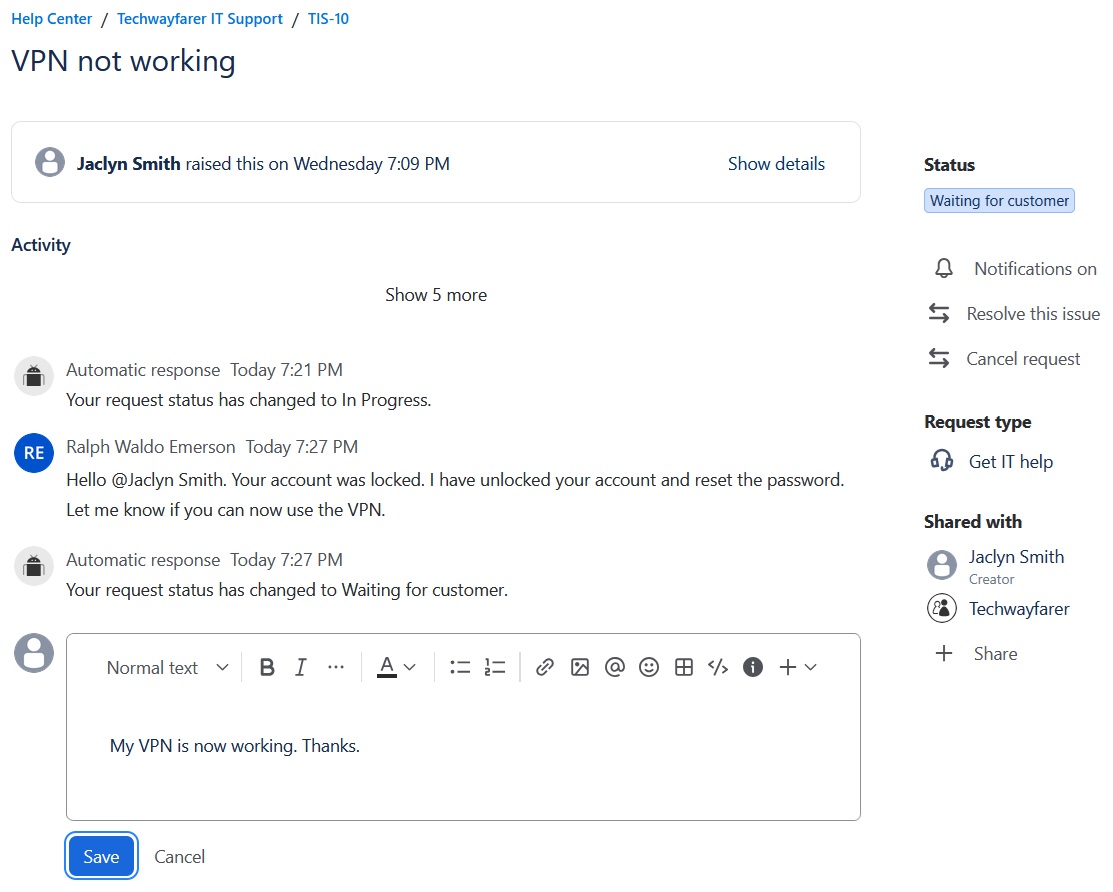
We now go back to the customer’s view of the ticket. The customer sees the message from Ralph asking her to confirm the issue is resolved. After verifying that her VPN is working, the customer sends a message to the agent.
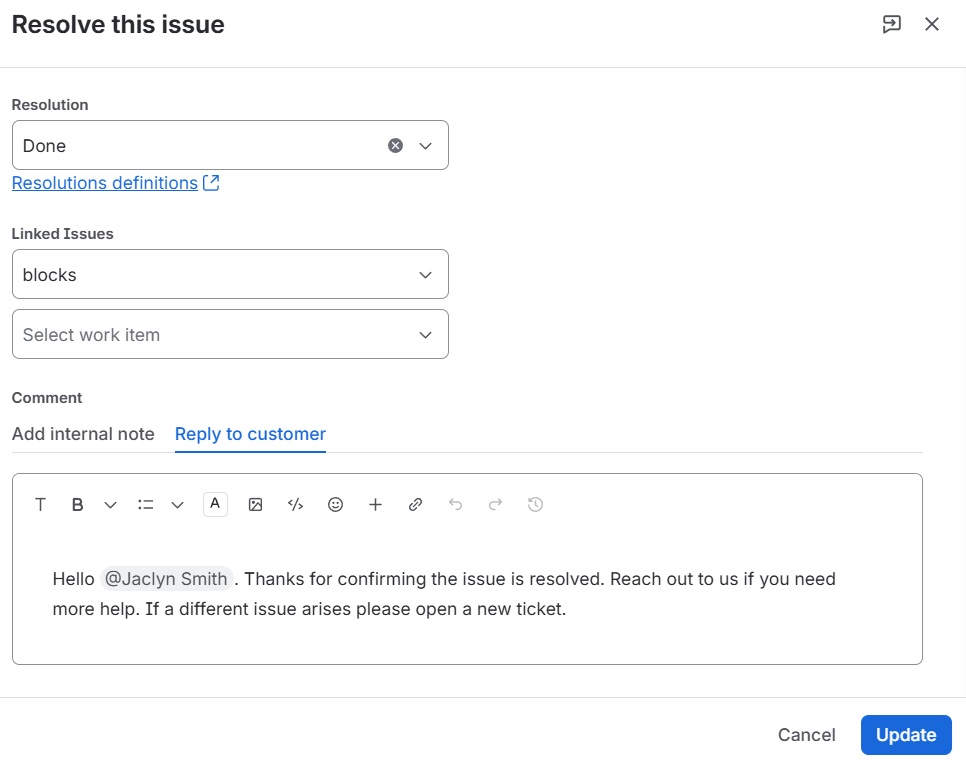
When the agent receives the message from the customer, confirming the issue is resolved, he changes the status to Resolved and enters a final message to the customer.
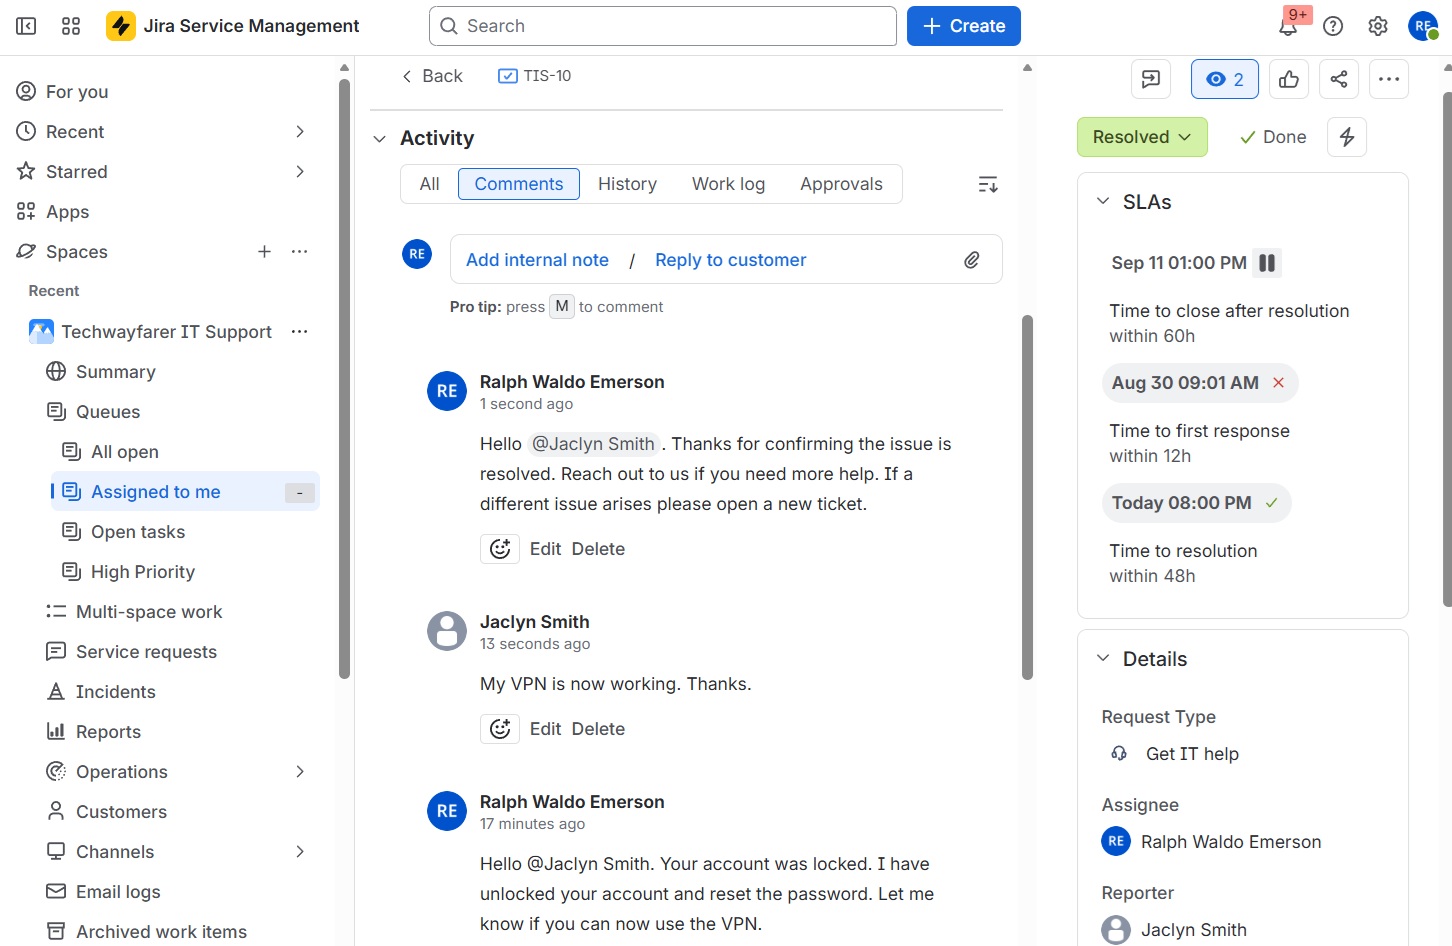
The Resolved status lets the support team know that work is completed on the ticket.
The final status in our workflow is Closed. For many organizations a ticket is moved from Resolved to Closed after a waiting period that gives the customer time to reopen the ticket if additional help is required.
Step 6: Analyze Ticket
Support teams should routinely review closed tickets that involve the same type of issue (e.g., VPN). There may be commonalities among tickets that if resolved could reduce the need for opening similar tickets.
In our example business, a support administrator created a new queue “Resolved, Done, Closed” that lists all tickets that have a status of resolved, done, or closed. The support staff can further filter the queue to find tickets involving the same issue.
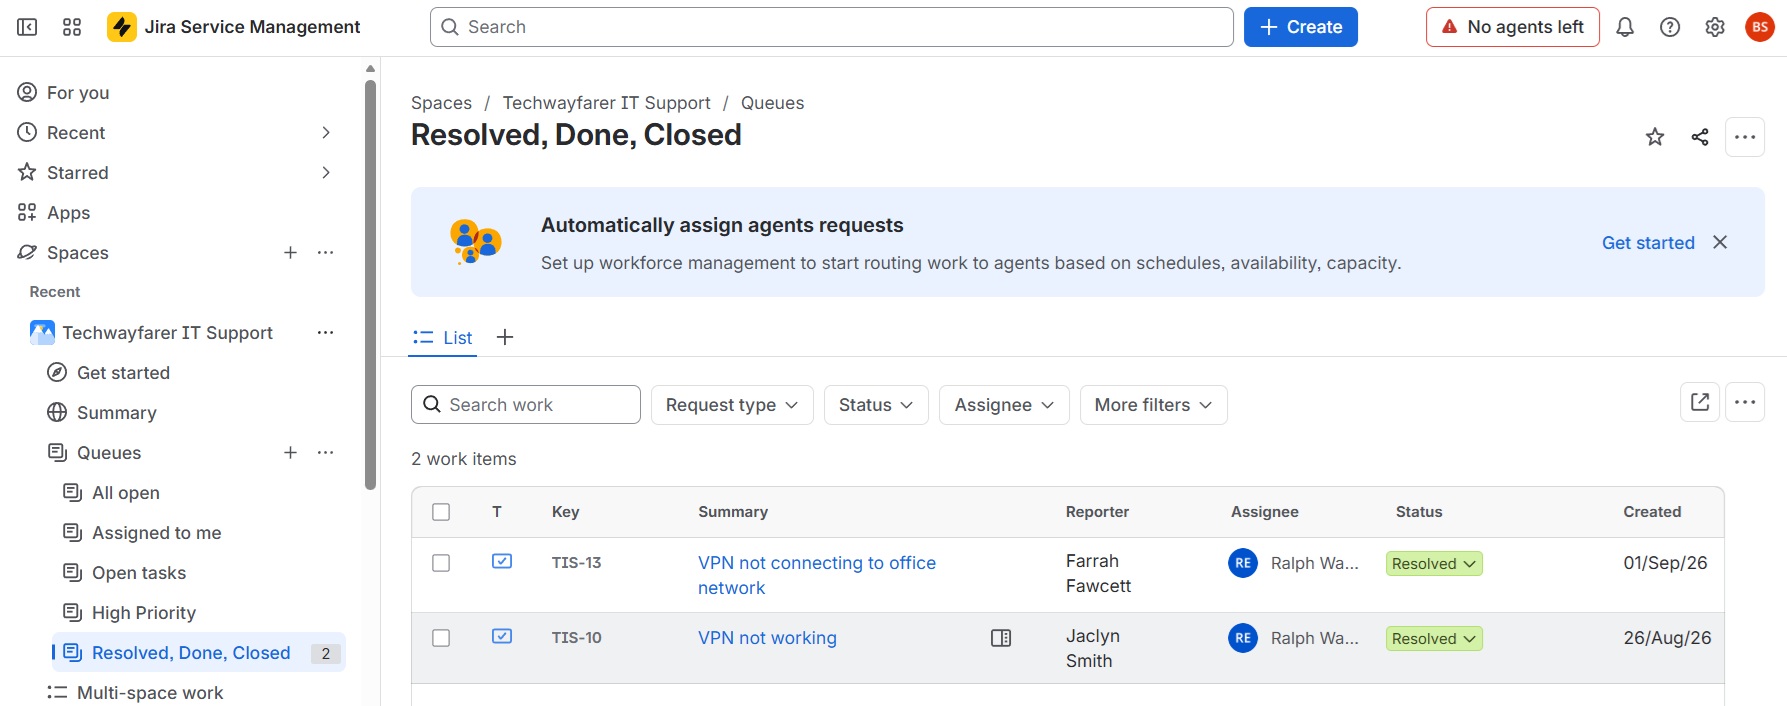
If we click on the two tickets related to VPN, we can see the details of each ticket including the issue reported by the customer and how it was resolved by the agent. Both tickets were related to a particular version of the VPN app. It may prevent a customer from logging on to the network, and after a certain number of login attempts the customer’s account might be locked. If we are correct and the VPN issue can be resolved, then fewer tickets will be opened for the same issue.
Conclusion
A ticketing system that is correctly implemented makes it possible for IT support teams to do their best work consistently, at scale, with full accountability. It protects users from having their issues lost in the noise. It allows technicians to do their best work in a timely manner that meets user expectations. And it ensures that IT operations can be measured and continuously improved.