Table of Contents This Post
Home Lab Series of Posts
Windows Update
We will perform a Windows update to make sure our system is stable before configuring the OS and installing services.
At the Windows desktop enter “update” in the search bar. Choose the “Check for updates” option, and the Windows Update window will appear.
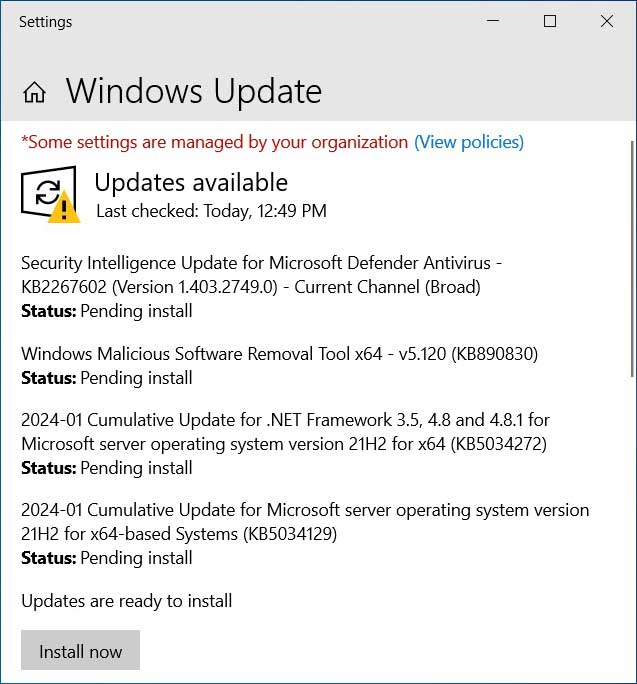
This is the first time we have performed a manual Windows update. Yet Windows has been automatically downloading updates in the background. Click “Install now” to begin the installation process.
When the installation is complete restart the OS. Then perform the update steps again to verify that all the needed updates have been installed.
Time Zone
Verify the server OS is set to the correct time zone. Open the Server Manager app and look in the Local Server section. The current time zone setting is visible in the right column. We are in the PST time zone so the time zone is accurate. If your time zone needs to be updated click on the link next to Time Zone.

Assign Static IP Address
The server’s IP address should be statically assigned, so it can be upgraded to a domain controller and DNS server later in this lab. A summary of the server’s current IP settings can be viewed in Server Manager > Local Server windows (see the above image). In our VM, Ethernet 0 is set to “IPv4 address assigned by DHCP, IPv6 enabled”, which indicates that the server is current receiving a dynamic IP address from the VMware virtual DHCP server.
When we created the Windows Server VM in an earlier post, we added it to the NAT virtual network. There are 20 possible virtual networks in VMware labeled VMnet0 to VMnet19. NAT corresponds to VMnet8 by default in VMware.
We want to assign a static IP address to the server that will keep it on the VMnet8 (NAT) virtual network, so it can communicate with other computers on the NAT subnet.
Let us first look at the current IPv4 settings for the server. In the search bar enter cmd to open the Administrator Command Prompt window. At the C prompt enter ipconfig /all to see all the IP settings for the server.
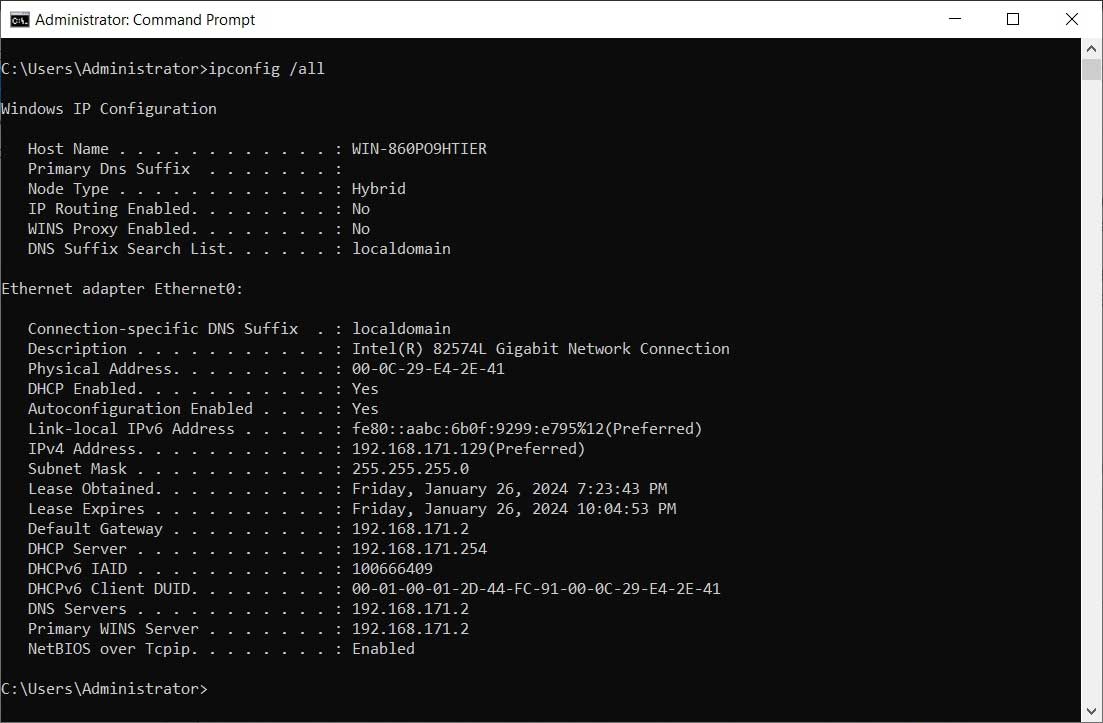
Below are the current IPv4 settings:
- The server’s dynamically assigned IP address is 192.168.171.129
- Subnet Mask is 255.255.255.0
- Default Gateway is 192.168.171.2
- DHCP Server is 192.168.171.254
- DNS Server is 192.168.171.2
Let’s take a look at how VMware assigned the above IPv4 settings. In the top menu of VMware Workstation choose Edit > Virtual Network Editor. The “Virtual Network Editor” window opens.
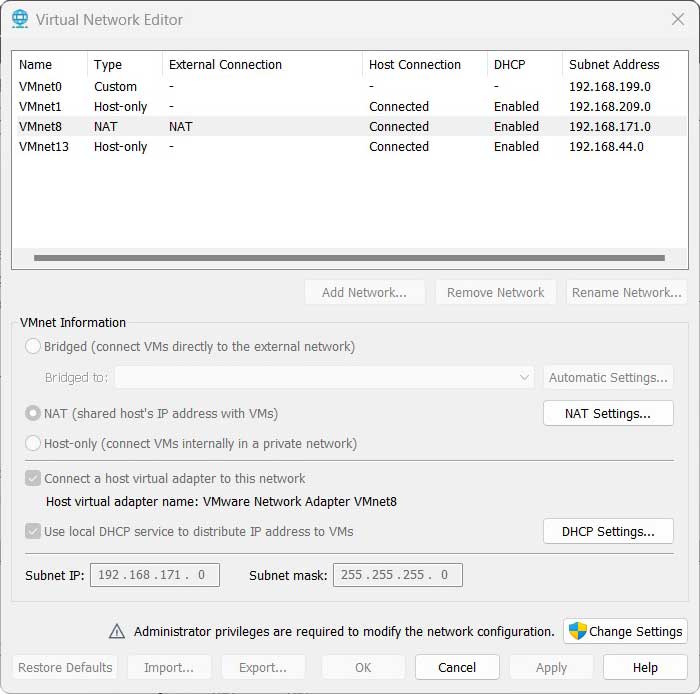
Click on VMnet8 in the top window, and then click on the “NAT Settings” button to open the “NAT Settings” window.
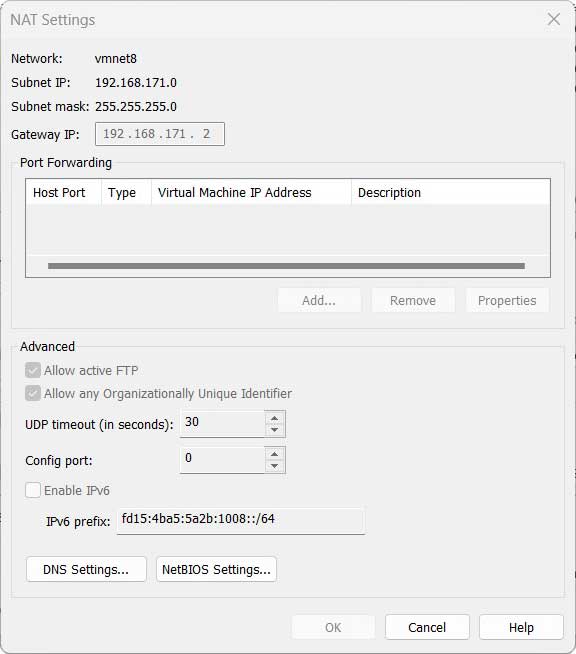
We see the following settings:
- Network is vmnet8
- Subnet IP is 192.168.171.0
- Subnet mask is 255.255.255.0
- Gateway IP is 192.168.171.2
Click Cancel to close the NAT Settings window.
In the Virtual Network Editor window, click on the DHCP Settings button to open the DHCP Settings window.
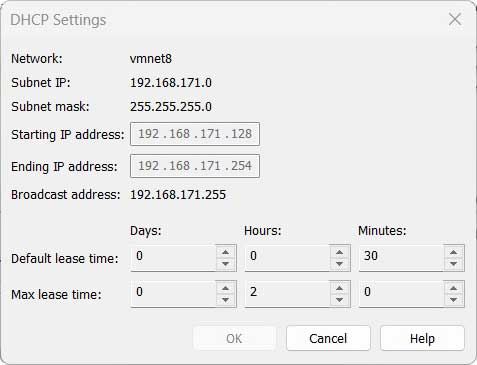
You can see the pool of dynamically assigned IP addresses is 192.168.171.128 to 192.168.171.254. Since the Windows Server is currently being assigned an IPv4 address by the DHCP server, it’s IPv4 address (192.168.171.129) is within the pool of dynamically assigned IP addresses.
We now have a full picture of the VMnet8 (NAT) network:
- The subnet IP range begins at 192.168.171.0
- The Subnet mask is 255.255.255.0, so there are 256 total IP addresses on the subnet
- The gateway that is running DHCP and dynamically assigning IP addresses is at 192.168.171.2
- The pool of dynamically assigned IP addresses available is 192.168.171.128 to 192.168.171.254
- The range of static IP addresses available is 192.168.171 and 192.168.171.3 to 192.168.171.127
When deciding upon the statically assigned IP address for the server, we want an address that will allow it to communicate with other computers on the VMnet8 (NAT) network. Yet we want to choose an IP address that is outside the dynamically assigned IP range, so no other computer on the network will get assigned the same IP address as the server.
For this lab, we will choose the static IP address of 192.168.171.100. It is part of the VMnet8 (NAT) subnet, easy to remember, and outside the range of dynamically assigned IP addresses.
We are ready to modify the IP settings for the server. Open the Server Manager app again and look in the Local Server section. Click on the text next to Ethernet0 to open the Network Connections window.
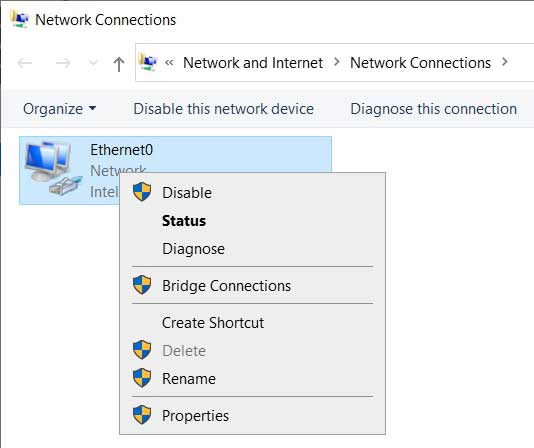
Right click on Ethernet0 and choose Properties.
The Ethernet0 Properties window opens.
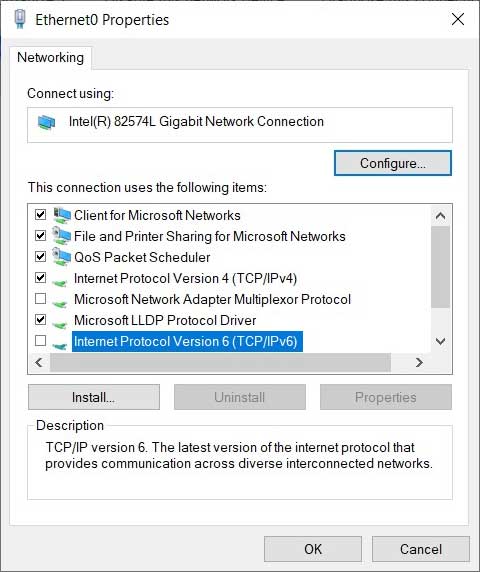
Turn off IPv6 for the server by clearing the check box next to “Internet Protocol Version 6 (TCP/IPv6).” We currently do not have a need for the IPv6 protocol.
Click on “Internet Protocol Version 4 (TCP/IPv4)” and then the Properties button. The “Internet Protocol Version 4 (TCP/IPv4)” window opens.
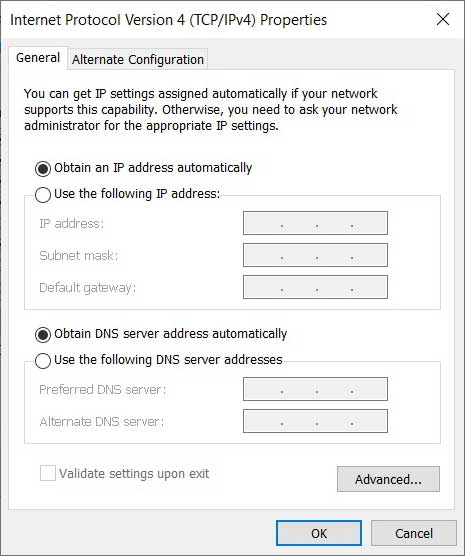
Currently the IP address and DNS addresses are being assigned automatically by the VMware virtual gateway. Now we will manually assign the IP and DNS addresses.
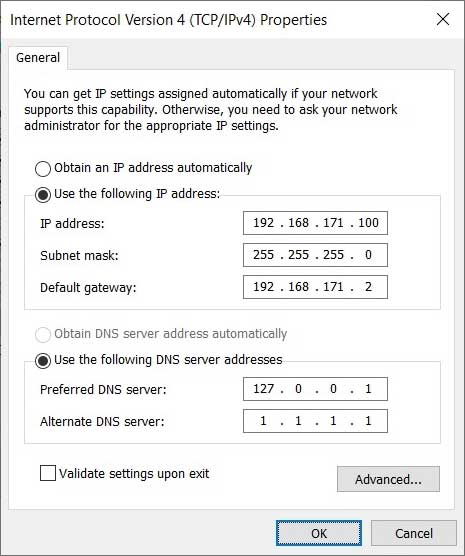
The IP address, Subnet mask, and Default Gateway match the values we decided upon earlier. The Windows Server will become both a domain controller and DNS server later in this lab. So we want the Preferred DNS server field to point to our Window Server. You could enter either the IP address of the server (192.168.171.100) or the loopback address (127.0.0.1). We chose the Cloudflare DNS server address for the Alternate DNS server.
Click OK to close the IPv4 Properties window. Then in the Ethernet0 Properties window click Close. Then close the Network Connections window.
Open the Administrator Command Prompt window.
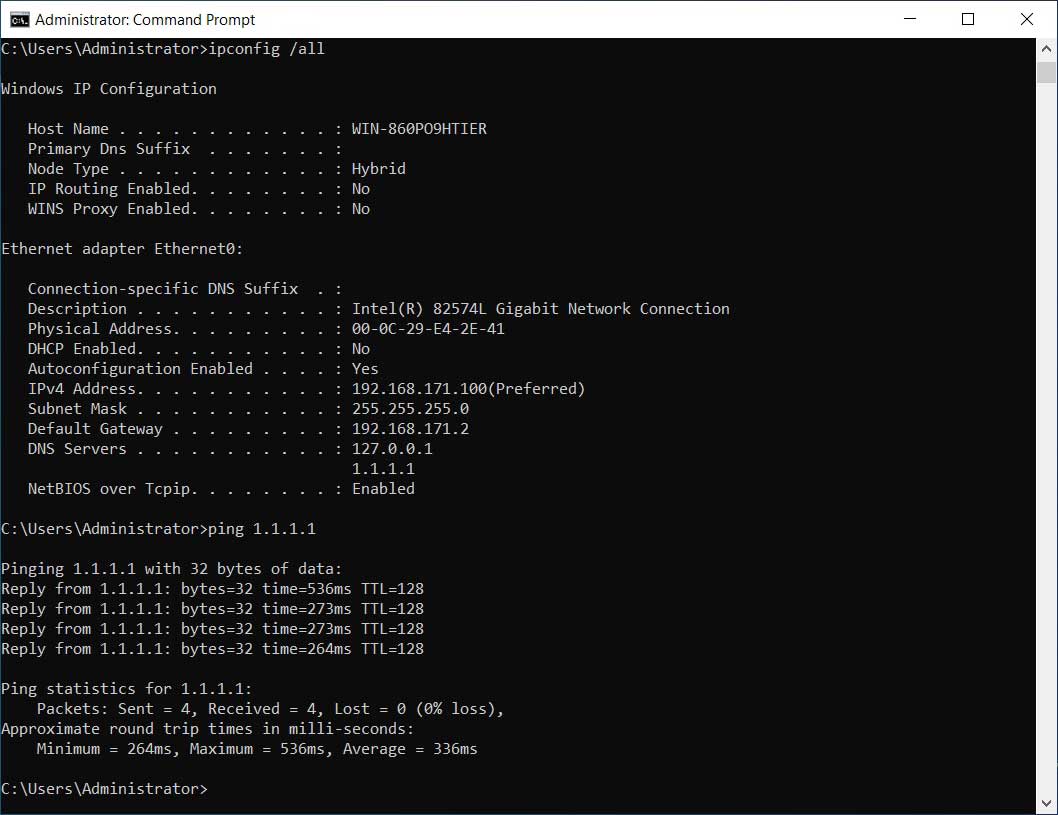
At the C prompt enter ipconfig /all to verify the changes made to the IP settings.
Then at the next C prompt enter ping 1.1.1.1 to verify that the server has internet access.
After you verify the system is working correctly close the Administrator Command Prompt window.
Enable Remote Desktop
We will enable remote desktop so an administrator can log into the server from another computer on the network. Open the Server Manager window again and look in the Local Server section. Remote Desktop is currently set to Disabled. Click on the hyperlink next to Remote Desktop and the Systems Properties window will open.
Initially “Don’t allow remote connections to this computer” will be selected. Choose the option “Allow remote connections to this computer” and the Remote Desktop Connection window will open. Click OK.
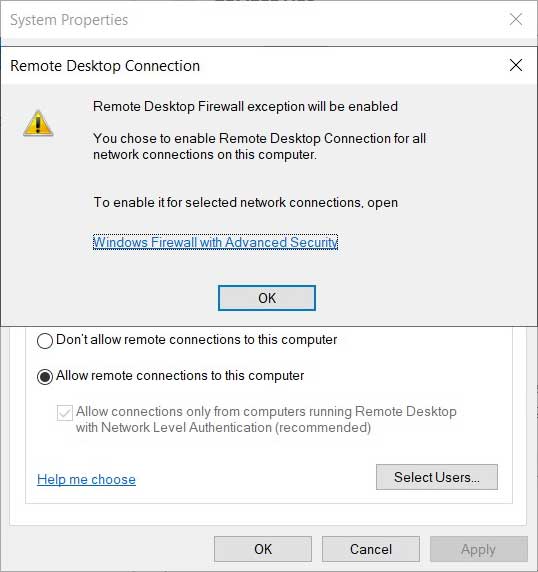
In the System Properties window click Select Users.
The Remote Desktop Users window will open. It states that any Administrator can connect remotely to the server. We have not yet created any other users, so we will leave the setting as it is for now.
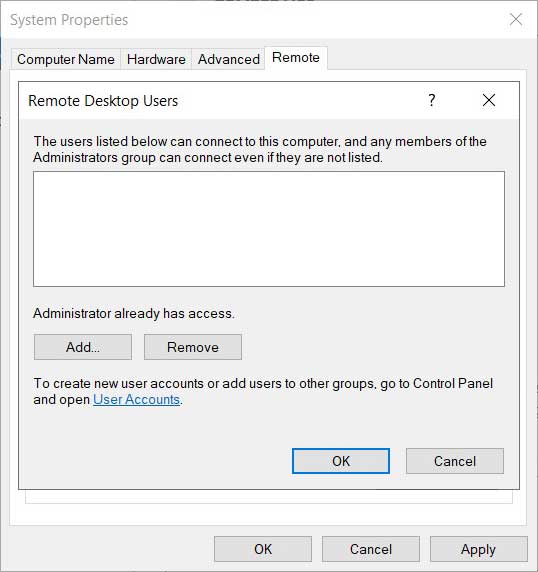
We are done with the remote desktop settings. Click OK in the Remote Desktop Users window. Then click Apply and then OK in the System Properties window.
Rename Server
We will now change the name of the Windows Server to something more meaningful. Open the Server Manager window once again and look in the Local Server section. Remote Desktop is currently set to Disabled. Click on the hyperlink next to Remote Desktop and the Systems Properties window will open. Click the hyperlink next to Computer Name.
A System Properties window will open with the Computer Name tab selected.
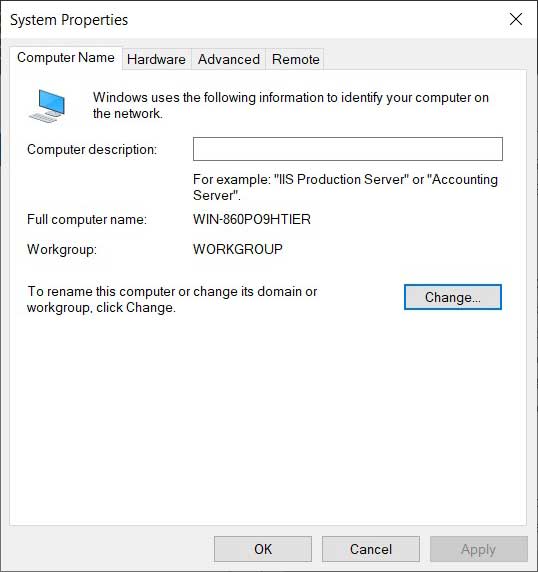
Click the Change button.
The “Computer Name/Domain Changes” window opens. In the Computer name field enter the new name for the server. For now we will leave the server in a Workgroup. The server will be upgraded to a domain controller later in the lab.
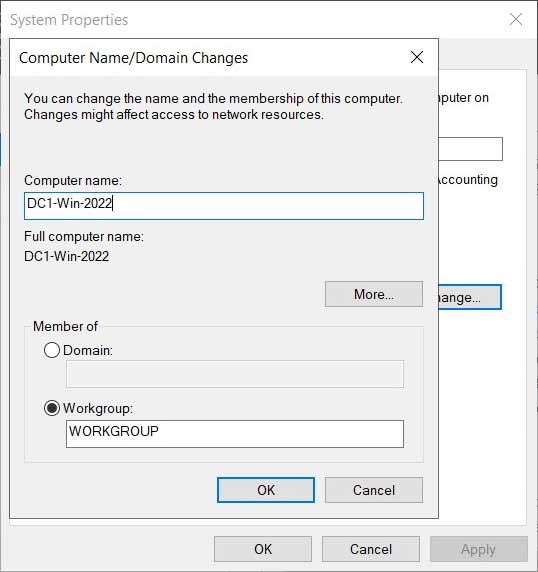
Click OK and another window will open reminding you that the server needs to be restarted for the name change to take effect. Click OK. And in the System Properties windows click the Close button.
Now we will restart the server and verify all the changes we made were accepted by the server.
Verify Configuration
Log into Windows Server. In the Server Manager > Local Server window verify the system accepted your updates to Time zone, Ethernet0, and Computer name.

