In this post, we will configure the VMware Workstation settings for a recently installed Kali Linux virtual machine (VM).
Table of Contents This Post
This post is part of a series that documents the creation of a home lab using VMware Workstation Pro and Kali Linux.
Home Lab Series of Posts
Virtual Machine Settings
Once a Kali Linux VM is installed, you should adjust the settings in VMware Workstation to provide good system performance and minimize security vulnerabilities.
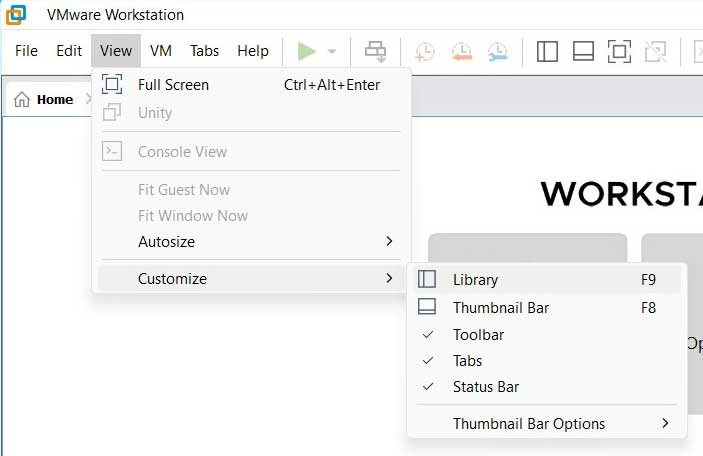
Begin by viewing all the virtual machines installed in VMware Workstation. In the top menu click on View > Customize > Library.
A list of installed virtual machines will appear in the left pane of VMware under the Library column heading. Click on the Kali Linux folder, and a tab will appear in the right pane displaying the VM settings.
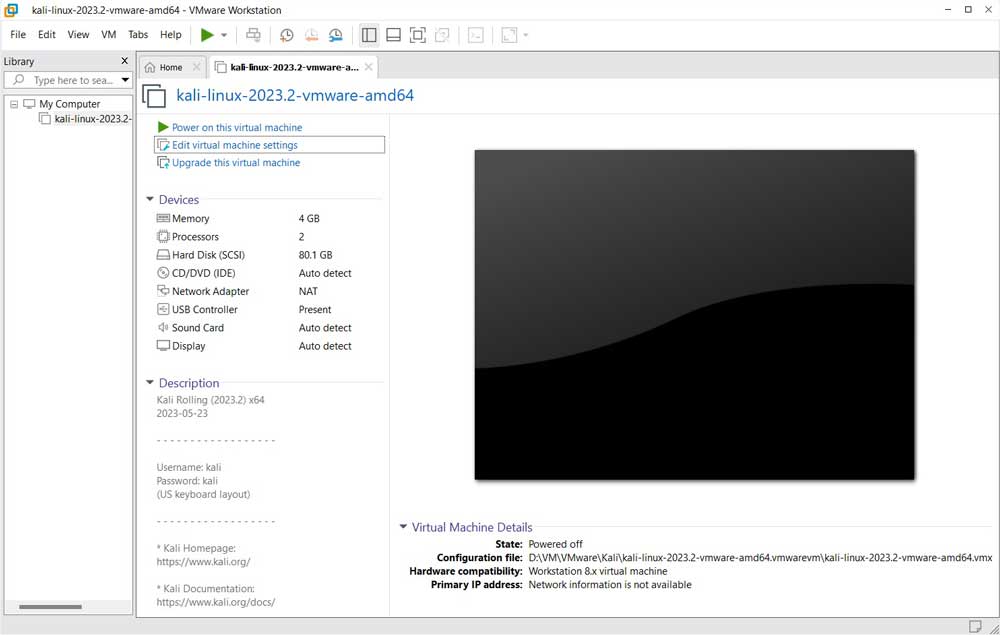
To adjust the VM settings click on “Edit virtual machine settings” at the top of the Kali Linux tab. The “Virtual Machine Settings” pop-up window will open.
Memory Settings
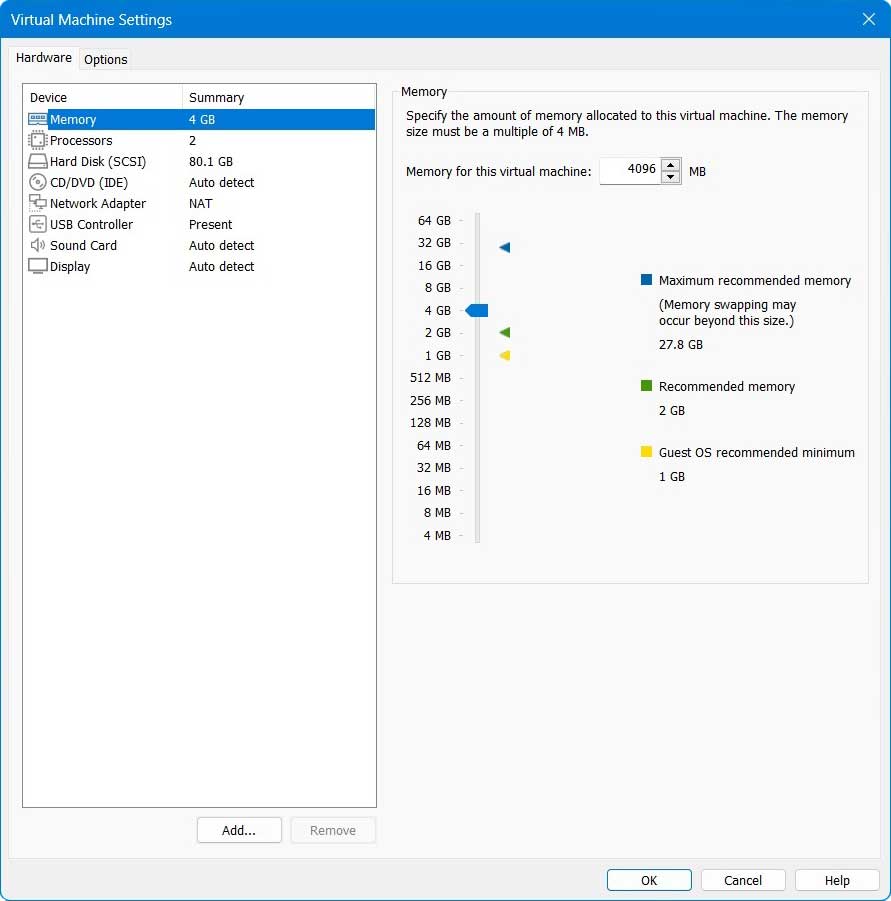
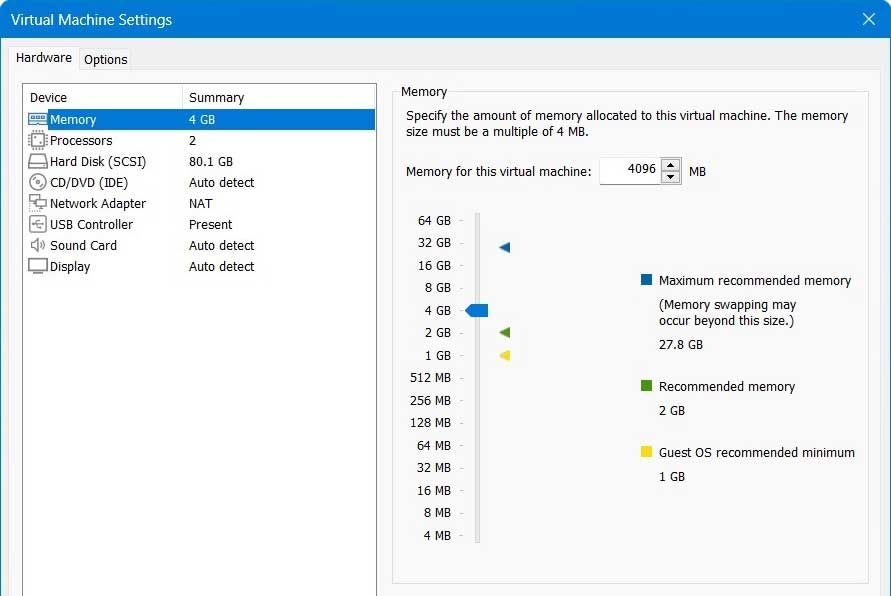
The first setting listed in the Virtual Machine Settings pop-up is Memory. If you have extra memory available in your system, you will probably want to increase the memory available to Kali Linux. Leave 6 to 8 GB of RAM free for your Windows operating system. The rest of your available physical memory can be allocated to your virtual machines.
The system used in this lab has a total of 32 GB of physical RAM, so we will allocate 4 GB to our Kali Linux distro. You can always return and change the memory settings later.
Processors Settings
To access the processor settings, click on Processors in the left pane of the Virtual Machine Settings pop-up. The number of processors allocated to the virtual machine is determined by the settings for “Number of processors” and “Number of cores per processor.” For instance, if you want to allocate 2 total processors to a virtual machine you can choose 1 processor and 2 cores. Or you can choose 2 processors and 1 core.
Our system has a single CPU with 6 cores. We will allocate 2 cores to Kali Linux knowing we can always adjust the settings up or down later.

Hard Disk Settings
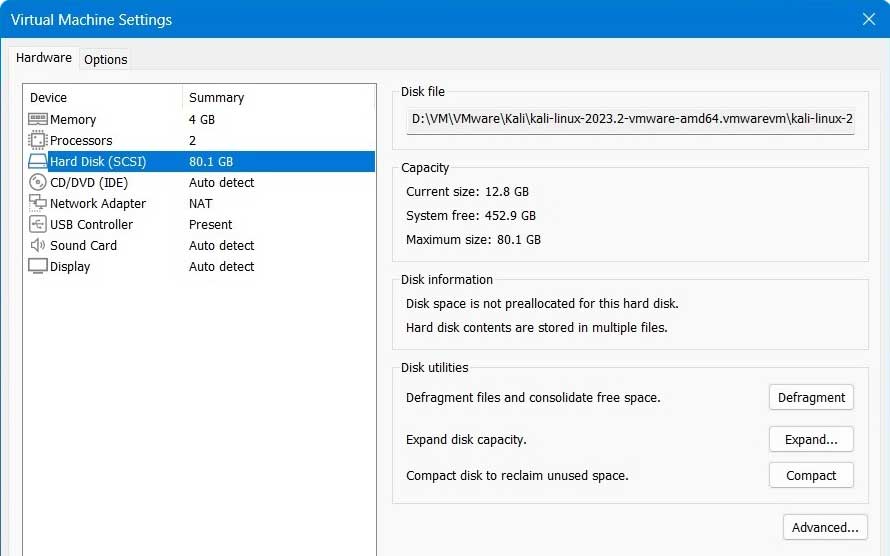
To access the hard disk settings, click on “Hard Disk” in the left pane of the Virtual Machine Settings pop-up. By default the Kali Linux distro is allocated a maximum of 80 GB of hard drive space. The current size of the distro is 12.8 GB. Since the hard drive space is dynamically allocated, Windows will show only the 12.8 GB of space that is being used on the physical hard drive.
Network Adapter Settings
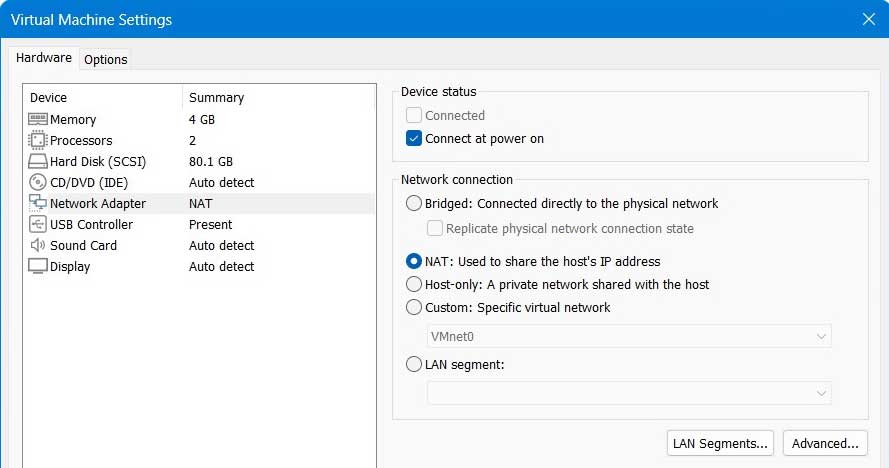
We can place our VM on different types of networks. To access the network adapter settings, click on “Network Adapter” in the left pane of the Virtual Machine Settings pop-up. In the right pane you can choose bridged, NAT, host-only, custom, or LAN segment.
Bridged Network Adapter
The Bridged network adapter setting in VMware Workstation enables the virtual machine to become part of your physical home network. The VM will receive settings for its internal IP address, subnet mask, default gateway, and DNS servers from the DHCP service on your home router. The VM will have access to the file servers, printers, or other computers on your physical home network. And the VM can use your home router as a gateway to access the internet just like any other computer on your home network.
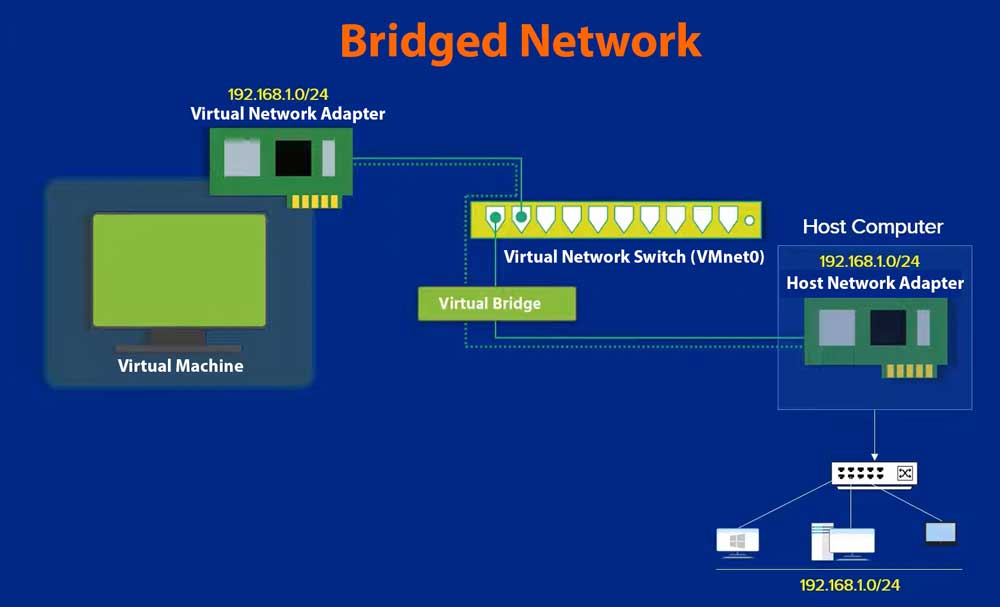
In VMware the bridged network is tied to the VMnet0 virtual network. All VMs created in VMware and assigned to the bridged network will be on the same network.
Be cautious in choosing the bridged network adapter setting. Kali Linux is used for penetration testing. You want to avoid accidentally corrupting your underlying host operating system or any other computers that are part of your local home network. You may want to choose either NAT or host-only.
NAT Network Adapter
With the Network Address Translation (NAT) setting in VMware Workstation, your VM will become part of an internal subnet that is separate from your home network. VMware’s domain host control protocol (DHCP) service will provide the VM with its internet protocol (IP) settings such as IP address, subnet mask, default gateway, and DNS server. All the VMs in VMware Workstation that use the same NAT virtual network will be part of the same internal network and can communicate with one another.
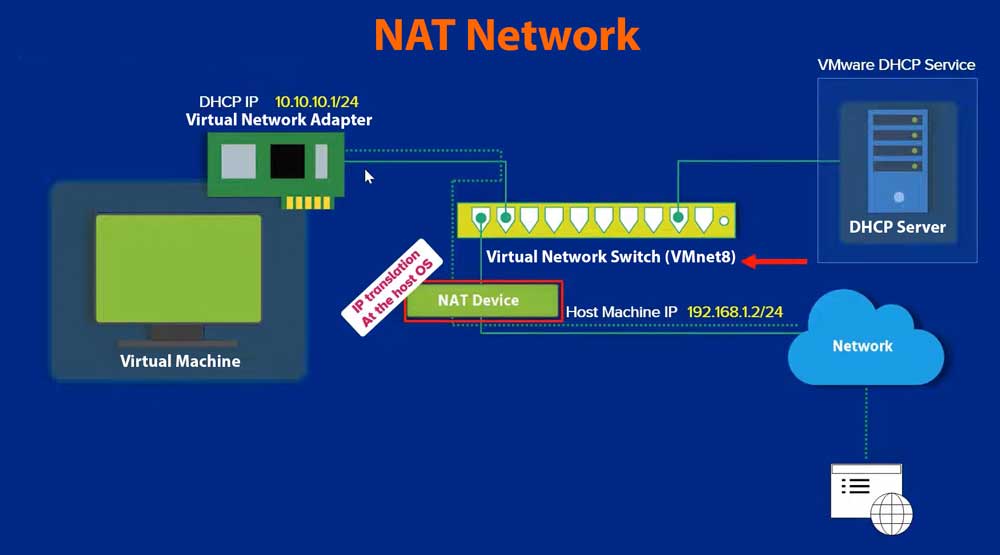
The VM will have access to the internet using a virtual NAT service that translates the VM’s IP address into the IP address of the physical host computer. In our example the virtual DHCP server assigns the VM the internal IP address 10.10.10.1. And the host machine’s IP address is 192.168.1.2.
If the VM requests a webpage, the request will first pass through the virtual NAT service and then through the physical home router, before reaching the internet. Any response from the internet will be routed back to physical home router, and then to the virtual NAT service, and finally to the VM using port forwarding.
The VMware Workstation file we downloaded from kali.org set the network connection to NAT. We will leave this setting as is, so the VM can have internet access yet remain on a different internal subnet than the host PC. If we were using our Kali Linux VM to run malware attacks on another VM, we may want to switch from NAT to host-only, which is described next.
By default, VMware maps NAT to the VMnet8 virtual network. You can see VMnet8 listed as a virtual network adapter on your host computer. In Windows going to Control Panel > Network Connections.

Host-only Network Adapter
The host-only setting in VMware Workstation places the VM on an internal subnet separate from your physical home network, just like with the NAT setting discussed previously. VMware’s DHCP service will provide the VM with IP settings. And all VMs using the same host-only virtual network will be part of the same internal subnet, allowing them to communicate with one another.
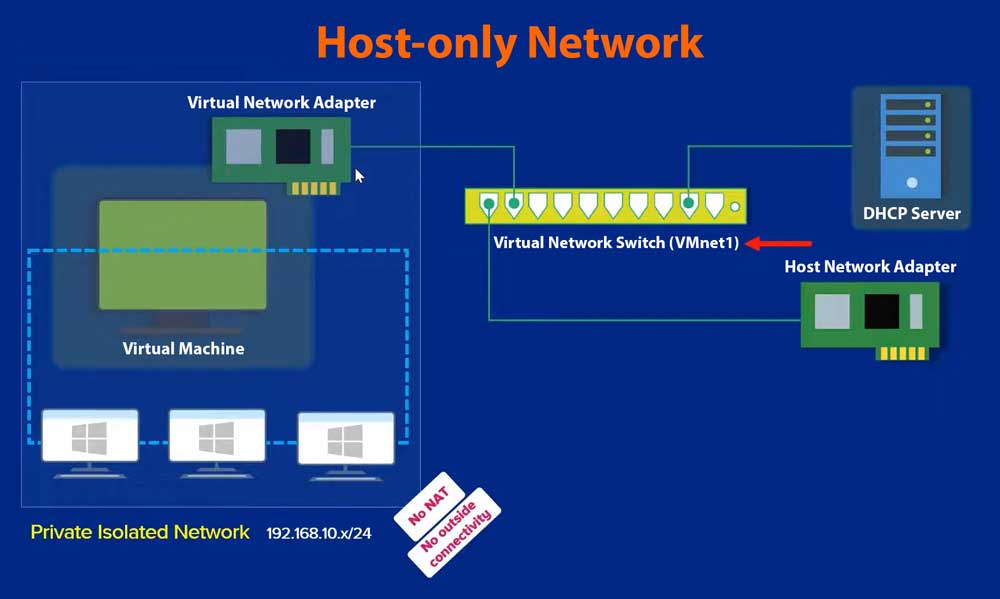
The difference between the host-only and NAT settings is that with a host-only network there is no network address translation. So devices on the host-only network cannot communicate with another network, including the internet. They can communicate with other VMs that are using the same host-only virtual network.
By default, VMware maps host-only networking to the VMnet1 virtual network. VMnet1 can be seen as a virtual network adapter on your host computer. In Windows going to Control Panel > Network Connections.
Custom Networks
VMware Workstation allows you to configure up to 20 different virtual networks: VMnet0 to VMnet19.
In the Virtual Machine Settings pop-up window, click on Network Adapter in the left pane. In the right pane click on the Custom radio button, and then click on the down arrow button to see all the virtual network choices.
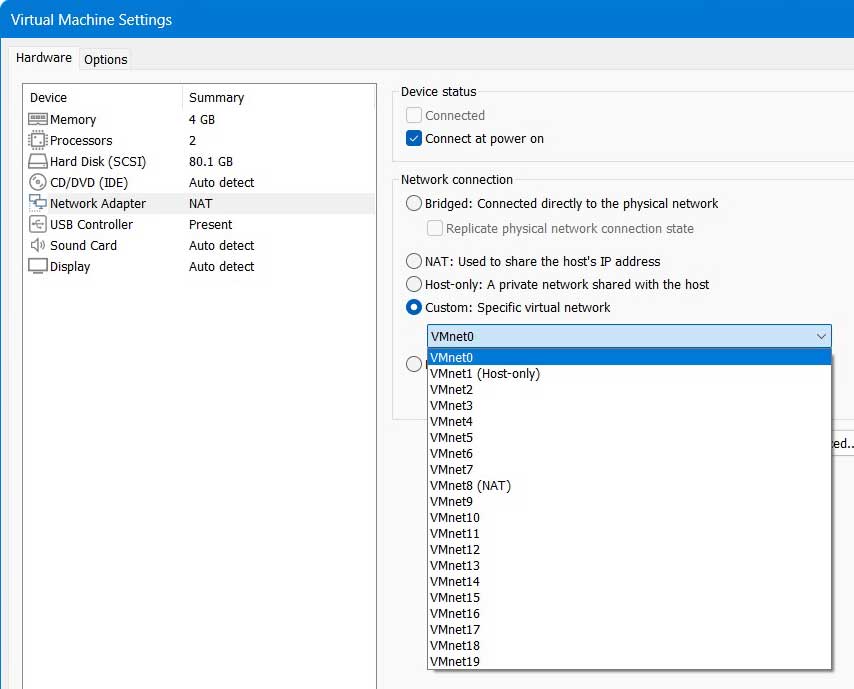
There are three default settings that we have already mentioned: VMnet0 is mapped to Bridge. VMnet1 is mapped to Host-only. VMnet8 is mapped to NAT. You can change the settings for those three default virtual networks or create new virtual networks using the Virtual Network Editor.
Virtual Network Editor
In VMware Workstation you have the ability to edit your current virtual networks or add new virtual networks. In the top menu click on Edit > Virtual Network Editor.
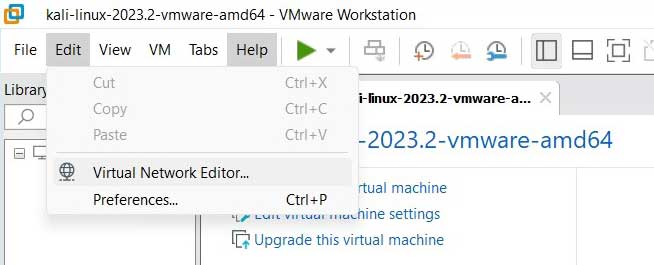
The Virtual Network Editor pop-up window opens.
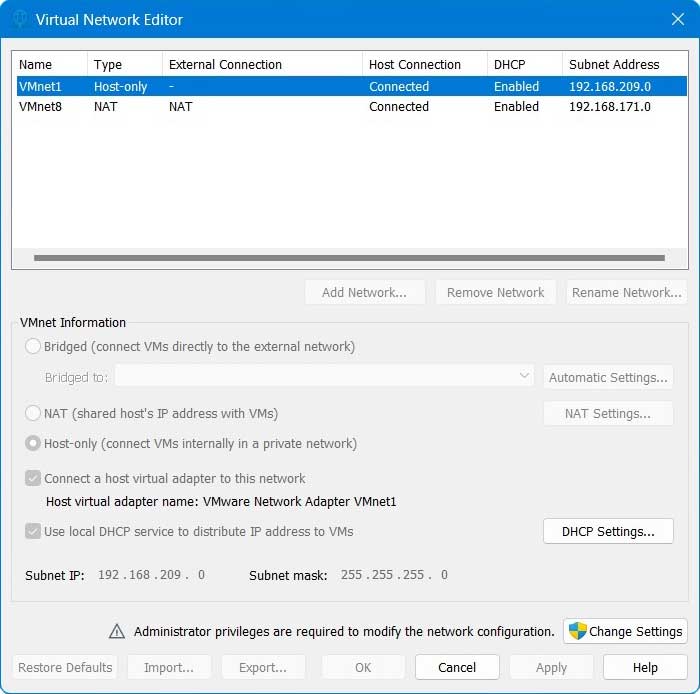
To edit the settings for a current network adapter, click on the “Change Settings” button in the bottom right corner of the editor screen. You’ll see a Windows User Account Control pop-up that asks you to verify an upgrade to administrator privileges. Click Yes and the Virtual Network Editor screen will reappear with the ability to modify the settings of the various virtual adapters.
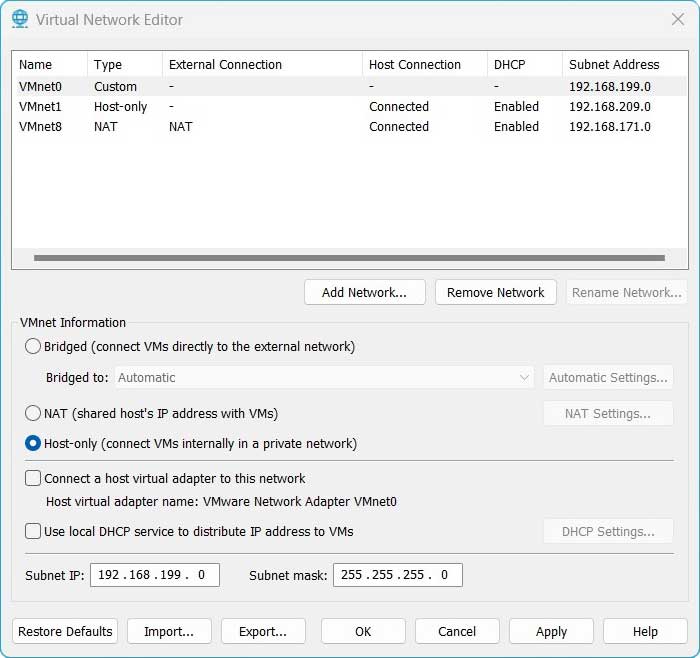
To add a new virtual network adapter, begin by selecting the type of network you want in the bottom half of the editor screen: Bridged, NAT, or Host-only. In our example we selected Host-only and VMware populates the “Subnet IP” and “Subnet mask” fields.
Click on the “Add Network” button. An “Add a Virtual Network” pop-up window will appear. Click on the down arrow button to choose one of the unused virtual networks and click the OK button.
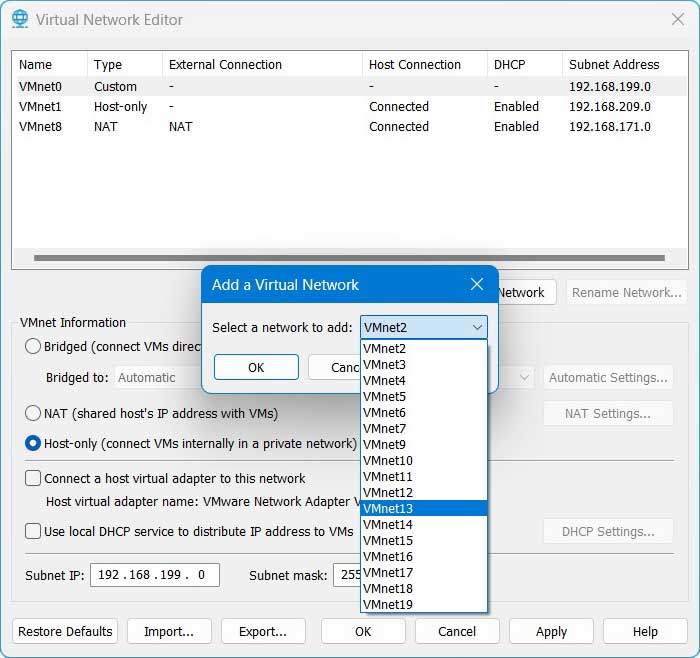
The new virtual network appears in the list of networks. Click on the apply button in the bottom right corner of the Virtual Network Editor screen and the new network will be created.
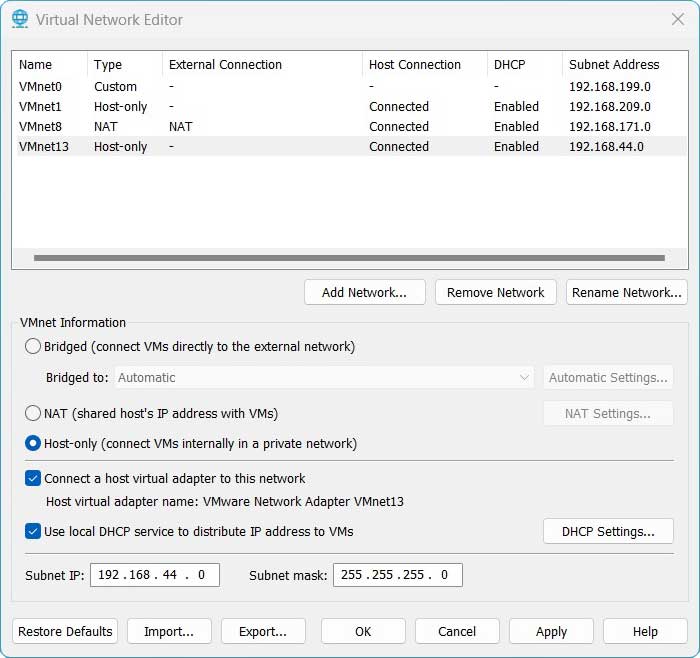
In our example we created a new Host-only virtual network mapped to VMnet13, which can be seen on the host computer by going to Control Panel > Network Connections.

You could now add VMs created in VMware Workstation to the new virtual network VMnet13.
VMware Tools
VMware Tools is an additional application that you can install to increase the functionality of your VM and provide better communication between the VM and your host OS.
VMware Tools provides drivers that allow you to easily move between your host OS and your VM. It allows your VM display to expand or contract to fit the size of your VMware Workstation window. And it allows you to share files between your guest and host operating systems.
For our Kali Linux virtual machine, VMware Tools was already included with the Kali Linux file we downloaded from kali.org. So we already have the functionality offered by VMware Tools.
If you choose VM from the top menu bar you can see the option “Reinstall VMware Tools” indicating VMware Tools is already installed.
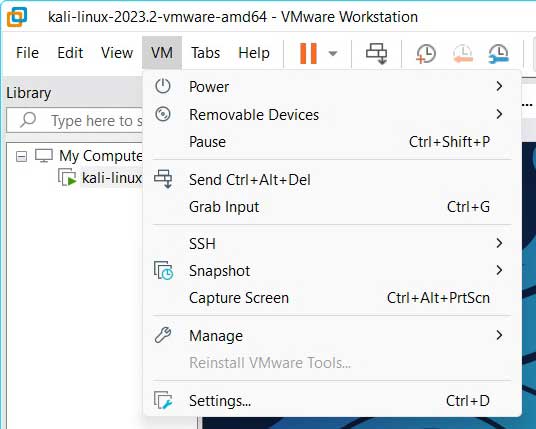
You may install a VM from an ISO file, instead of importing a pre-built VMware Workstation file. In that case, you will want to install VMware Tools after you’ve installed the VM.
If you need to install VMware Tools, the easiest way is to log into the Kali VM. Open a terminal window and enter the following command to update the packages on the Kali OS.
sudo apt-get updateThen enter the command to install the open-source desktop implementation of VMware Tools, called Open VM Tools.
sudo apt-get install open-vm-tools-desktop -y After Open VM Tools is installed reboot the Kali VM.
sudo rebootLogin to the Kali VM again. You should now be able to use the features of VM Tools, such as copying text from your host OS to the Kali VM.
Navigate Between VM and Host OS
VMware Workstation has key shortcuts that allow you to navigate between the host OS and a VM that is powered on. We”ll use our Kali Linux VM to illustrate.
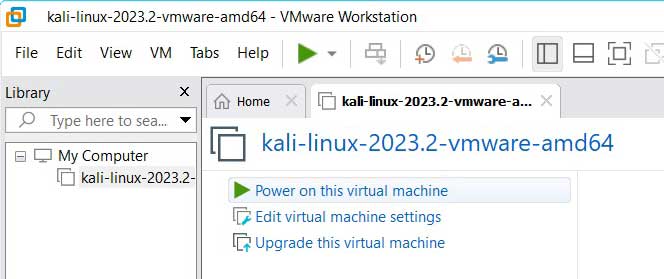
In the main VMware window, click on the Kali Linux tab and then choose “Power on this virtual machine.”
After 30 seconds or so the login screen for Kali Linux will appear.
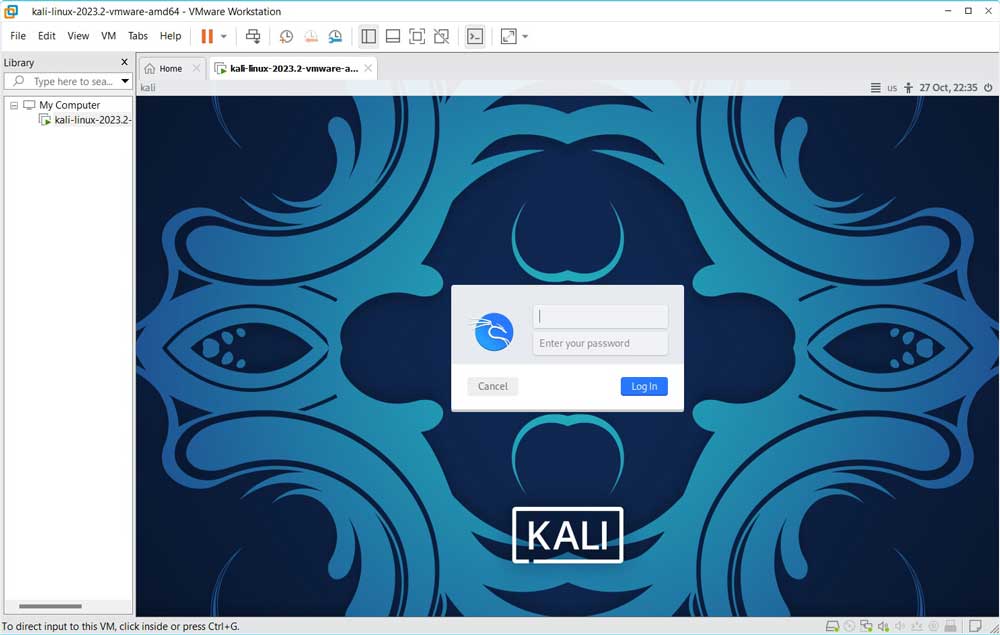
In the bottom left corner of the screen you will see a message “To direct input to this VM, click inside or press Ctrl+G.”

If you press the Ctrl and G keys at the same time you will be able to access the VM window. And in this case, you would enter the logon credentials for the Kali Linux VM.
Once you have access to the VM, the message in the bottom left corner of the screen will now read “To return to your computer, press Ctrl+Alt.” If you press the Ctrl and Alt keys at the same time you will be able to access the host OS.
Share files Between Guest OS and Host OS
After installing VMware Tools, you have several options for moving files between your host and guest operating systems.
Share Files using Drag and Drop, Copy and Paste
Click on “Edit virtual machine settings” at the top of the Kali Linux tab.
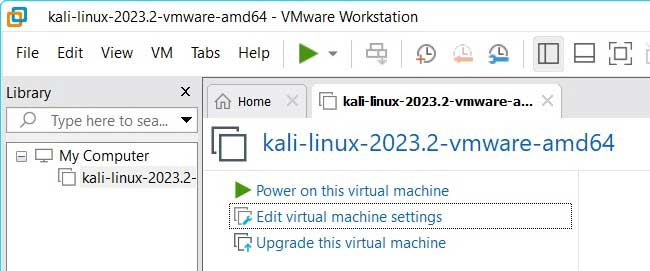
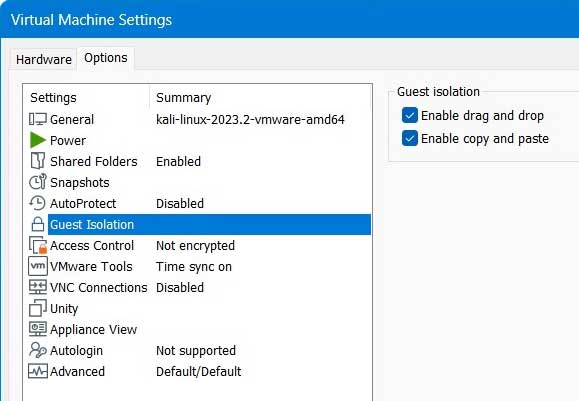
The “Virtual Machine Settings” pop-up window will open. Click on the Options tab at the top of the window and then click on “Guest Isolation” in the left column. Make sure the options for “Enable drag and drop” and “Enable copy and paste” are checked.
Create a Shared Folder
You can use a shared folder to transfer files between the host and guest VM operating systems. The shared folder is visible on both the host OS and the VM OS. If you copy a file to the shared folder from either the host or VM it will become visible to both systems.
To add a shared folder click on “Edit virtual machine settings” at the top of the Kali Linux tab

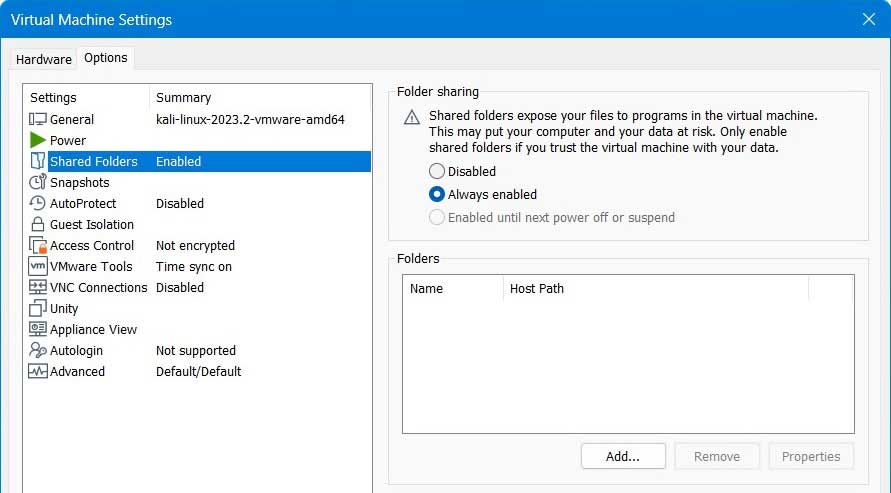
The “Virtual Machine Settings” pop-up window will appear. Click on the Options tab at the top of the window, then click on “Shared Folders” in the left column. Click on the Add button.
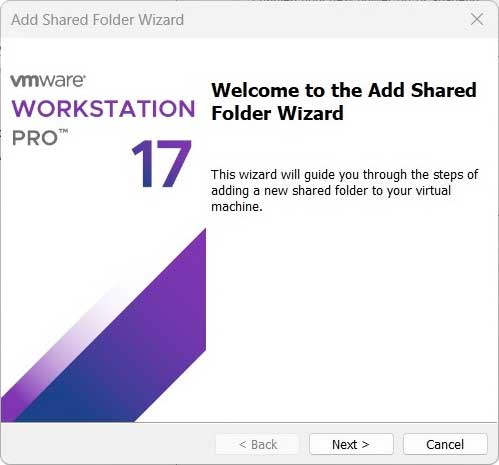
The “Add Shared Folder Wizard” pop-up appears. Click on the Next button.
Enter the Browse button to select where you want to place the shared folder. In this project, we created the folder “SharedFolder” in the same location as the virtual machines that we have installed with VMware Workstation. Click on the Next button.
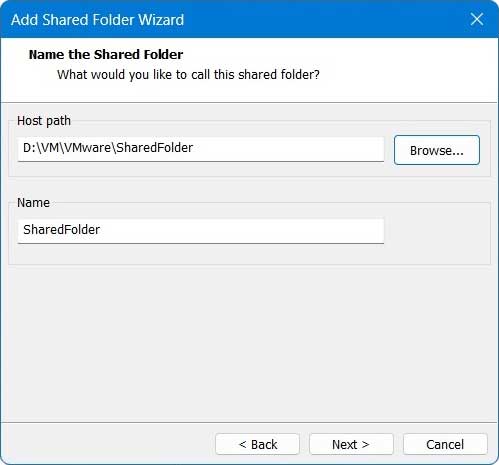
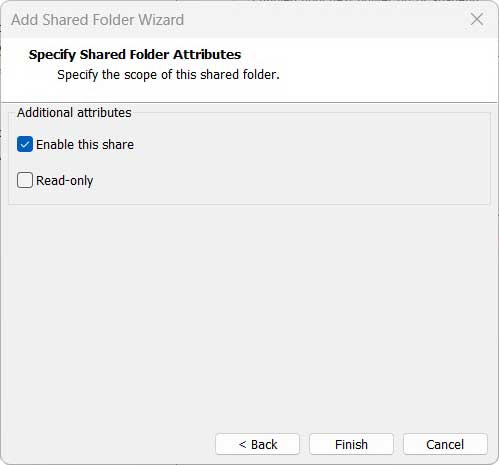
Choose to “Enable this share.” Then click the Finish button.
The shared folder will now appear the Virtual Machine Settings window.
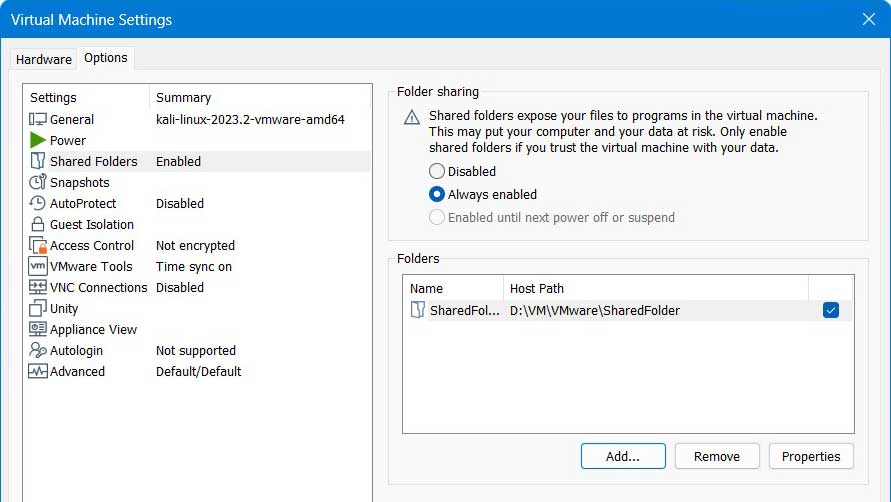
We now have the shared folder set up on the host at D:\VM\VMware\SharedFolder. I will place a sample text file inside the SharedFolder and name it shared-file-1.txt.
In the next post, we will configure the guest Kali Linux VM to access the shared folder. It will be located on the guest in the /mnt/hgfs directory.
Backup VM Using Snapshots
Before making changes to the newly imported Kali Linux operating system (OS), we will backup the VM using a snapshot. VMware allows us to take a snapshot of a VM that saves its entire state as of a point in time including the memory, disk, and settings.
If the need arises in the future, you can revert to a previously saved snapshot. Then the virtual memory, virtual disk, and settings will return to the state they were in when the snapshot was performed.
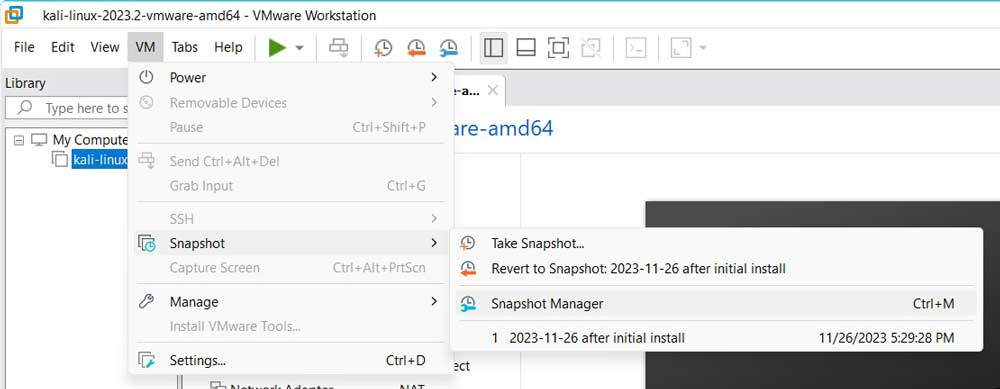
Perform the initial snapshot before turning on the VM. In VMware Workstation select the Kali Linux VM in the left column titled Library. Then in the top menu choose VM > Snapshot > Take Snapshot.
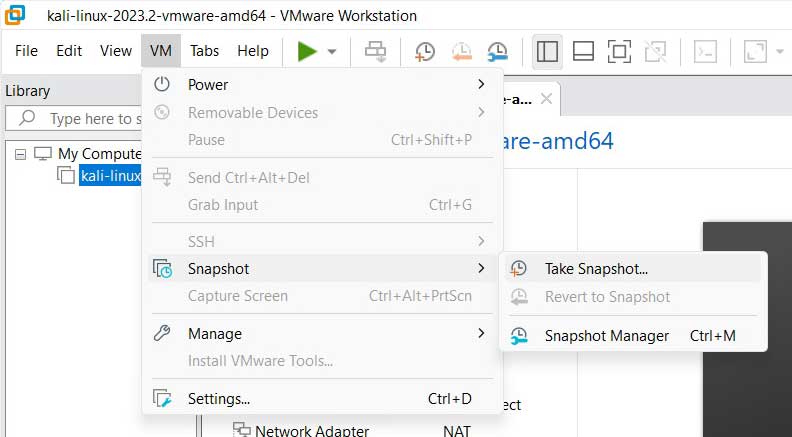
A pop-up windows appears where you can enter a name and description for the snapshot.
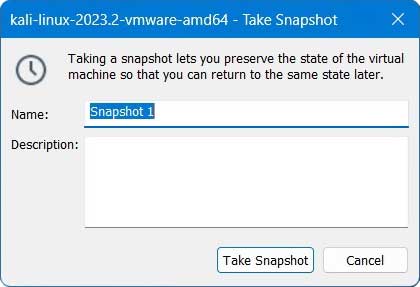
A default name will appear. Choose a name for the snapshot that will make sense to you later if you need to restore your VM to this prior state. For instance, in this lab you could use the name “2023-11-26 after initial install.”
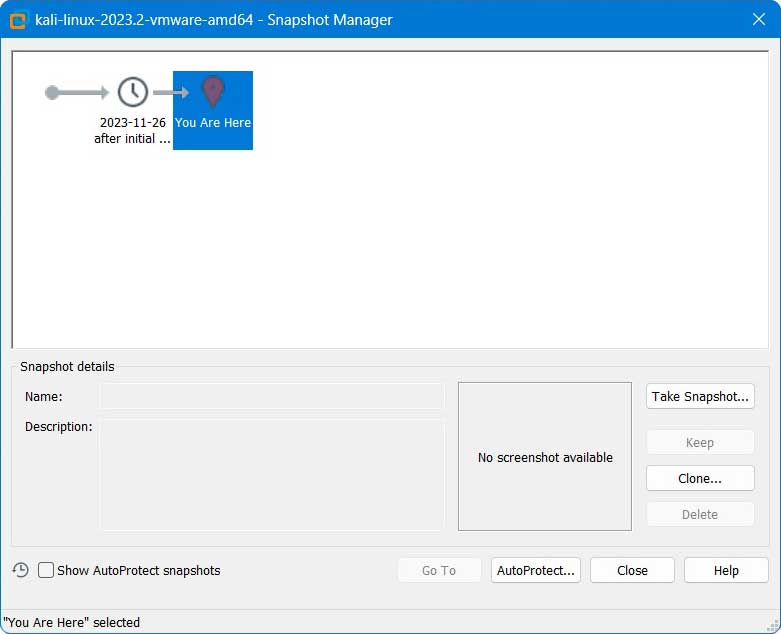
If you ever need to restore your VM to a prior state you will use the Snapshot Manager. To access the Snapshot Manager, select the Kali Linux VM in the left column titled Library. Then in the top menu choose VM > Snapshot > Snapshot Manager.
The Snapshot Manager pop-up window will appear. Here you can edit a snapshot, take a shapshot, or return your VM to a prior state.
We are finished configuring VMware Workstation.
In the next post you will learn how to configure Kali Linux After Installation.
Next Post >> How to Configure Kali Linux After Installation